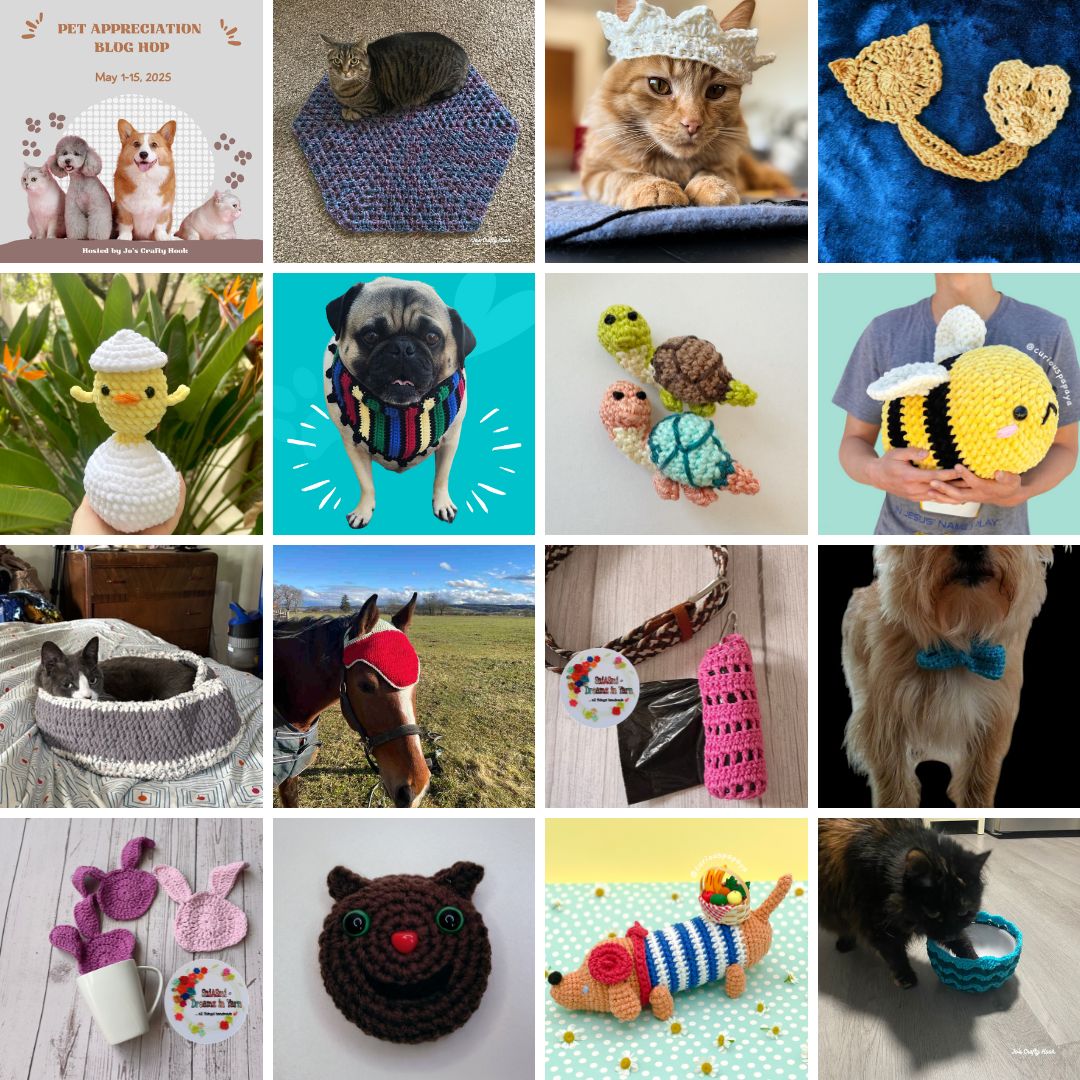
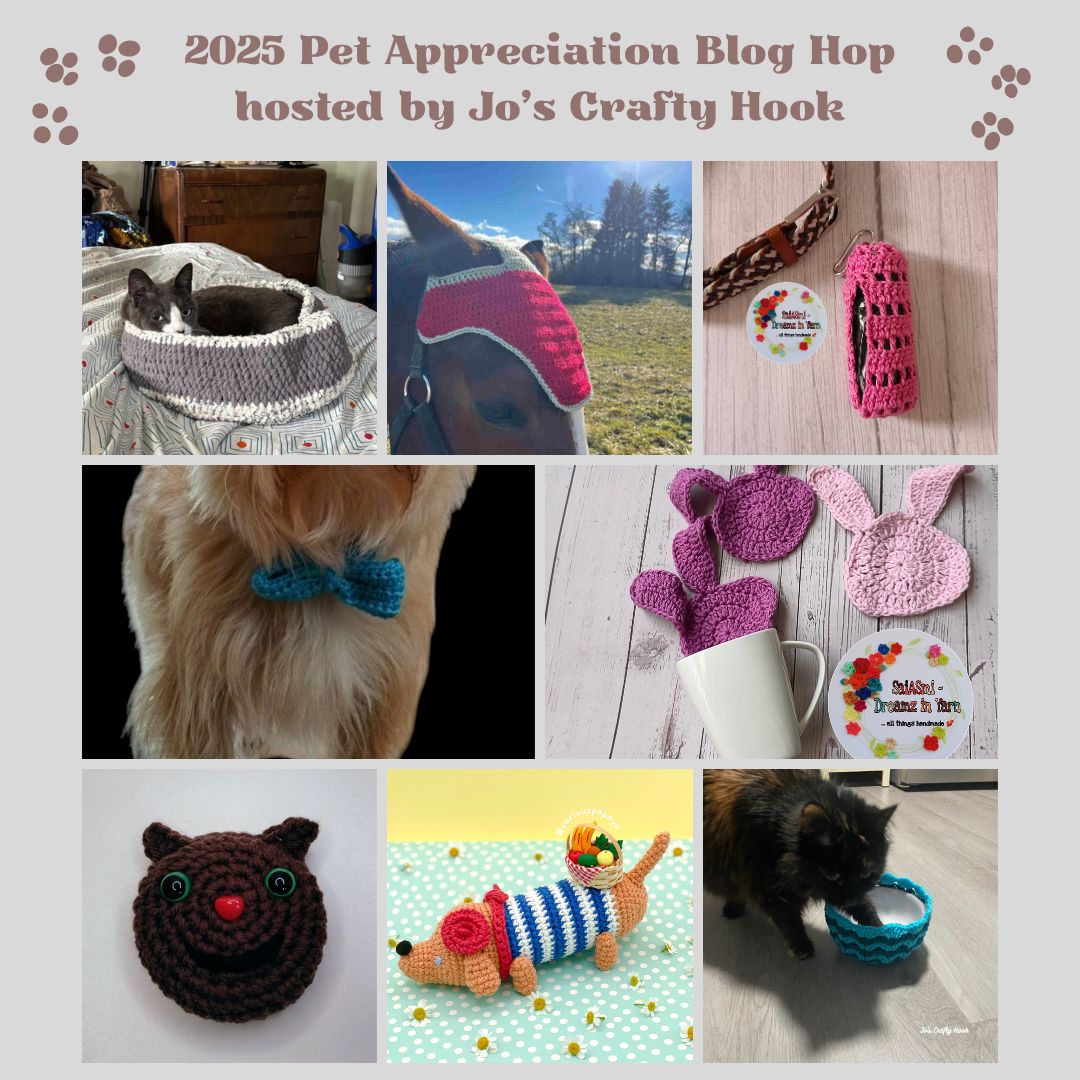
My 3rd annual Pet Appreciation Blog Hop was a huge success! I just love all of the crochet patterns for pets that were featured this month!
The blog hop may be over, but you can still find all of the crochet patterns designed specifically for our Furry Friends below! 🐶 😻
Some of the crochet patterns are FREE on the designers’ websites! The links provided will also direct you to the designers’ stores where you can purchase their premium crochet patterns.
I just love dressing up my Grand-Doggy Freyja! My son loves to dress her up and have me design stuff for her, so of course, I am always making adorable things for her to wear! 😆
This post contains affiliate links.
Most of the year I share crochet patterns designed for people, but to celebrate the LOVE ❤️ I receive from my cat Maze and my furry grand-babies, I love to share crochet designs just for them!
You can still celebrate National Pet Appreciation Month 🐶 🐱 or celebrate your pets with the crochet patterns rounded up below.
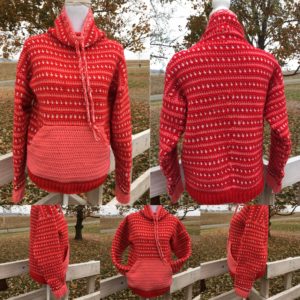
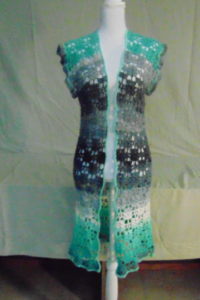
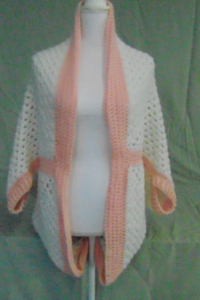
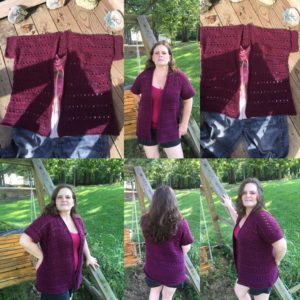
Participating Crochet Designers
We have a GREAT group of crochet designers participating this year. You will find NEW designs that you can make to celebrate the love you receive from your pets.
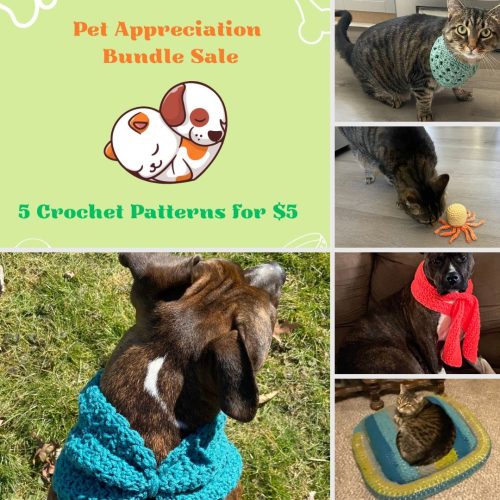
To go along with my 3rd annual pet appreciation blog hop, I am having a $5 bundle sale with 5 of my most popular crochet patterns designed specifically for pets in mind.
Bow Wow Cowl (new release), Pet Bandana, Squid Cat Toy, Tuxie Keyhole Scarf, Your Buddy’s Bed.
If you would like to purchase a specific crochet pattern, you will also find each crochet pattern on Sale!
For more info, visit the Sales Page on my website.
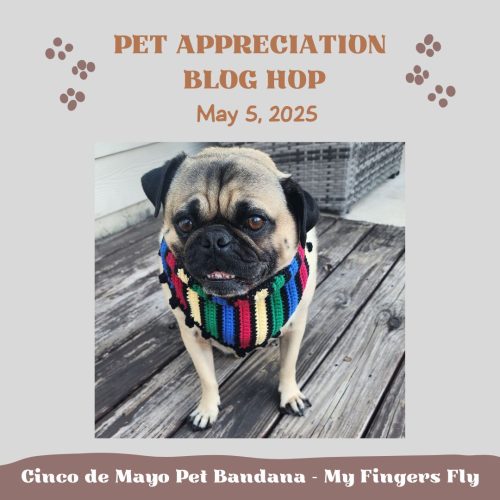
Celebrate Cinco de Mayo in style with this vibrant Crochet Pet Bandana Pattern! Designed to add a touch of fiesta flair, this easy-to-follow pattern lets you create a colorful accessory perfect for dogs and cats of all sizes.
Purchase the Cinco de Mayo Pet Bandana Crochet Pattern HERE
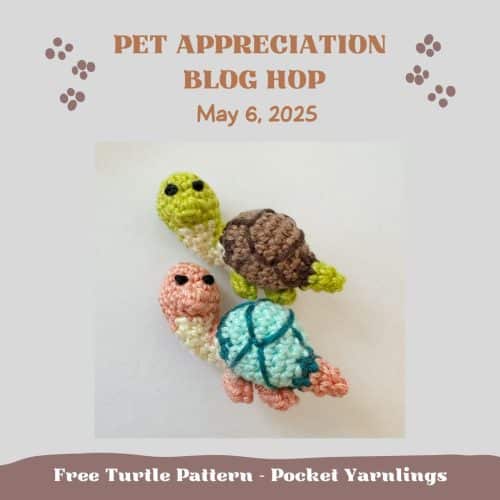
Turtles are popular amigurumi to make – and this version is done without having to sew on the shell separately! If you are looking to crochet turtle, look no further – try out this little guy with his flippers and shell! There are quite a few colour changes with this, so you should be comfortable with interchanging many crochet colours before trying him out!
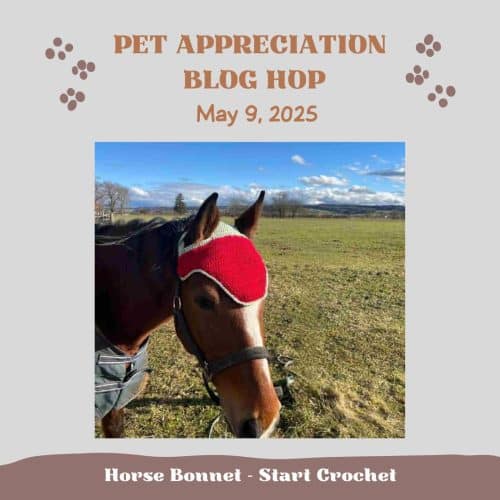
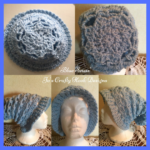
Crochet a stylish and functional horse ear bonnet with this easy-to-follow pattern! Perfect for beginners, this pattern includes step-by-step instructions to create a comfortable, handmade bonnet for your horse.
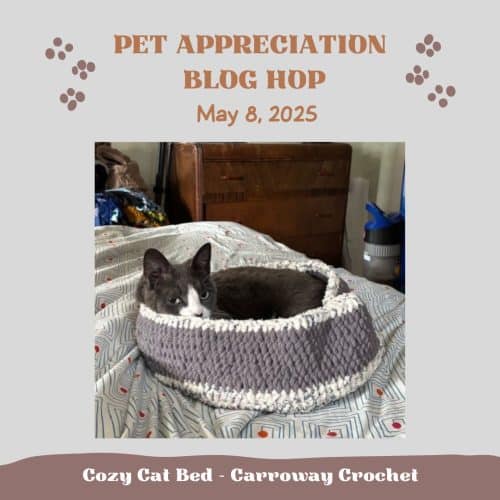
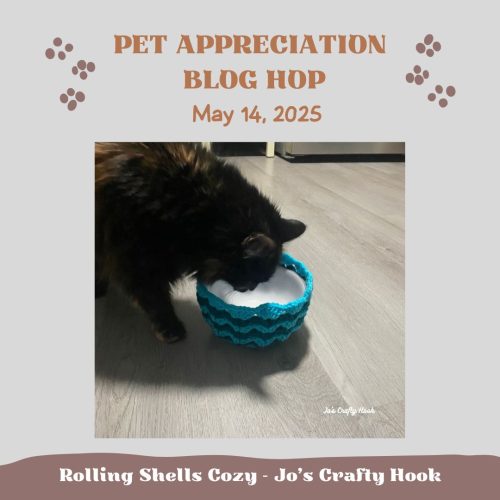
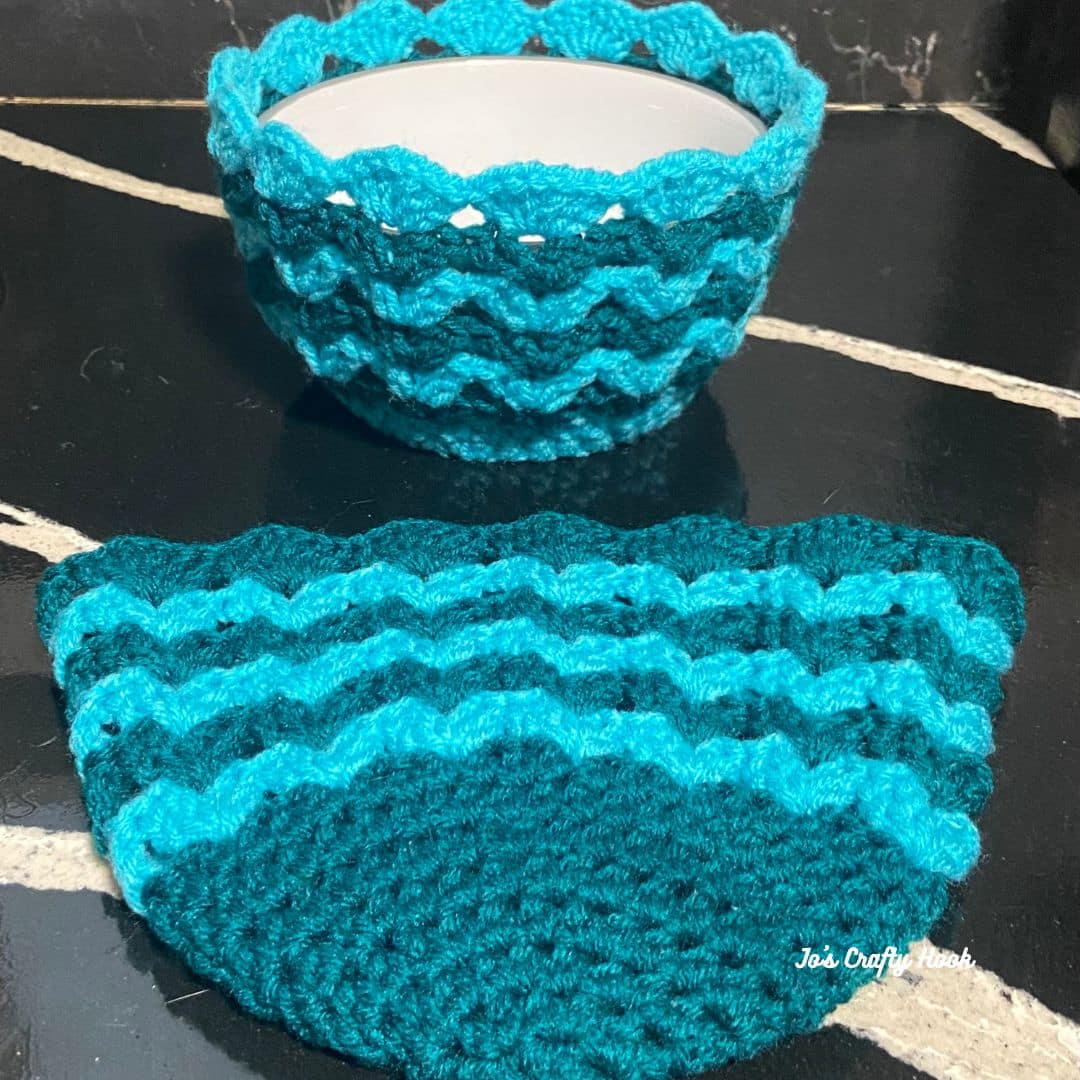
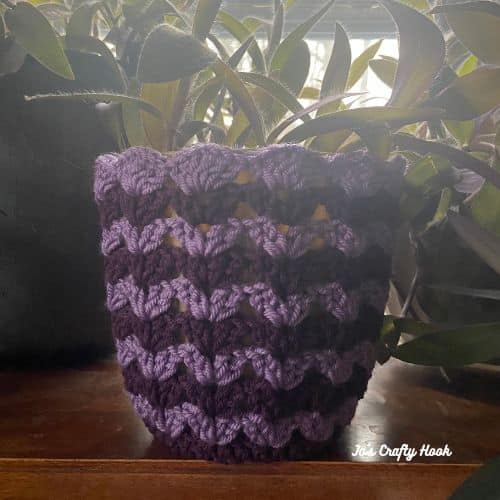
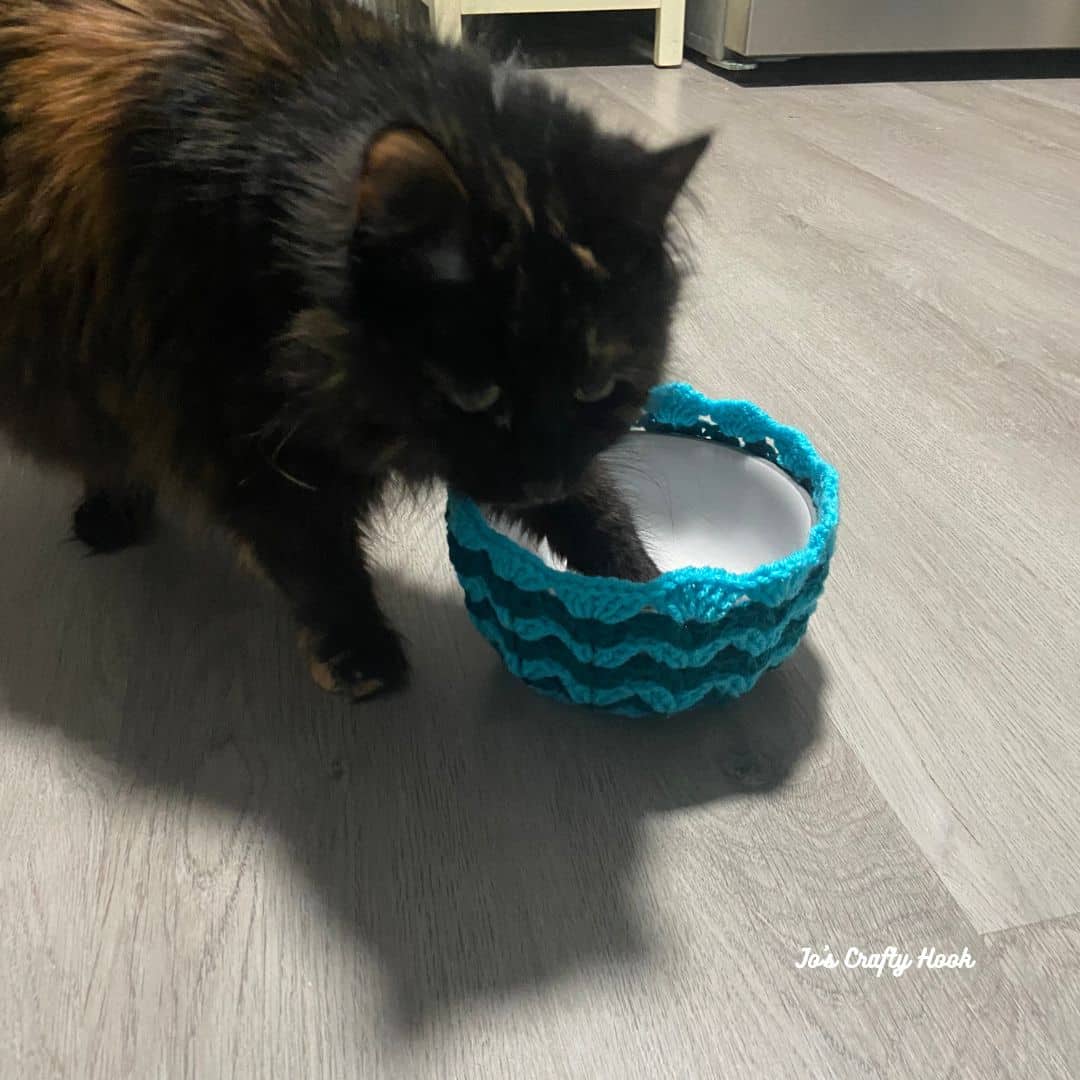
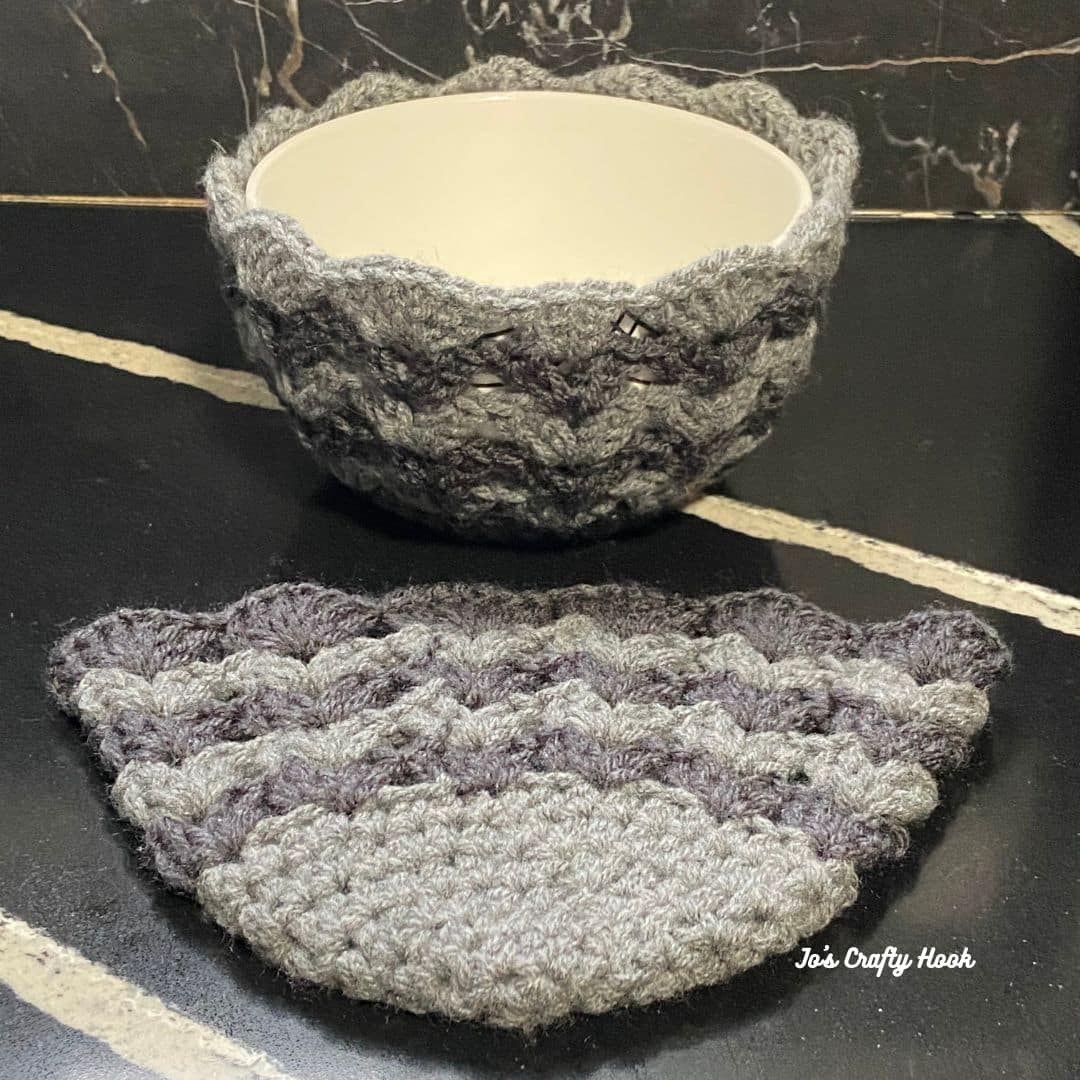
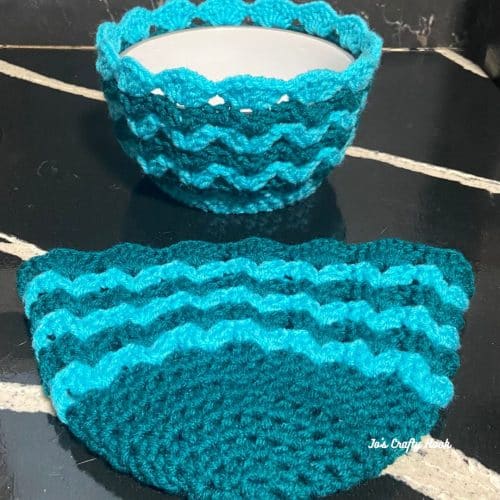
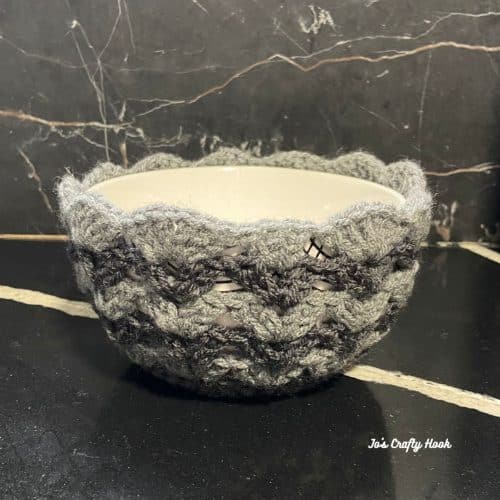
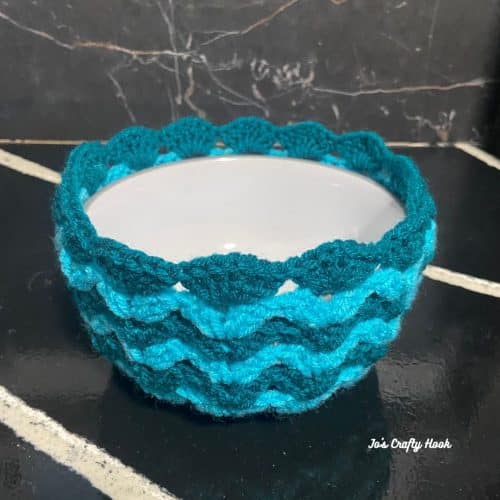
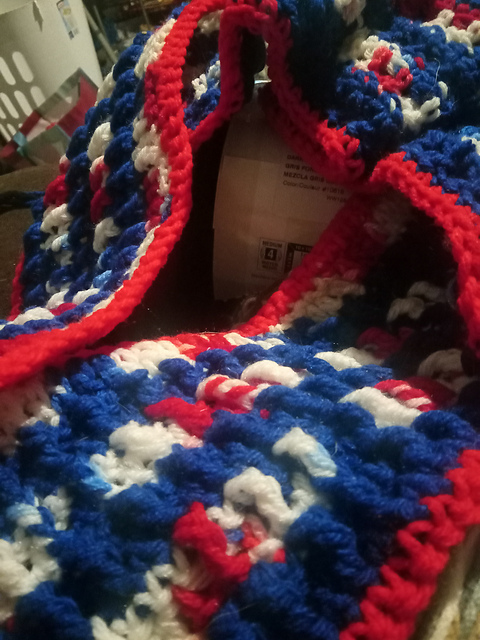
The Rolling Shells Cozy Crochet Pattern is a very versatile pattern that can be used to dress up your pet’s food bowl in vibrant colors or to match your Home Decor.
You can purchase a copy of my Rolling Shells Cozy Crochet Pattern HERE
Thank your for joining me again this year and I hope you enjoyed all of the new crochet patterns designed for a great group of designers!
The Rolling Shells Cozy Crochet Pattern is a very versatile pattern that can be used for bowl cozies, plants/flower pot covers; and a great way to dress up your home decor.
The cozy makes a cute cover for your pet’s food bowls; a great gift for teachers; moms and dads, and just about anyone that wants to give a little something special or anyone.
This post contains affiliate links
Subscribe to my Newsletter and get the latest updates and get a FREE crochet pattern just for signing up!
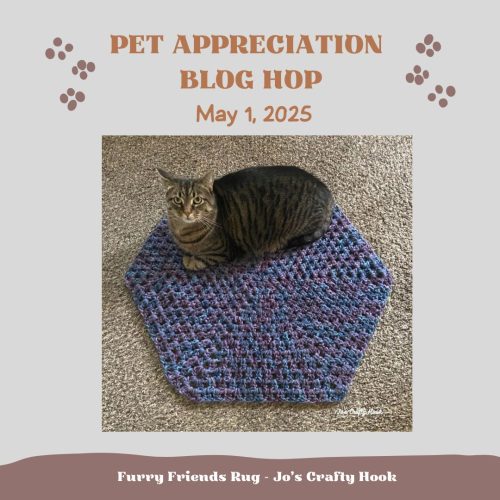
2025 Pet Appreciation Blog Hop
I am so excited because I am hosting my 3rd annual Pet Appreciation Blog Hop from May 1st through May 15, 2025!
May is National Pet Appreciation Month and me and great group of crochet designers have designed NEW patterns that can be made by you to celebrate how much love and joy your pets bring into your lives!
Visit 2025 Pet Appreciation Blog Hop daily
From May 1st-May 15, 2025 be sure to visit the 2025 Pet Appreciation Blog Hop daily to get a NEW premium crochet pattern designed specifically for your pet in mind.
My Day – May 15th-May 16th
Today is my featured day in my 2025 Pet Appreciation Blog Hop and you can get a FREE premium copy of my Rolling Shells Cozy Crochet Pattern.
Once you have the Coupon Code, click on the Button below and use the Coupon Code at Checkout.
Rolling Shells Cozy Free Crochet Pattern
Information Needed
US Terminology
Beginner Friendly
Materials:
MC 30-45 yds of #4 ply Worsted Weight Yarn
CC 30-45 yds of #4 ply Worsted Weight Yarn
US H or 5mm Crochet Hook
Tape Measure
Scissors
Tapestry Needle
Abbreviations/Stitches Used:
ch = chain
st = stitch(es)
sl st = slip stitch
hdc = half double crochet
dc = double crochet
MC = Main Color
CC = Contrasting Color
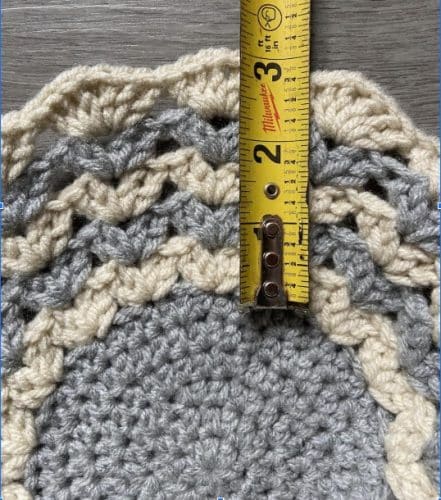
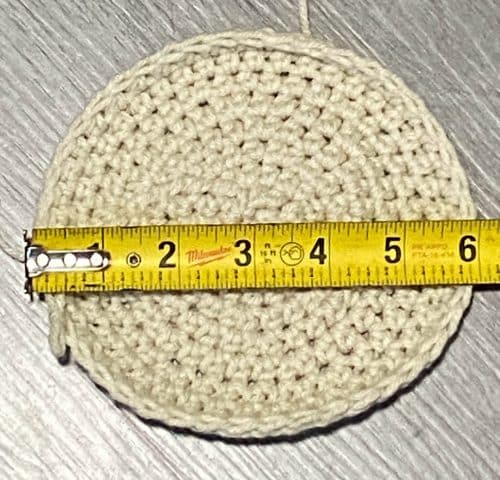
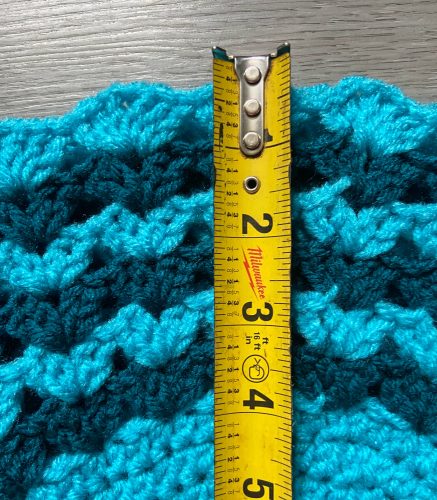
Finished Sizes: 4” round x 3” tall 6” round x 4” tall
Notes:
ch 2 does NOT count as a stitch.
the bowl cozy is worked in the round.
due to different thicknesses of yarn, you may need to go up or down a hook size to meet Gauge.
since the pattern calls for 2 different colors, it would be best to use the same brands of yarn or at least the same thickness.
Special Note: The pattern calls for using the Carrying Colors Method. This allows you to carry your MC and CC up the rows without fastening off.
Special Stitches:
Beg Shell = (ch 3, dc, ch 1, 2 dc) all in same ch-1 sp
Shell = (2 dc, ch 1, 2 dc) all in same ch-1 sp
Gauge: US H or 5mm Crochet Hook 16 hdc x 12 rows = 4″
Gauge Swatch: The Gauge Swatch will follow the instructions for R1-R6 of the Bottom of the Cozy.
You can purchase a premium copy of the Rolling Shells Cozy Crochet Pattern for $2 at my Ravelry Store.
The premium copy has Step-by-Step Picture Tutorials to help you every step of the way.
4″ x 3″ Cozy Crochet Pattern
Bottom
R1: Make a Magic Circle, ch 2, 6 hdc in magic circle, sl st in 1st hdc to join. (6 hdc)
R2: 2 hdc in 1st hdc, 2 hdc in next st. sl st in 1st hdc to join. (12 hdc)
R3: 2 hdc in 1st st, hdc in next st. *2 hdc in next st, hdc in next st. rep from * around. sl st in 1st hdc to join. (18 hdc)
R4: 2 hdc in 1st st, hdc in next 2 st. *2 hdc in next st, hdc in 2 next st. rep from * around. sl st in 1st hdc to join. (24 hdc)
R5: 2 hdc in 1st st, hdc in next 3 st. *2 hdc in next st, hdc in 3 next st. rep from * around. sl st in 1st hdc to join. (30 hdc)
R6: 2 hdc in 1st st, hdc in next 4 st. *2 hdc in next st, hdc in 4 next st. rep from * around. sl st in 1st hdc to join. (36 hdc)
R7: hdc in each st around. (36 hdc)
Body
R1: using your CC, attach yarn with a sl st in 1st hdc, Beg Shell in same st, sk 2 sts, *Shell in next st, sk 2 st. rep from * around. sl st in top of ch 3, sl st in next dc, insert hook into ch-1 sp, Carry Up your MC (12 Shells)
R2: Beg Shell in same ch-1 sp, *Shell in each ch-1 sp around. sl st in top of ch 3, sl st in next dc, insert hook into ch-1 sp, Carry Up your CC (12 Shells)
R3: Beg Shell in same ch-1 sp, *Shell in each ch-1 sp around. sl st in top of ch 3, sl st in next dc, insert hook into ch-1 sp, Carry Up your MC (12 Shells)
R4: Beg Shell in same ch-1 sp, *Shell in each ch-1 sp around. sl st in top of ch 3, sl st in next dc, insert hook into ch-1 sp, Carry Up your CC (12 Shells)
Special Note: The Shells below will be different from the Shells above. Beg Shell: (ch 3, 2 dc, ch 1, 3 dc) all in same ch-1 sp Shell: (3 dc, ch 1, 3 dc) all in same ch-1 sp
R5: Beg Shell in same ch-1 sp, *Shell in each ch-1 sp around. sl st in top of ch 3 to join. (12 Shells)
Fasten off and weave in ends.
6″ x 4″ Cozy Crochet Pattern
Bottom
Repeat R1-R6
R7: 2 hdc in 1st st, hdc in next 4 st. *2 hdc in next st, hdc in 4 next st. rep from * around. sl st in 1st hdc to join. (42 hdc)
R8: hdc in each st around. (42 hdc)
Body
R1: using your CC, attach yarn with a sl st in 1st hdc, Beg Shell in same st, sk 2 sts, *Shell in next st, sk 2 st. rep from * around. sl st in top of ch 3, sl st in next dc, insert hook into ch-1 sp, Carry Up your MC (14 Shells)
R2: Beg Shell in same ch-1 sp, *Shell in each ch-1 sp around. sl st in top of ch 3, sl st in next dc, insert hook into ch-1 sp, Carry Up your CC (14 Shells)
R3: Beg Shell in same ch-1 sp, *Shell in each ch-1 sp around. sl st in top of ch 3, sl st in next dc, insert hook into ch-1 sp, Carry Up your MC (14 Shells)
R4: Beg Shell in same ch-1 sp, *Shell in each ch-1 sp around. sl st in top of ch 3, sl st in next dc, insert hook into ch-1 sp, Carry Up your CC (14 Shells)
R5: Beg Shell in same ch-1 sp, *Shell in each ch-1 sp around. sl st in top of ch 3, sl st in next dc, insert hook into ch-1 sp, Carry Up your MC (14 Shells)
Special Note: The Shells below will be different from the Shells above. Beg Shell: (ch 3, 2 dc, ch 1, 3 dc) all in same ch-1 sp Shell: (3 dc, ch 1, 3 dc) all in same ch-1 sp
R5: Beg Shell in same ch-1 sp, *Shell in each ch-1 sp around. sl st in top of ch 3 to join. (14 Shells)
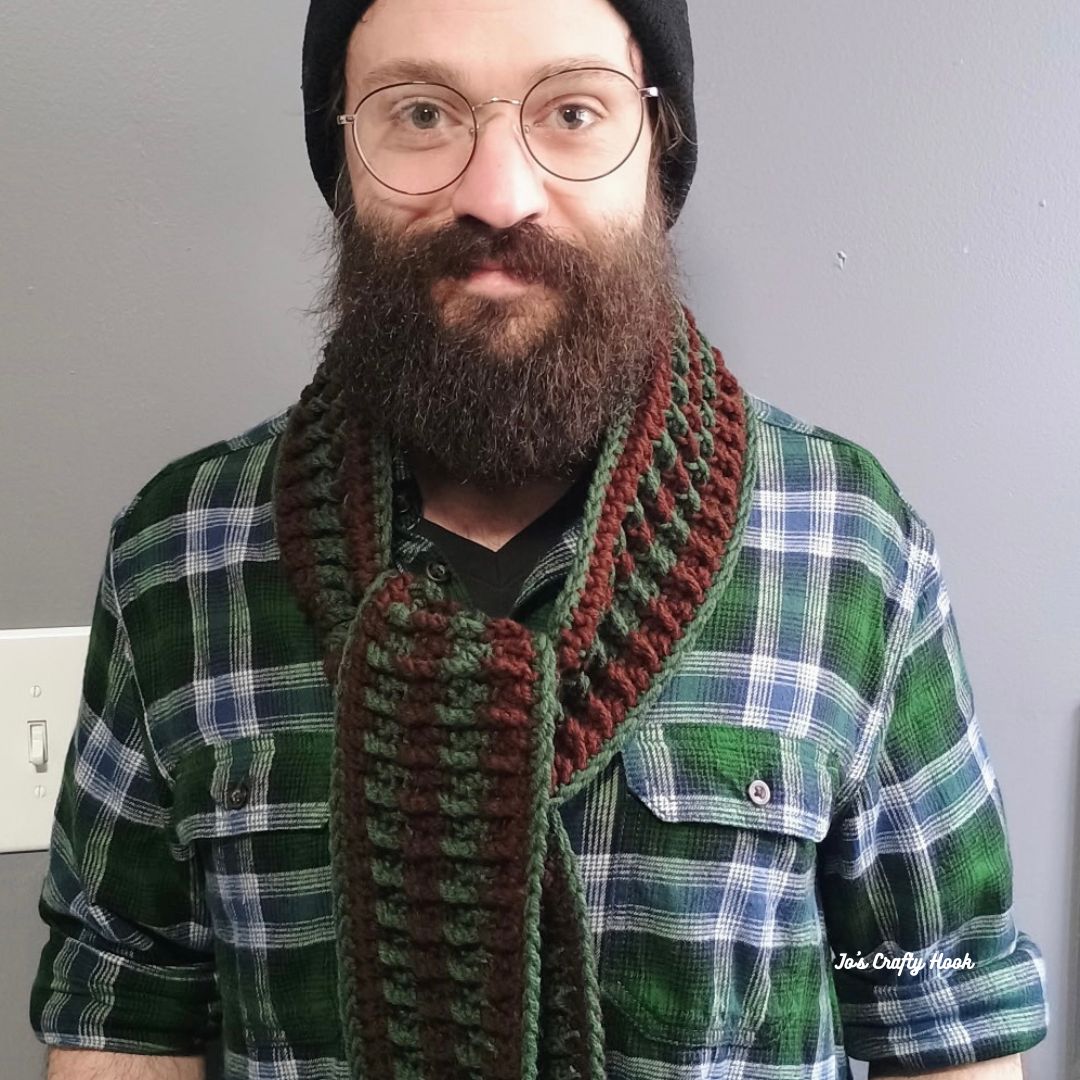
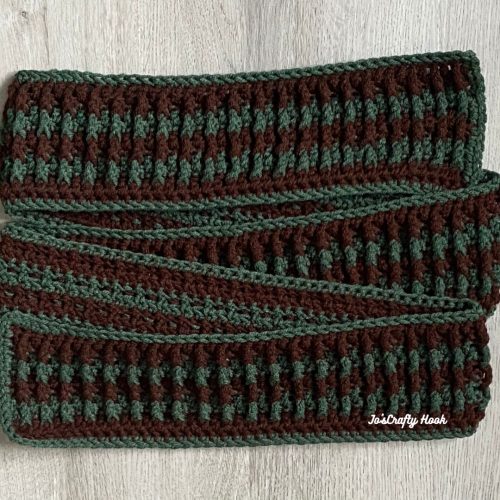
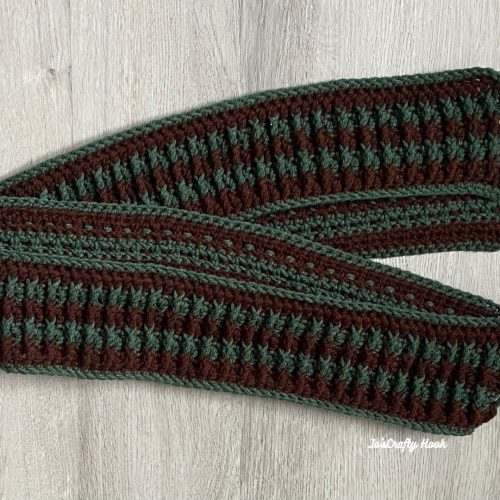
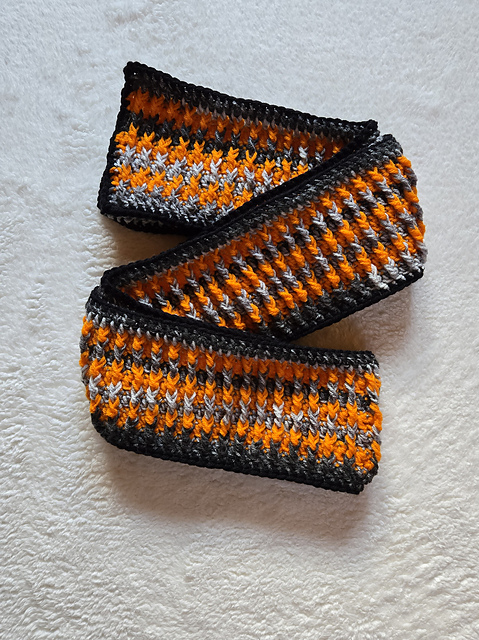
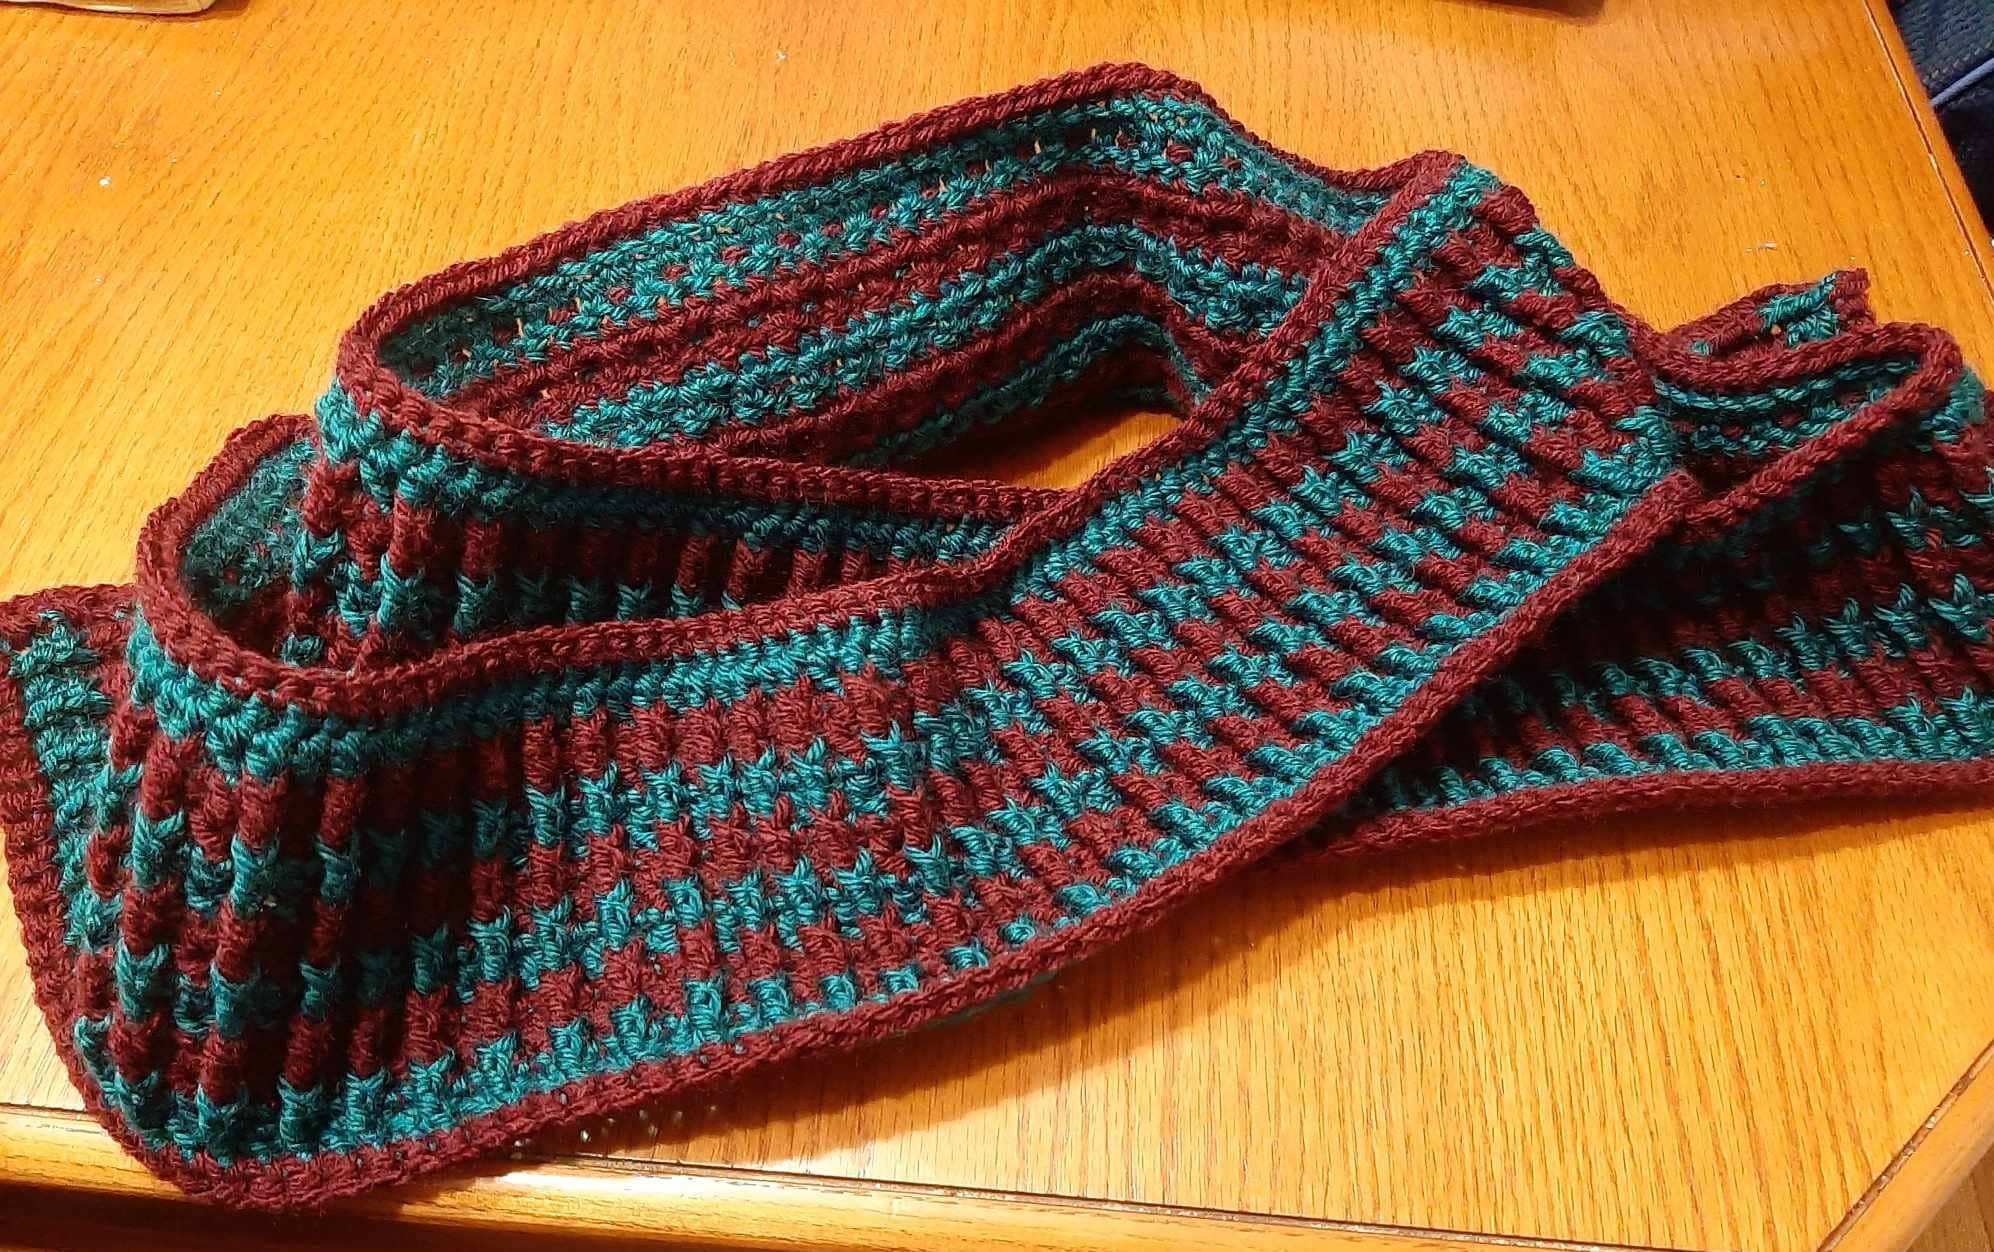
I just love designing scarves for my hubby and son! I also love sharing the designs with you so below you will find the Ridge Runner Men’s Scarf Free Crochet Pattern that is a great make that you can crochet for your hubby’s and son’s. The scarf can even be crocheted for the women.
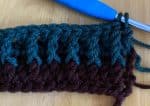
I also love to add texture to the design. The crochet stitch I used to create the “running ridges” is the Front Post Triple Crochet.
While you are there be sure to sign up for my Newsletter where you will receive news about New Crochet Pattern Releases, Roundups, Collaborations, and MORE! For signing up you will also get a FREE crochet pattern!
Information Needed to Crochet the Ridge Runner Men’s Scarf
US Terminology Skill Level: Beginner
I used Mainstays Medium Acrylic Yarn in Black and Maroon. (7 oz/364 yds)
Materials: MC = 175 – 250 yds of #4 ply Worsted/Aran Weight Yarn
CC = 150 – 200 yds of #4 ply Worsted/Aran Weight Yarn
US H or 5 mm Crochet Hook
Tape Measure Scissors
Tapestry Needle
Abbreviations/Stitches Used: ch = chain
sc = single crochet
fsc = foundation single crochet
dc = double crochet
fptrc = front post triple (treble) crochet
alt ch 2 = alternate chain 2
sk = skip
rep = rep
sl st = slip stitch
RS = Right Side
WS = Wrong Side
Notes: ch 1 does not count as st ch 3 counts as a dc alt ch 2 counts as a dc There are 2 ways you can start your color changes, by fastening off or by carrying up your new color at the beginning of the specified row
There are 3 sizes to choose from 60″ 66″ 72″ in length consecutively
Special Notes: Due to different thicknesses of yarn, try and match up the same thicknesses for each color.
If you do not meet Gauge, try going up or down a hook size.
Gauge: US H or 5 mm Crochet Hook 12 st x 8 rows = 4” Gauge Swatch: R1: ch 14, sc in 2nd ch from hook, sc across. ch 3, turn (13 sc) R2: dc in 1st st, dc across. ch 1, turn (13 dc) R3: sc in 1st st, sc across. turn (13 sc) R4: alt ch 2 or ch 3, *fptrc around dc 2 rows down, dc in next st. rep from * across until last st. dc in last st. ch 1, turn (13 st) R5: sc in 1st st, sc across. turn (13 sc) R6: alt ch 2 or ch 3 *fptrc around fptrc 2 rows down, dc in next st. rep from * across until last st. dc in last st. ch 1, turn. (13 st) R7-R8: Repeat R5-R6
Special Stitches:
Front Post Triple Crochet – triple crochet around the front post of the dc or fptrc 2 rows down from current row.
Ad-Free Premium Copy
The Ridge Runner Men’s Scarf Crochet Pattern can be purchased at my Stores listed below.
R2(RS): alt ch 2 or ch 3, dc across. turn (181, 199, 217 dc)
Fasten off and weave in ends or carry your new color.
**Tip for Changing Colors**
*when fastening off your ends, it would be a good idea to leave about a 8” tail of yarn.
*This way you can weave in your current color and new color as you start your next row.
**Benefits of Carrying a New Color**
*There are fewer ends to weave in. *It creates a cleaner finish on the back of your project. *It gives your work a more seamless appearance when changing colors frequently in a pattern.
Carrying Color Instructions
Do not complete your last dc, leave 2 loops on hook
Do not complete your last dc, leave 2 loops on hook
Pull up your new color by yarning over
Yarn Over with your new color
Pull new color through the last 2 loops on your hook
Pull new color through last 2 loops on your hook
Change to CC
R3: attach yarn with a sl st in 1st st, sc in same sp, sc across. turn (181, 199, 217 sc)
R4: alt ch 2 or ch 3, *fptrc around next dc 2 rows down, dc in next st. rep from * across until last st. dc in last st. turn (181, 199, 217 st)
Fasten off and weave in ends or Carry MC
Change to MC
R5: attach yarn with a sl st in 1st st, sc in same sp, sc across. turn (181, 199, 217 sc)
R6: alt ch 2 or ch 3, *fptrc around next fptrc 2 rows down, dc in next st. rep from * across until last st. dc in last st. turn (181, 199, 217 st)
Fasten off and weave in ends or Carry CC. Change to CC
R7-R8: Repeat R5-R6
Fasten off and weave in ends of CC. Carry MC
Change to MC
R9-R10: Repeat R5-R6
Fasten off and weave in ends.
Customizing **If you would like to make a wider scarf, Repeat R6-R7 as many times as you’d like before adding the Border**
Border
Change to CC
Across the Top: attach yarn with a sl st in 1st st of last row worked (RS),2 sc in same sp, sc each st across the top until last st. 2 sc in last st.
Down the Side: Note: each dc counts as 2 st sc in each st down the side until last st. 2 sc in last st.
Across the Bottom: sc across the bottom until last st. 2 sc in last st.
Up the Side: Note: each dc counts as 2 st sc in each st up the side until 1st st. sl st in 1st st to join.
Fasten off and weave in ends. @Jo’s Crafty Hook 2025
Thank you Malynda Parker, Christina Anderson and Cheryl Klassen for testing and creating such awesome versions of the Ridge Runner Men’s Scarf! I also want to thank Will Suva, my daughter’s fiance, for modeling for me. He loved the colors so much that I gave him the finished scarf. lol
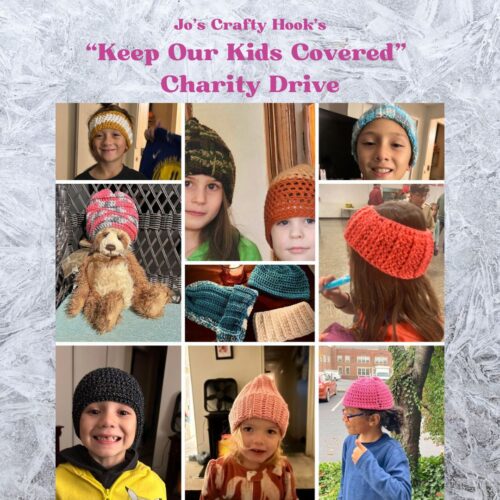
I started a “Keep Our Kids Covered” Charity Drive and I need your help. I have joined with my church, Calvary Wesleyan Church, to help school kids in my community to who need winter wear for the colder months ahead.
If you would like to receive more information about the events happening at Jo’s Crafty Hook and receive a FREE crochet pattern, why not Subscribe to my Newsletter at my website.
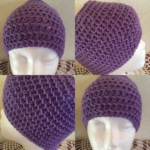
I am sure there are kids in your community who need help, so I designed a collection of beanie crochet patterns just for this charity drive called the Barberton Beanie Bundle.
The Barberton Beanie Bundle has 3 crochet patterns inside with 2 sizes that can be made. The 2 sizes inside the bundle are for a Toque, a Skull Cap, and Ear Warmers.
Premium Beanie crochet patterns, with multiple sizes to choose from, can go for $3 each or more.
The purchase of the Barberton Beanie Bundle for $1.50 will go a long way in helping school kids in my community or yours.
Whether the beanies are donated to your community or mine, Keeping Our Kids Covered when it’s cold outside is all that matters.
The Keep Our Kids Covered Campaign has 3 main purposes.
Donations of Beanies to Calvary Wesleyan Church will help keep our kids covered during the colder months.
Keep Our Kids Covered in prayer . We pray for the kids in our community because we don’t always know their home life situations.
The final purpose is with your purchase of the $1.50 Barberton Beanie Bundle all of the proceeds (minus PayPal fees of $.52) will be donated for the Sports Camp Youth Ministry that we offer every year to the kids in our community.
What you can do.
Purchase a copy of the Barberton Beanie Bundle for $1.50 from my Ravelry Store or my Etsy Shop.
Spread the word about the “Keep Our Kids Covered” Charity Drive.
Create a Charity Drive of your own and donate your versions of the Barberton Beanies to my charity drive or create your local schools, homeless shelters, or where you can help the most.
You can mail your finished version and support my charity drive to: Jo Baird c/o Calvary Wesleyan Church 139 31 St SW Barberton, OH 44203
My Show of Appreciation
As a way to show my appreciation for your donation, I would love to gift you a coupon for $3 that can be used at my Ravelry Store.
When you mail your beanie donations and upon receipt, I will send you a Coupon for $3 off to be used at my Ravelry Store.
When you send your donation, please include your name and email address so that I may contact you with your coupon that be used at my Ravelry Store.
If you send your beanies to my charity drive, please include your name and email address so that I may contact you with your coupon that be used at my Ravelry Store.
Below you will find some FREE beanie crochet patterns on my website that you can use to donate to help the kids in your community.
If you would like to receive more information about the events happening at Jo’s Crafty Hook and receive a FREE crochet pattern, why not Subscribe to my Newsletter at my website.
You can find some of my free crochet patterns at my website.
If you would like me to crochet any of my designs for you or others, I do take Custom Orders. Visit my Ravelry Store or LoveCrafts or my Etsy Shop to see some ideas of what you would like to Custom Order. You can email me with your order or any other questions at j.o@joscraftyhook.com.
Today you can take advantage of my December Deals from my Etsy Shop Jo’s Crafty Hook! You will find Sweaters, Tees, and Tanks $10-$20 OFF!
The BEST thing about my Shop is that EVERYTHING can be adjusted to fit YOUR style, size, and color(s)! Custom Orders Welcome!
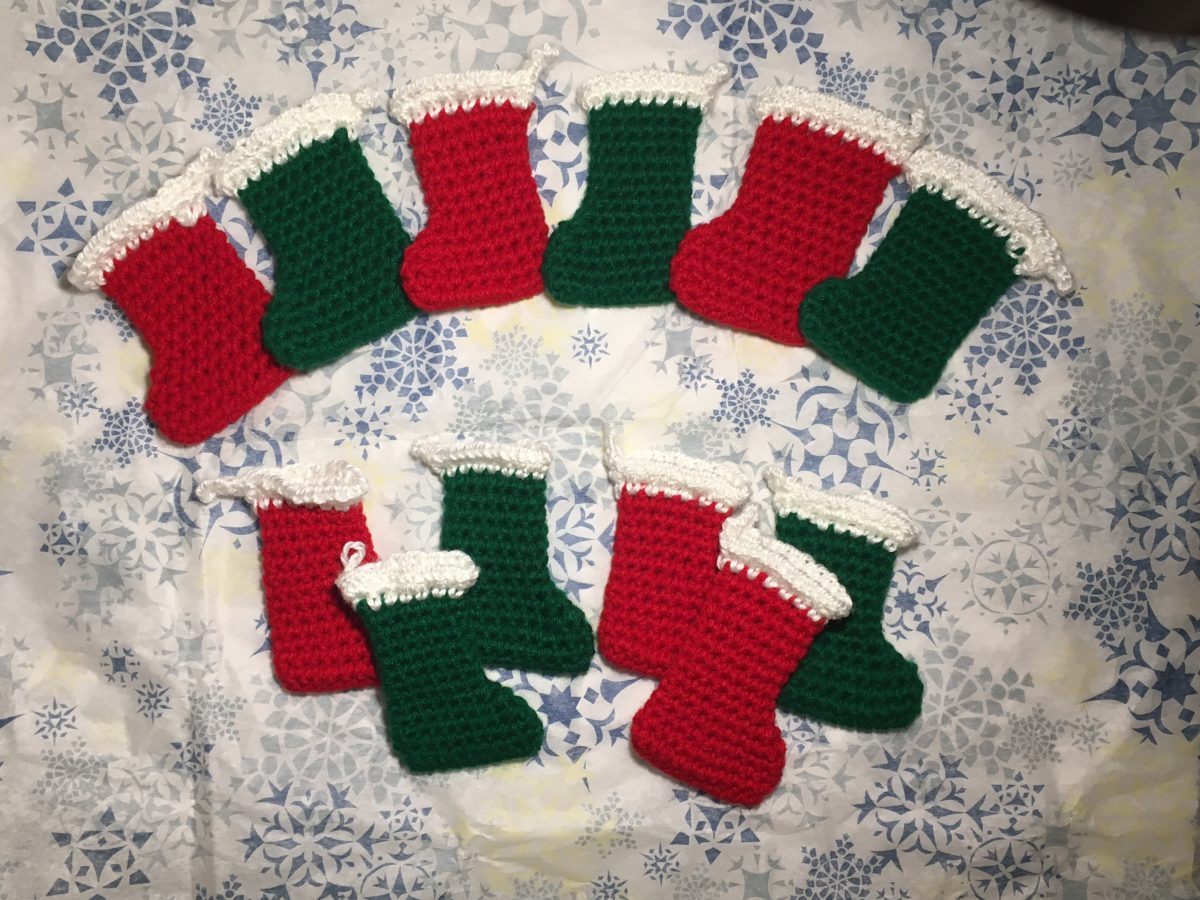
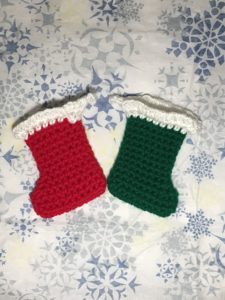
$60 Gray Cardigan $50 Cowl Pullover $30 Ombre Sweater Vest $20 Cocoon Sweater-One Size Fits All $40 Women’s Cardigan $20 Ombre Cardigan $30 Little Black Sweater $50 Unisex Striped Cardigan $20 Boat Neck Tee $30 Tunic or Summer Tee $30 Blue Ombre Tank $30 V-Neck Pullover $40 Gray Tank $30 Cotton Tee $20 Off the Shoulder Tee $20 Yellow TeeJo’s Crafty Hook Designs Crochet Patterns$1.50-$5.00 Crochet Patterns$1.50 Mini Stocking Ornament
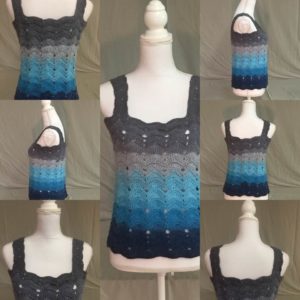
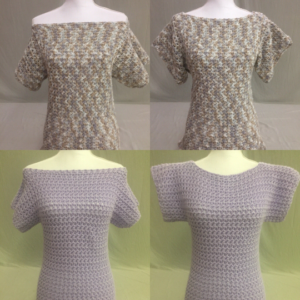
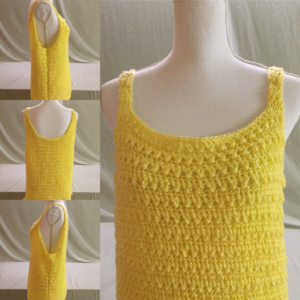
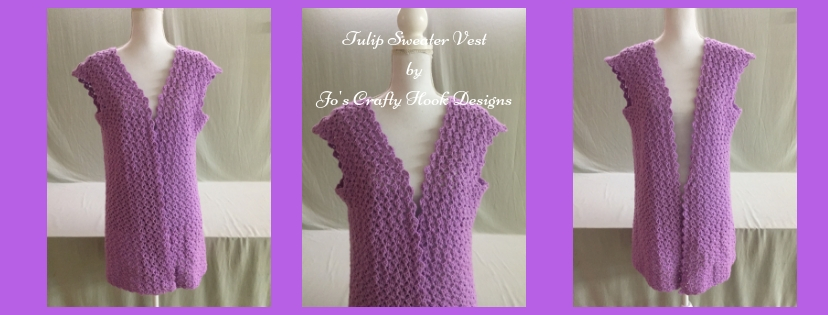
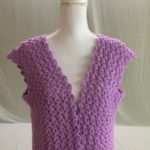
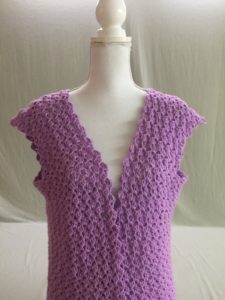
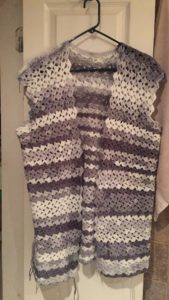
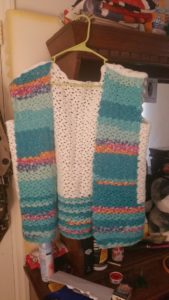
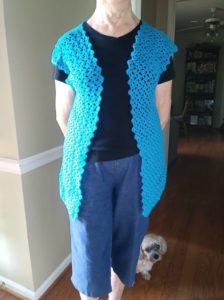
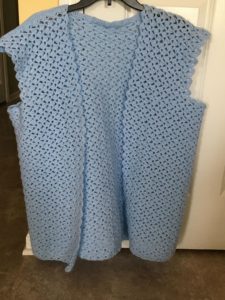
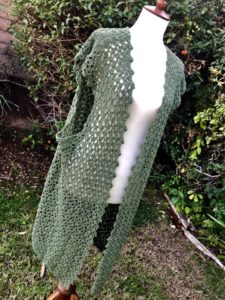
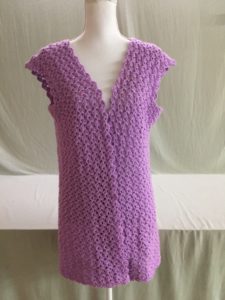
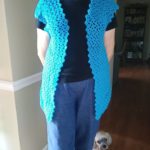
Today’s post is all about the new design I have created and sharing it with your for FREE! This post is titled “Tulip Sweater Vest Free Crochet Pattern” because YES, I am sharing it with you for FREE!
This post contains affiliate links. If you make a purchase using these links I may receive compensation (at no added cost to you.)
I designed the Tulip Sweater Vest earlier this year and I finally got it tested and uploaded to my Etsy Shop and my Ravelry Store!
Tulip Sweater Vest Crochet Pattern
Jo’s Crafty Hook Designs
Tulip Stitch Sweater Vest Crochet Pattern
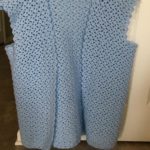
Tulip Sweater Vest
Tulip Sweater Vest
Jo’s Crafty Hook Designs
Tulip Sweater Vest
Tulip Sweater Vest
Tulip Sweater Vest
Materials Needed
F 3.75 mm Crochet Hook
Light Weight #3 yarn (1200-2000 yards)
Scissors
Tapestry Needle
Stitches Used/Abbreviations
DC – Double Crochet
SC – Single Crochet
CH – Chain
Join – Slip Stitch to first st made
Special Stitches
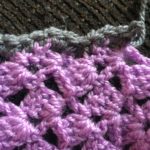
Beginning Shell = dc in 4th ch from hook, 2 dc, ch 2, 1 dc all in the same stitch as 1st dc
Shell = 3 dc, ch 2, 1 dc all in the same stitch
Gauge
2” = 2 Shells x 4 Rows
Swatch
Ch 20.
R1: [dc in 4th ch from hook, 2 dc, ch 2, dc all in the same stitch as 1st dc (Beg Shell made)] Skip 3 stitches 3dc ch 2, dc all in same stitch (Shell made). *skip 3 st, Shell in next st* Repeat from * to * 1 more time.
R2-R5: turn, Beg Shell, * skip 4 st, Shell in next st.*. Repeat from * to * 2 more times.
Pattern Notes
Pattern is written in U.S. Crochet Terms.
Beginning chain 3 does count as a stitch.
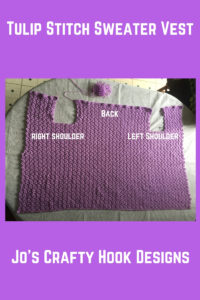
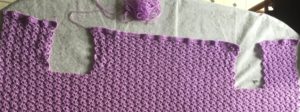
The Sweater Vest is crocheted as 1 Panel.
This pattern is worked from the bottom up.
In the pattern I broke each section of the panel down so you can get an idea of what the Tulip Stitch Vest will look like once the back and front sections are sewn together.
Size
XS
S
M
L
XL
2X
3X
4X
5X
To fit Bust (in):
28-31
32-35
36-39
40-43
44-47
48-51
52-55
56-59
60-62
Armhole Up (in):
3×17
4×18
5×19
6×20
7×21
8×22
9×23
10×24
11×25
Panel Width
37”
38”
39”
40”
41”
42”
43”
44”
45”
Panel Height
22”
23”
24”
25”
26”
27”
28”
29”
30”
Est. Yardage
900
910
920
930
940
950
960
970
980
DK Paintbox Yarn
3
3.5
4
4.5
5
5.5
6
6.5
6.5
Tulip Sweater Vest Free Crochet Pattern
Tulip Sweater Vest
XSmall
Chain 164 turn
Bottom of Sweater
R1: [dc in 4th ch from hook, 2 dc, ch 2, dc all in the same stitch as 1st dc (Beg Shell made)] [skip 3 st, 3dc, ch 2, dc (Shell made)] *skip 3 st, Shell* repeat from * to * across (1 Beg Shell, 40 Shells)
R2-R37: turn. Beg Shell in ch 2 sp of Shell in previous row, *skip 4 st, Shell in ch 2 sp of Shell in previous row.* Repeat from * to * across. (1 Beg Shell, 40 Shells)
First Armhole
R38-R46: turn. Beg Shell in ch 2 sp of Shell in previous row, *skip 4 st, Shell in ch 2 sp of Shell in previous row.* Repeat from * to * 5 times. (1 Beg Shell, 6 Shells)
R47: turn. Ch 3, dc in each st across to end. (35 dc) Note: There are a total of 6 stitches in each Shell.
Fasten off.
Back Section
R1: Skip 4 Shells from 1st Armhole, slip stitch in the ch 2 of the 5th Shell, Beg Shell *skip 4 st, Shell in ch 2 sp of Shell in previous row. * Repeat from * to * 16 times. Leave remaining Shells unworked. (1 Beg Shell, 18 Shell)
R2-R9: Beg Shell, *skip 4 st, Shell in ch 2 sp of Shell in previous row.* Repeat from * to * 16 more times. (1 Beg Shell, 18 Shell) Leave Remaining Shells unworked.
R10: turn. Ch 3, dc in each st across to end. (114 dc) Note: There are a total of 6 stitches in each Shell.
Fasten Off.
Second Armhole
R1: Skip 4 Shells from Back Section, slip stitch in the ch 2 of the 5th Shell, Beg Shell *skip 4 st, Shell in ch 2 sp of Shell in previous row. * Repeat from * to * 5 times. (1 Beg Shell, 6 Shells)
R2-9: Beg Shell*skip 4 st, Shell in ch 2 sp of Shell in previous row. * Repeat from * to * 5 times. (1 Beg Shell, 6 Shells)
R10: turn. Ch 3, dc in each st across to end. (35 dc) Note: There are a total of 6 stitches in each Shell. Fasten Off. Use Tapestry Needle to Weave in Ends.
Edging
Jo’s Crafty Hook Designs
First Shoulder & Second Shoulder
Fold in the front panels from the Arm Hole. Line them up to the back. Whip Stitch together the front and back panels from the arm holes to chest. Fasten off.
Use Tapestry Needle and weave in any loose ends.
Sleeves
I left my Sleeves undone. I LOVE the look of them with the Tulip Stitches leaving little Scallops. IF you would like to add Sleeves, follow these instructions.
Join with sl st to bottom of arm hole in ch 2 space of Shell.
Bottom of Armhole
Side of Armhole
R1: ch 1, sc in same st, *sc in the next 4 dc, 1 sc in ch 2 sp.* Repeat from * to * along the bottom of Armhole. 2 sc in the end row along the side of the Armhole, sc in dc, sc in dc.* Repeat from * to * in the remainder of the end rows. Join in 1st sc.
R2: Beg Shell in same st as join, *skip 3 st, Shell in next st.* * Repeat from * to * around.
R3-R6: Slip st in top of ch 3 and in the next 3 st, ch 3 and turn. Beg Shell in same st as join, skip the next 4 st, Shell in ch 2 sp of Shell from previous row.* Repeat from * to * around.
R1: [dc in 4th ch from hook, 2 dc, ch 2, dc all in the same st as 1st dc (Beg Shell made)] [skip 3 st, 3dc, ch 2, dc (Shell made)] *skip 3 st, Shell* repeat from * to * across (1 Beg Shell, 40 Shells)
R2-R38: turn. Beg Shell in ch 2 sp of Shell in previous row, *skip 4 st, Shell in ch 2 sp of Shell in previous row.* Repeat from * to * across. (1 Beg Shell, 40 Shells)
First Armhole
R39-R48: turn. Beg Shell in ch 2 sp of Shell in previous row, *skip 4 st, Shell in ch 2 sp of Shell in previous row.* Repeat from * to * 5 times. (1 Beg Shell, 6 Shells)
R49: turn. Ch 3, dc in each st across to end. (42 dc) Note: There are a total of 6 stitches in each Shell.
Fasten off.
Back Section
R1: Skip 4 Shells from 1st Armhole, slip stitch in the ch 2 of the 5th Shell, Beg Shell *skip 4 st, Shell in ch 2 sp of Shell in previous row. * Repeat from * to * 18 times. Leave remaining Shells unworked. (1 Beg Shell, 19 Shell)
R2-R10: Beg Shell *skip 4 st, Shell in ch 2 sp of Shell in previous row. * Repeat from * to * 18 times. Leave remaining Shells unworked. (1 Beg Shell, 19 Shell)
R11: turn. Ch 3, dc in each st across to end. (120 dc) Note: There are a total of 6 stitches in each Shell.
Fasten Off.
Second Armhole
R1: Skip 4 Shells from Back Section, slip stitch in the ch 2 of the 5th Shell, Beg Shell *skip 4 st, Shell in ch 2 sp of Shell in previous row. * Repeat from * to * 5 times.
R2-R10: Turn. Beg Shell *skip 4 st, Shell in ch 2 sp of Shell in previous row. * Repeat from * to * 5 times.
R11: turn. Ch 3, dc in each st across to end. (42 dc) Note: There are a total of 6 stitches in each Shell.
Fasten Off. Use Tapestry Needle to Weave in Ends
Edging
Jo’s Crafty Hook Designs
First Shoulder
Fold in the front panels from the Arm Hole. Line them up to the back. Whip Stitch together the front and back panels from the arm holes to chest. Fasten off.
Second Shoulder
Fold in the second front panel from the Armhole to the Front. Line them up to the back. Whip Stitch together the front and back panels from the arm holes to chest. Fasten off.
Use Tapestry Needle and weave in any loose ends.
Sleeves
I left my Sleeves undone. I LOVE the look of them with the Tulip Stitches leaving little Scallops. IF you would like to add Sleeves, follow these instructions.
Bottom of Armhole
Side of Armhole
Join with sl st to bottom of arm hole in ch 2 space of Shell.
R1: ch 1, sc in same st, sc evenly around. Join in 1st sc.
R2: Beg Shell in 1st sc of previous row. *Skip 2 st, Shell in next st.* Repeat from * to * around. Join in ch 3 of Beg Shell.
R3: turn. ss to ch 2 sp of last Shell made in previous row. Beg Shell in ch 2 sp, *Shell in ch 2 sp of Shell in previous row.* Repeat from * to * around.
R4-R6: turn. Beg Shell in ch 2 sp, *Shell in ch 2 sp of Shell in previous row.* Repeat from * to * around.
Repeat R1-R6 in the 2nd Armhole.
Finish off & weave in ends
Medium
Medium
Chain 172 turn
Bottom of Vest
R1: [dc in 4th ch from hook, 2 dc, ch 2, dc all in the same st as 1st dc (Beg Shell made)] [skip 3 st, 3dc, ch 2, dc (Shell made)] *skip 3 st, Shell* repeat from * to * across (1 Beg Shell, 42 Shells)
R2-R39: turn. Beg Shell in ch 2 sp of Shell in previous row, *skip 4 st, Shell in ch 2 sp of Shell in previous row.* Repeat from * to * across. (1 Beg Shell, 42 Shells)
First Armhole
R40-R50: turn. Beg Shell in ch 2 sp of Shell in previous row, *skip 4 st, Shell in ch 2 sp of Shell in previous row.* Repeat from * to * 5 times. (1 Beg Shell, 6 Shells)
R51: turn. Ch 3, dc in each st across to end. (42 dc) Note: There are a total of 6 stitches in each Shell.
Fasten off.
Back Section
R1: Skip 4 Shells from 1st Armhole, ss in the ch 2 of the 5th Shell, Beg Shell *skip 4 st, Shell in ch 2 sp of Shell in previous row. * Repeat from * to * 19 times. Leave remaining Shells unworked. (1 Beg Shell, 20 Shell)
R2-R11: Beg Shell *skip 4 st, Shell in ch 2 sp of Shell in previous row. * Repeat from * to * 19 times. Leave remaining Shells unworked. (1 Beg Shell, 20 Shell)
R12: turn. Ch 3, dc in each st across to end. (126 dc) Note: There are a total of 6 stitches in each Shell.
Fasten Off.
Second Armhole
R1: Skip 4 Shells from Back Section, ss in the ch 2 of the 5th Shell, Beg Shell *skip 4 st, Shell in ch 2 sp of Shell in previous row. * Repeat from * to * 5 times.
R2-R11: Beg Shell *skip 4 st, Shell in ch 2 sp of Shell in previous row. * Repeat from * to * 5 times.
R12: turn. Ch 3, dc in each st across to end. (42 dc) Note: There are a total of 6 stitches in each Shell.
Fasten Off. Use Tapestry Needle to Weave in Ends.
Edging
Jo’s Crafty Hook Designs
First Shoulder
Fold in the front panels from the Arm Hole. Line them up to the back. Whip Stitch together the front and back panels from the arm holes to chest. Fasten off.
Second Shoulder
Fold in the second front panel from the Armhole to the Front. Line them up to the back. Whip Stitch together the front and back panels from the arm holes to chest. Fasten off.
Use Tapestry Needle and weave in any loose ends.
Sleeves
I left my Sleeves undone. I LOVE the look of them with the Tulip Stitches leaving little Scallops. IF you would like to add Sleeves, follow these instructions.
Bottom of Armhole
Side of Armhole
Join with sl st to bottom of arm hole in ch 2 space of Shell.
R1: ch 1, sc in same st, sc evenly around. Join in 1st sc.
R2: Beg Shell in 1st sc of previous row. *Skip 2 st, Shell in next st.* Repeat from * to * around. Join in ch 3 of Beg Shell.
R3: turn. ss to ch 2 sp of last Shell made in previous row. Beg Shell in ch 2 sp, *Shell in ch 2 sp of Shell in previous row.* Repeat from * to * around.
R4-R6: turn. Beg Shell in ch 2 sp, *Shell in ch 2 sp of Shell in previous row.* Repeat from * to * around.
Repeat R1-R6 in the 2nd Armhole.
Finish off & weave in ends
Large
Large
Chain 176 turn
First Front Section
R1: dc in 4th ch from hook, 2 dc, ch 2, dc all in the same st as 1st dc (Beg Shell made)] [skip 3 st, 3dc, ch 2, dc (Shell made)] *skip 3 st, Shell* repeat from * to * across (1 Beg Shell, 43 Shells)
R2-R40: turn. Beg Shell in ch 2 sp of Shell in previous row, *skip 4 st, Shell in ch 2 sp of Shell in previous row.* Repeat from * to * across. (1 Beg Shell, 43 Shells)
First Armhole
R41-R52: turn. Beg Shell in ch 2 sp of Shell in previous row, *skip 4 st, Shell in ch 2 sp of Shell in previous row.* Repeat from * to * 5 times. Leave the remaining stitches unworked. (1 Beg Shell, 6 Shells)
R53: turn. Ch 3, dc in each st across to end. (35 dc) Note: There are a total of 6 stitches in each Shell.
Fasten off.
Back Section
R1: Skip 4 Shells from 1st Armhole, ss in the ch 2 of the 5th Shell, Beg Shell *skip 4 st, Shell in ch 2 sp of Shell in previous row. * Repeat from * to * 19 times. Leave remaining stitches unworked. (1 Beg Shell, 21 Shell)
R2-R12: Turn.Beg Shell *skip 4 st, Shell in ch 2 sp of Shell in previous row. * Repeat from * to * 19 times. Leave remaining stitches unworked. (1 Beg Shell, 21 Shell)
R13: turn. Ch 3, dc in each st across to end. (132 dc) Note: There are a total of 6 stitches in each Shell.
Fasten Off.
Second Armhole
R1: Skip 4 Shells from Back Section, ss in the ch 2 of the 5th Shell, Beg Shell *skip 4 st, Shell in ch 2 sp of Shell in previous row. * Repeat from * to * 5 times.
R2-R12: Turn. Beg Shell *skip 4 st, Shell in ch 2 sp of Shell in previous row. * Repeat from * to * 5 times.
R13: turn. Ch 3, dc in each st across to end. (35 dc) Note: There are a total of 6 stitches in each Shell.
Fasten Off. Use Tapestry Needle to Weave in Ends.
Edging
Jo’s Crafty Hook Designs
First Shoulder
Fold in the front panels from the Arm Hole. Line them up to the back. Whip Stitch together the front and back panels from the arm holes to chest. Fasten off.
Second Shoulder
Fold in the second front panel from the Armhole to the Front. Line them up to the back. Whip Stitch together the front and back panels from the arm holes to chest. Fasten off.
Use Tapestry Needle and weave in any loose ends.
Sleeves
I left my Sleeves undone. I LOVE the look of them with the Tulip Stitches leaving little Scallops. IF you would like to add Sleeves, follow these instructions.
Bottom of Armhole
Side of Armhole
Join with sl st to bottom of arm hole in ch 2 space of Shell.
R1: ch 1, sc in same st, sc evenly around. Join in 1st sc.
R2: Beg Shell in 1st sc of previous row. *Skip 2 st, Shell in next st.* Repeat from * to * around. Join in ch 3 of Beg Shell.
R3: turn. ss to ch 2 sp of last Shell made in previous row. Beg Shell in ch 2 sp, *Shell in ch 2 sp of Shell in previous row.* Repeat from * to * around.
R4-R6: turn. Beg Shell in ch 2 sp, *Shell in ch 2 sp of Shell in previous row.* Repeat from * to * around.
Repeat R1-R6 in the 2nd Armhole.
Finish off & weave in ends
XLarge
Chain 180 turn
Bottom of Sweater
R1: [dc in 4th ch from hook, 2 dc, ch 2, dc all in the same st as 1st dc (Beg Shell made)] [skip 3 st, 3dc, ch 2, dc (Shell made)] *skip 3 st, Shell* repeat from * to * across (1 Beg Shell, 45 Shells)
R2-R41: turn. Beg Shell in ch 2 sp of Shell in previous row, *skip 4 st, Shell in ch 2 sp of Shell in previous row.* Repeat from * to * across. (1 Beg Shell, 45 Shells)
First Armhole
R41-R53: turn. Beg Shell in ch 2 sp of Shell in previous row, *skip 4 st, Shell in ch 2 sp of Shell in previous row.* Repeat from * to * 6 times. Leave the remaining stitches unworked. (1 Beg Shell, 7 Shells)
R54: turn. Ch 3, dc in each st across to end. (48 dc) Note: There are a total of 6 stitches in each Shell.
Fasten off.
Back Section
R1: Skip 4 Shells from 1st Armhole, ss in the ch 2 of the 5th Shell, Beg Shell *skip 4 st, Shell in ch 2 sp of Shell in previous row. * Repeat from * to * 20 times. Leave remaining stitches unworked. (1 Beg Shell, 21 Shell)
R2-R13: Turn. Beg Shell *skip 4 st, Shell in ch 2 sp of Shell in previous row. * Repeat from * to * 20 times. Leave remaining stitches unworked. (1 Beg Shell, 21 Shell)
R14: turn. Ch 3, dc in each st across to end. (132 dc) Note: There are a total of 6 stitches in each Shell.
Fasten Off.
Second Armhole
R1: Skip 4 Shells from Back Section, ss in the ch 2 of the 5th Shell, Beg Shell *skip 4 st, Shell in ch 2 sp of Shell in previous row. * Repeat from * to * across.
R2-13: Turn. Beg Shell *skip 4 st, Shell in ch 2 sp of Shell in previous row. * Repeat from * to * across.
R14: turn. Ch 3, dc in each st across to end. (48 dc) Note: There are a total of 6 stitches in each Shell.
Fasten Off. Use Tapestry Needle to Weave in Ends.
Edging
Jo’s Crafty Hook Designs
First Shoulder
Fold in the front panels from the Arm Hole. Line them up to the back. Whip Stitch together the front and back panels from the arm holes to chest. Fasten off.
Second Shoulder
Fold in the second front panel from the Armhole to the Front. Line them up to the back. Whip Stitch together the front and back panels from the arm holes to chest. Fasten off.
Use Tapestry Needle and weave in any loose ends.
Sleeves
I left my Sleeves undone. I LOVE the look of them with the Tulip Stitches leaving little Scallops. IF you would like to add Sleeves, follow these instructions.
Bottom of Armhole
Side of Armhole
Join with sl st to bottom of arm hole in ch 2 space of Shell.
R1: ch 1, sc in same st, sc evenly around. Join in 1st sc.
R2: Beg Shell in 1st sc of previous row. *Skip 2 st, Shell in next st.* Repeat from * to * around. Join in ch 3 of Beg Shell.
R3: turn. ss to ch 2 sp of last Shell made in previous row. Beg Shell in ch 2 sp, *Shell in ch 2 sp of Shell in previous row.* Repeat from * to * around.
R4-R6: turn. Beg Shell in ch 2 sp, *Shell in ch 2 sp of Shell in previous row.* Repeat from * to * around.
R1: [dc in 4th ch from hook, 2 dc, ch 2, dc all in the same st as 1st dc (Beg Shell made)] [skip 3 st, 3dc, ch 2, dc (Shell made)] *skip 3 st, Shell* repeat from * to * across (1 Beg Shell, 47 Shells)
R2-R42: turn. Beg Shell in ch 2 sp of Shell in previous row, *skip 4 st, Shell in ch 2 sp of Shell in previous row.* Repeat from * to * across. (1 Beg Shell, 47 Shells)
First Armhole
R43-R56: turn. Beg Shell in ch 2 sp of Shell in previous row, *skip 4 st, Shell in ch 2 sp of Shell in previous row.* Repeat from * to * 6 times. Leave the remaining stitches unworked. (1 Beg Shell, 7 Shells)
R57: turn. Ch 3, dc in each st across to end. (48 dc) Note: There are a total of 6 stitches in each Shell.
Fasten off.
Back Section
R1: Skip 5 Shells from 1st Armhole, ss in the ch 2 of the 6th Shell, Beg Shell *skip 4 st, Shell in ch 2 sp of Shell in previous row. * Repeat from * to * 20 times. Leave remaining stitches unworked. (1 Beg Shell, 21 Shell)
R2-14: Turn. Beg Shell, *skip 4 st., Shell in ch 2 sp of Shell in previous row.* Repeat from * to * 20 times. (22 Shells)
R15: turn. Ch 3, dc in each st across to end. (132 dc) Note: There are a total of 6 stitches in each Shell.
Fasten Off.
Second Armhole
R1: Skip 5 Shells from Back Section, ss in ch 2 sp of Shell in previous row, Beg Shell *skip 4 st, Shell in ch 2 sp of Shell in previous row.* Repeat from * to * 6 more times. Leave the remaining stitches unworked. (1 Beg Shell, 7 Shells)
R2-14: Turn. Beg Shell, *skip 4 st., Shell in ch 2 sp of Shell in previous row.* Repeat from * to * 6 times. (1 Beg Shell, 7 Shells)
R15: turn. Ch 3, dc in each st across to end. (48 dc) Note: There are a total of 6 stitches in each Shell.
Fasten Off. Use Tapestry Needle and Weave in Ends.
Edging
Jo’s Crafty Hook Designs
First Shoulder
Fold in the front panels from the Arm Hole. Line them up to the back. Whip Stitch together the front and back panels from the arm holes to chest. Fasten off.
Second Shoulder
Fold in the second front panel from the Armhole to the Front. Line them up to the back. Whip Stitch together the front and back panels from the arm holes to chest. Fasten off.
Use Tapestry Needle and weave in any loose ends.
Sleeves
I left my Sleeves undone. I LOVE the look of them with the Tulip Stitches leaving little Scallops. IF you would like to add Sleeves, follow these instructions.
Bottom of Armhole
Side of Armhole
Join with sl st to bottom of arm hole in ch 2 space of Shell.
R1: ch 1, sc in same st, sc evenly around. Join in 1st sc.
R2: Beg Shell in 1st sc of previous row. *Skip 2 st, Shell in next st.* Repeat from * to * around. Join in ch 3 of Beg Shell.
R3: turn. ss to ch 2 sp of last Shell made in previous row. Beg Shell in ch 2 sp, *Shell in ch 2 sp of Shell in previous row.* Repeat from * to * around.
R4-R6: turn. Beg Shell in ch 2 sp, *Shell in ch 2 sp of Shell in previous row.* Repeat from * to * around.
R1: [dc in 4th ch from hook, 2 dc, ch 2, dc all in the same st as 1st dc (Beg Shell made)] [skip 3 st, 3dc, ch 2, dc (Shell made)] *skip 3 st, Shell* repeat from * to * across (1 Beg Shell, 49 Shells)
R2-R43: turn. Beg Shell in ch 2 sp of Shell in previous row, *skip 4 st, Shell in ch 2 sp of Shell in previous row.* Repeat from * to * across. (1 Beg Shell, 49 Shells)
First Armhole
R44-R58: turn. Beg Shell in ch 2 sp of Shell in previous row, *skip 4 st, Shell in ch 2 sp of Shell in previous row.* Repeat from * to * 6 times. Leave the remaining stitches unworked. (1 Beg Shell, 7 Shells)
R59: turn. Ch 3, dc in each st across to end. (48 dc) Note: There are a total of 6 stitches in each Shell.
Fasten off.
Back Section
R1: Skip 5 Shells from 1st Armhole, ss in the ch 2 of the 6th Shell, Beg Shell *skip 4 st, Shell in ch 2 sp of Shell in previous row. * Repeat from * to * 20 times. Leave remaining stitches unworked. (1 Beg Shell, 23 Shell)
R2-15: Turn, ss in the ch 2 of the 6th Shell, Beg Shell *skip 4 st, Shell in ch 2 sp of Shell in previous row. * Repeat from * to * 20 times. Leave remaining stitches unworked. (1 Beg Shell, 23 Shell)
R16: turn. Ch 3, dc in each st across to end. (144 dc) Note: There are a total of 6 stitches in each Shell.
Fasten Off.
Second Armhole
R1: Skip 5 Shells from Back Section, Beg Shell *skip 4 st, Shell in ch 2 sp of Shell in previous row. * Repeat from * to * across.
R2-15: ss in the ch 2 of the 5th Shell, Beg Shell *skip 4 st, Shell in ch 2 sp of Shell in previous row. * Repeat from * to * across.
R16: turn. Ch 3, dc in each st across to end. (48 dc) Note: There are a total of 6 stitches in each Shell.
Fasten off. Use Tapestry Needle to weave in ends.
Edging
Jo’s Crafty Hook Designs
First Armhole
Fold in the front panels from the Arm Hole. Line them up to the back. Whip Stitch together the front and back panels from the arm holes to chest. Fasten off.
Second Armhole
Fold in the second front panel from the Armhole to the Front. Line them up to the back. Whip Stitch together the front and back panels from the arm holes to chest. Fasten off.
Use Tapestry Needle and weave in any loose ends.
Sleeves
I left my Sleeves undone. I LOVE the look of them with the Tulip Stitches leaving little Scallops. IF you would like to add Sleeves, follow these instructions.
Bottom of Armhole
Side of Armhole
Join with sl st to bottom of arm hole in ch 2 space of Shell.
R1: ch 1, sc in same st, sc evenly around. Join in 1st sc.
R2: Beg Shell in 1st sc of previous row. *Skip 2 st, Shell in next st.* Repeat from * to * around. Join in ch 3 of Beg Shell.
R3: turn. ss to ch 2 sp of last Shell made in previous row. Beg Shell in ch 2 sp, *Shell in ch 2 sp of Shell in previous row.* Repeat from * to * around.
R4-R6: turn. Beg Shell in ch 2 sp, *Shell in ch 2 sp of Shell in previous row.* Repeat from * to * around.
Repeat R1-R6 in the 2nd Armhole.
Finish off & weave in ends
4X Large
Chain 208 turn
Bottom of Sweater
R1: [dc in 4th ch from hook, 2 dc, ch 2, dc all in the same st as 1st dc (Beg Shell made)] [skip 3 st, 3dc, ch 2, dc (Shell made)] *skip 3 st, Shell* repeat from * to * across (1 Beg Shell, 51 Shells)
R2-R44: turn. Beg Shell in ch 2 sp of Shell in previous row, *skip 4 st, Shell in ch 2 sp of Shell in previous row.* Repeat from * to * across. (1 Beg Shell, 51 Shells)
First Armhole
R45-R60: turn. Beg Shell in ch 2 sp of Shell in previous row, *skip 4 st, Shell in ch 2 sp of Shell in previous row.* Repeat from * to * 6 times. Leave the remaining stitches unworked. (1 Beg Shell, 8 Shells)
R61: turn. Ch 3, dc in each st across to end. (40 dc) Note: There are a total of 6 stitches in each Shell.
Fasten off.
Back Section
R1: Skip 6 Shells from 1st Armhole, ss in the ch 2 sp of the 7th Shell, Beg Shell *skip 4 st, Shell in ch 2 sp of Shell in previous row. * Repeat from * to * 22 times. Leave remaining stitches unworked. (1 Beg Shell, 23 Shell)
R2-16: Turn. Beg Shell *skip 4 st, Shell in ch 2 sp of Shell in previous row. * Repeat from * to * 22 times. Leave remaining stitches unworked. (1 Beg Shell, 23 Shell)
R17: turn. Ch 3, dc in each st across to end. (110 dc) Note: There are a total of 6 stitches in each Shell.
Fasten Off.
Second Armhole
R1: Skip 6 Shells from Back Section, ss in the ch 2 of the 7th Shell, Beg Shell *skip 4 st, Shell in ch 2 sp of Shell in previous row. * Repeat from * to * across.
R2-R16: Turn.Beg Shell *skip 4 st, Shell in ch 2 sp of Shell in previous row. * Repeat from * to * across.
R17: turn. Ch 3, dc in each st across to end. (40 dc) Note: There are a total of 6 stitches in each Shell.
Fasten off. Use Tapestry Needle to Weave in Ends.
Edging
Jo’s Crafty Hook Designs
First Shoulder
Fold in the front panels from the Arm Hole. Line them up to the back. Whip Stitch together the front and back panels from the arm holes to chest. Fasten off.
Second Shoulder
Fold in the second front panel from the Armhole to the Front. Line them up to the back. Whip Stitch together the front and back panels from the arm holes to chest. Fasten off.
Use Tapestry Needle and weave in any loose ends.
Sleeves
I left my Sleeves undone. I LOVE the look of them with the Tulip Stitches leaving little Scallops. IF you would like to add Sleeves, follow these instructions.
Bottom of Armhole
Side of Armhole
Join with sl st to bottom of arm hole in ch 2 space of Shell.
R1: ch 1, sc in same st, sc evenly around. Join in 1st sc.
R2: Beg Shell in 1st sc of previous row. *Skip 2 st, Shell in next st.* Repeat from * to * around. Join in ch 3 of Beg Shell.
R3: turn. ss to ch 2 sp of last Shell made in previous row. Beg Shell in ch 2 sp, *Shell in ch 2 sp of Shell in previous row.* Repeat from * to * around.
R4-R6: turn. Beg Shell in ch 2 sp, *Shell in ch 2 sp of Shell in previous row.* Repeat from * to * around.
Repeat R1-R6 in the 2nd Armhole.
Finish off & weave in ends
5X Large
Chain 216 turn
Bottom of Sweater
R1: [dc in 4th ch from hook, 2 dc, ch 2, dc all in the same st as 1st dc (Beg Shell made)] [skip 3 st, 3dc, ch 2, dc (Shell made)] *skip 3 st, Shell* repeat from * to * across (1 Beg Shell, 53 Shells)
R2-R45: turn. Beg Shell in ch 2 sp of Shell in previous row, *skip 4 st, Shell in ch 2 sp of Shell in previous row.* Repeat from * to * across. (1 Beg Shell, 53 Shells)
First Armhole
R46-R62: turn. Beg Shell in ch 2 sp of Shell in previous row, *skip 4 st, Shell in ch 2 sp of Shell in previous row.* Repeat from * to * 6 times. Leave the remaining stitches unworked. (1 Beg Shell, 8 Shells)
R63: turn. Ch 3, dc in each st across to end. (54 dc) Note: There are a total of 6 stitches in each Shell.
Fasten off.
Back Section
R1: Skip 6 Shells from 1st Armhole, ss in the ch 2 of the 7th Shell, Beg Shell *skip 4 st, Shell in ch 2 sp of Shell in previous row. * Repeat from * to * 20 times. Leave remaining stitches unworked. (1 Beg Shell, 23 Shell)
R2-R17: Turn. Beg Shell *skip 4 st, Shell in ch 2 sp of Shell in previous row. * Repeat from * to * 20 times. Leave remaining stitches unworked. (1 Beg Shell, 23 Shell)
R18: turn. Ch 3, dc in each st across to end. (144 dc) Note: There are a total of 6 stitches in each Shell.
Fasten Off.
Second Armhole
R1: Skip 6 Shells from Back Section, ss in the ch 2 of the 7th Shell, Beg Shell *skip 4 st, Shell in ch 2 sp of Shell in previous row. * Repeat from * to * across.
R2-R17: Turn. Beg Shell *skip 4 st, Shell in ch 2 sp of Shell in previous row. * Repeat from * to * across.
R18: turn. Ch 3, dc in each st across to end. (54 dc) Note: There are a total of 6 stitches in each Shell.
Edging
Jo’s Crafty Hook Designs
First Shoulder
Fold in the front panels from the Arm Hole. Line them up to the back. Whip Stitch together the front and back panels from the arm holes to chest. Fasten off.
Second Shoulder
Fold in the second front panel from the Armhole to the Front. Line them up to the back. Whip Stitch together the front and back panels from the arm holes to chest. Fasten off.
Use Tapestry Needle and weave in any loose ends.
Sleeves
I left my Sleeves undone. I LOVE the look of them with the Tulip Stitches leaving little Scallops. IF you would like to add Sleeves, follow these instructions.
Bottom of Armhole
Side of Armhole
Join with sl st to bottom of arm hole in ch 2 space of Shell.
R1: ch 1, sc in same st, sc evenly around. Join in 1st sc.
R2: Beg Shell in 1st sc of previous row. *Skip 2 st, Shell in next st.* Repeat from * to * around. Join in ch 3 of Beg Shell.
R3: turn. ss to ch 2 sp of last Shell made in previous row. Beg Shell in ch 2 sp, *Shell in ch 2 sp of Shell in previous row.* Repeat from * to * around.
R4-R6: turn. Beg Shell in ch 2 sp, *Shell in ch 2 sp of Shell in previous row.* Repeat from * to * around.
Repeat R1-R6 in the 2nd Armhole.
Finish off & weave in ends
This pattern has been tested by experienced crocheters. I thank each one of them for their time and devotion to testing my Tulip Sweater Vest crochet pattern! Thank you Kelly Vicchione, Nichole Tanner, Tambra Nalley, Amanda Corniello, and Cassandra Hillary!
Kelly Vicchione
Nichole Tanner
Tambra Nalley
Amanda Corniello
Cassandra Hillary
From the Designer:
Thank you for trying the Tulip Sweater Vest Pattern! Check out my other GREAT patterns at my Etsy Shop OR at the Ravelry Store under Jo’s Crafty Hook OR at my website joscraftyhook.com! While you are at my website be sure to add your email address for my Mailing List and Newsletter. This way you will be notified when I release another pattern or blog post! If you have any questions or concerns about any pattern find me at Jo’s Crafty Hook Designs on Facebook!
You are free to sell or gift the Tulip Sweater Vest. Please forward anyone who would like to do one of my patterns or purchase this pattern at my Etsy shop, the Ravelry Store, or to my website. The web addresses for any place to connect with me are listed below.
Every purchase of my patterns helps! It allows me to buy more yarn so I can create and design more Handmade Crocheted Creations for you to enjoy.
I would LOVE to see your version of my Tulip Sweater Vest! You can “Hook It” to my Ravelry Store Jo’s Crafty Hook Designs OR add a pic on my Facebook Page Jo’s Crafty Hook Designs OR at anyone of the places below that allows you to connect with me! Pictures, Comments, Feedback, etc. are ALWAYS welcome at my website www.joscraftyhook.com!
Find me, Joey Lea Baird, Jo of Jo’s Crafty Hook Designs at any one of these places listed below!