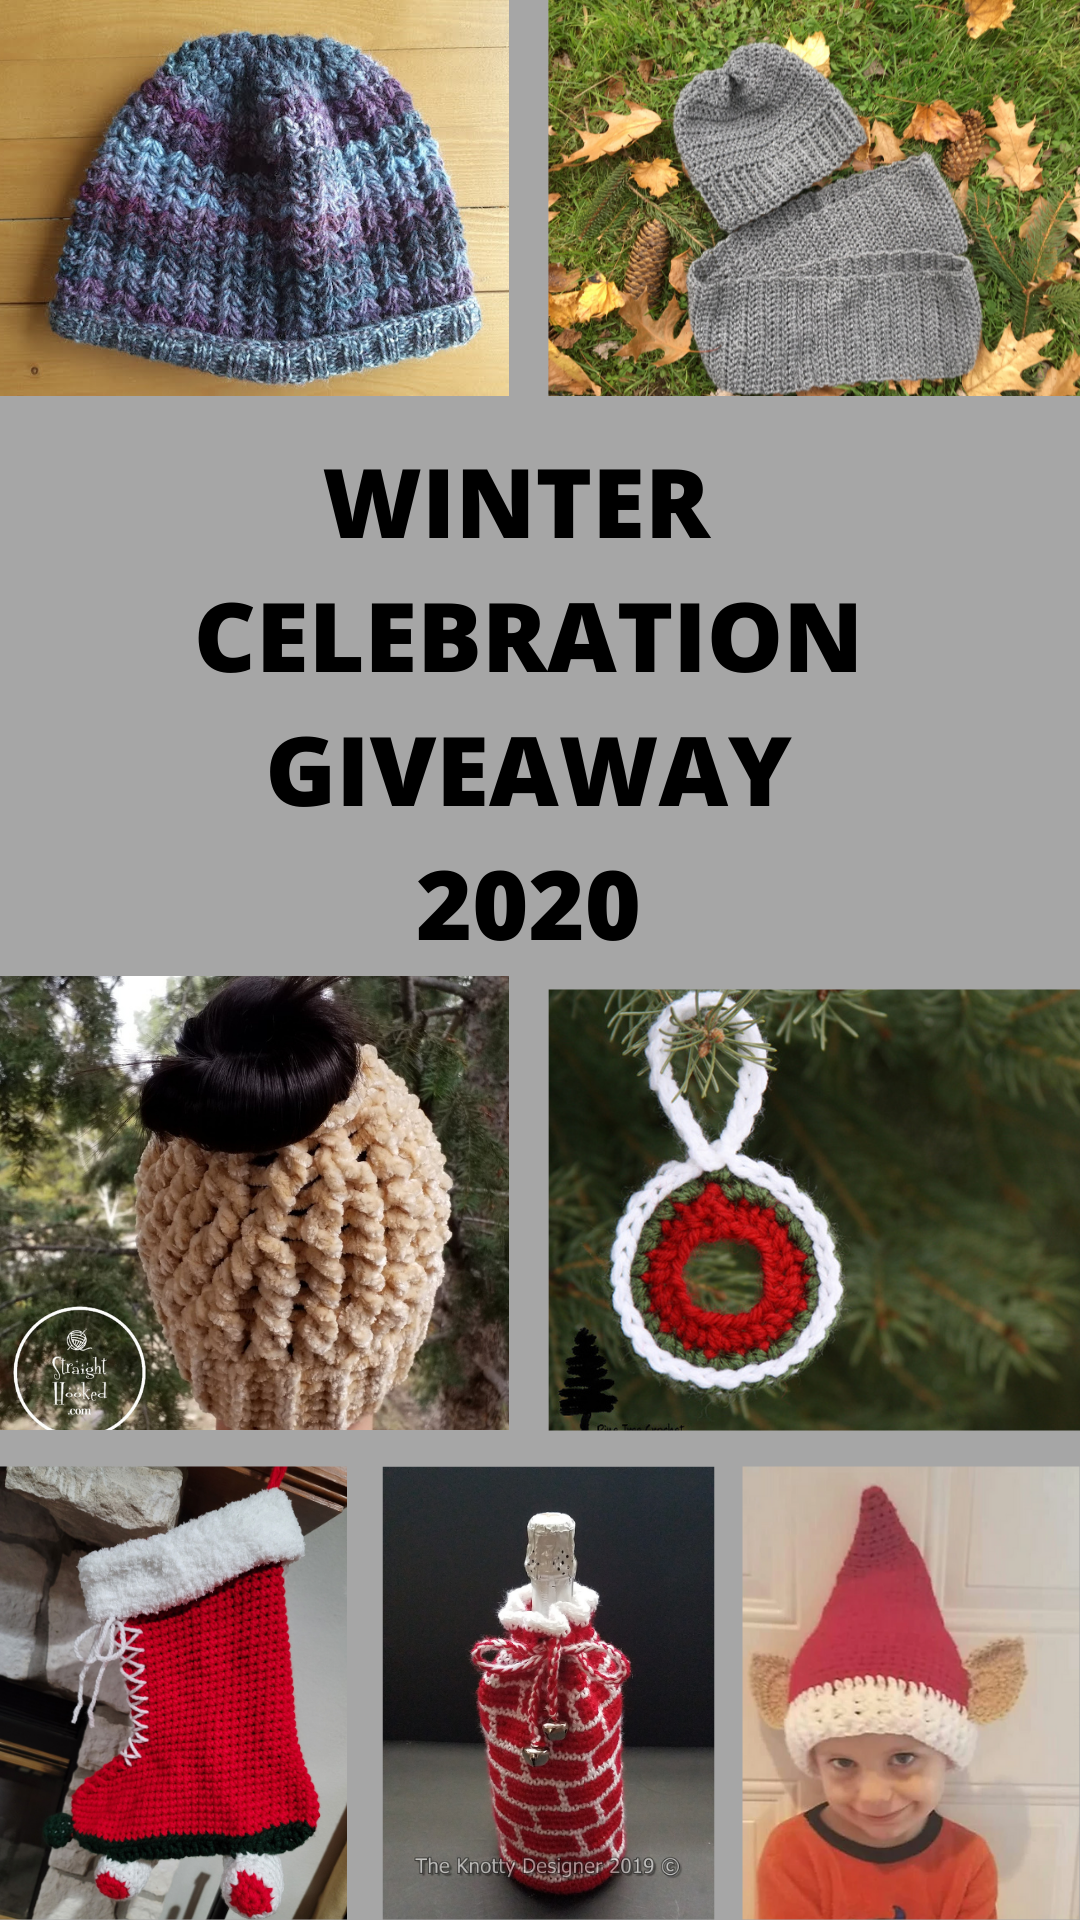
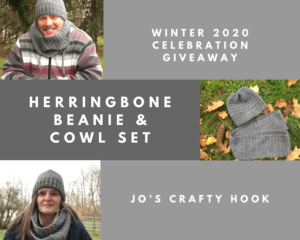
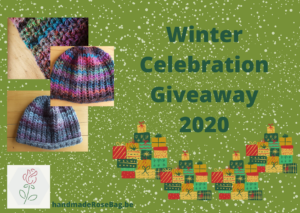
Thank you for stopping by my website, Jo’s Crafty Hook! I have some exciting news for you! My Herringbone Beanie and Cowl Set Crochet Pattern will be featured in the Winter Celebration 2020 Giveaway hosted by Angel of The Knotty Designer!
This page contains affiliate links. You can make a purchase using these links that I provide where I may receive compensation (at no added cost to you.) Purchases you make will help keep my website, Etsy Shop, and my Ravelry Store going and provide quality designs just for you!
Angel Brandon of The Knotty Designer is doing some wonderful things inside her Facebook Page The Knotty Designer! She is having a Winter Celebration 2020 Giveaway! Be sure to join us and find out more about the Winter Celebration 2020 Giveaway at Angel’s Facebook Page The Knotty Designer. Here’s what Angel has to say:
Save the dates! From December 1st to the 8th I will be hosting a holiday celebration. I will be joined by other pattern designers and we will be giving away free patterns. There will even be a giveaway too! Invite your friends to this page to join the celebration. Stay tuned!
Here is the list of the 7 designers and their designs that will be part in the Winter Celebration 2020 Giveaway December 1 – December 8, 2020. Starting December 1 – December 8, 2020 you can use the Coupon Code: CELEBRATION2020 at the Ravelry Checkout.
I hope you will join us for the Winter Celebration 2020 Giveaway being hosted by Angel Brandon of The Knotty Designer! Stop by her Facebook Page early so you don’t miss out on any of the exciting news leading up to the giveaway!
Be sure to sign up for my Newsletter. This way you will be notified directly when I have another giveaway, release a new pattern or blog post. As a Special Bonus, when you sign up for my Newsletter you will receive a Coupon that you can use at my Ravelry Store. So be sure to sign up so you don’t miss any news about Jo’s Crafty Hook.
[yikes-mailchimp form=”1″]
You can find the free crochet pattern for the Herringbone Beanie & Cowl Set. If you would like to get the Ad-Free pdf copy of the crochet pattern you can find it at my Ravelry Store or LoveCraft or Etsy Shop.
Karen
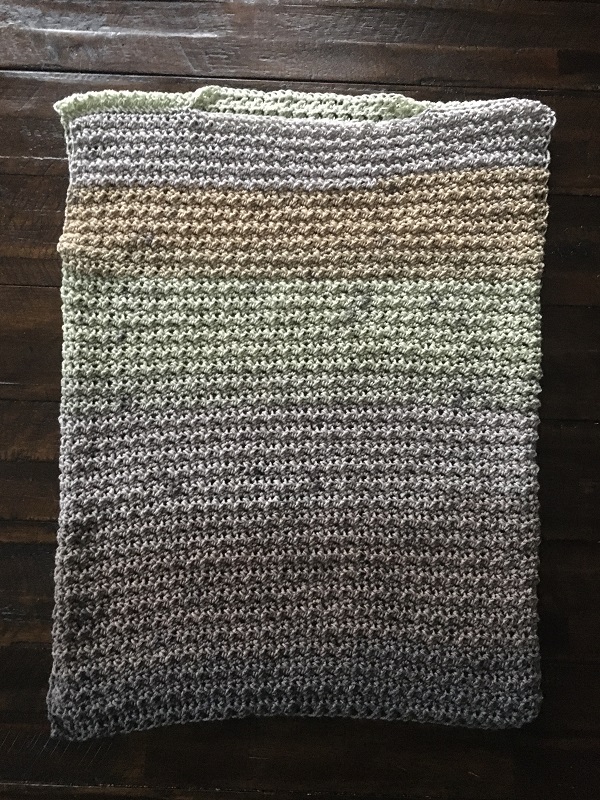
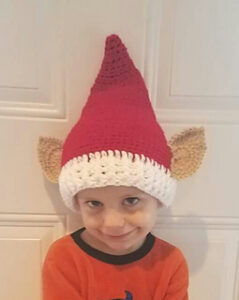
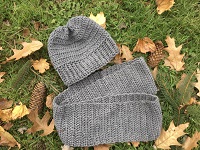
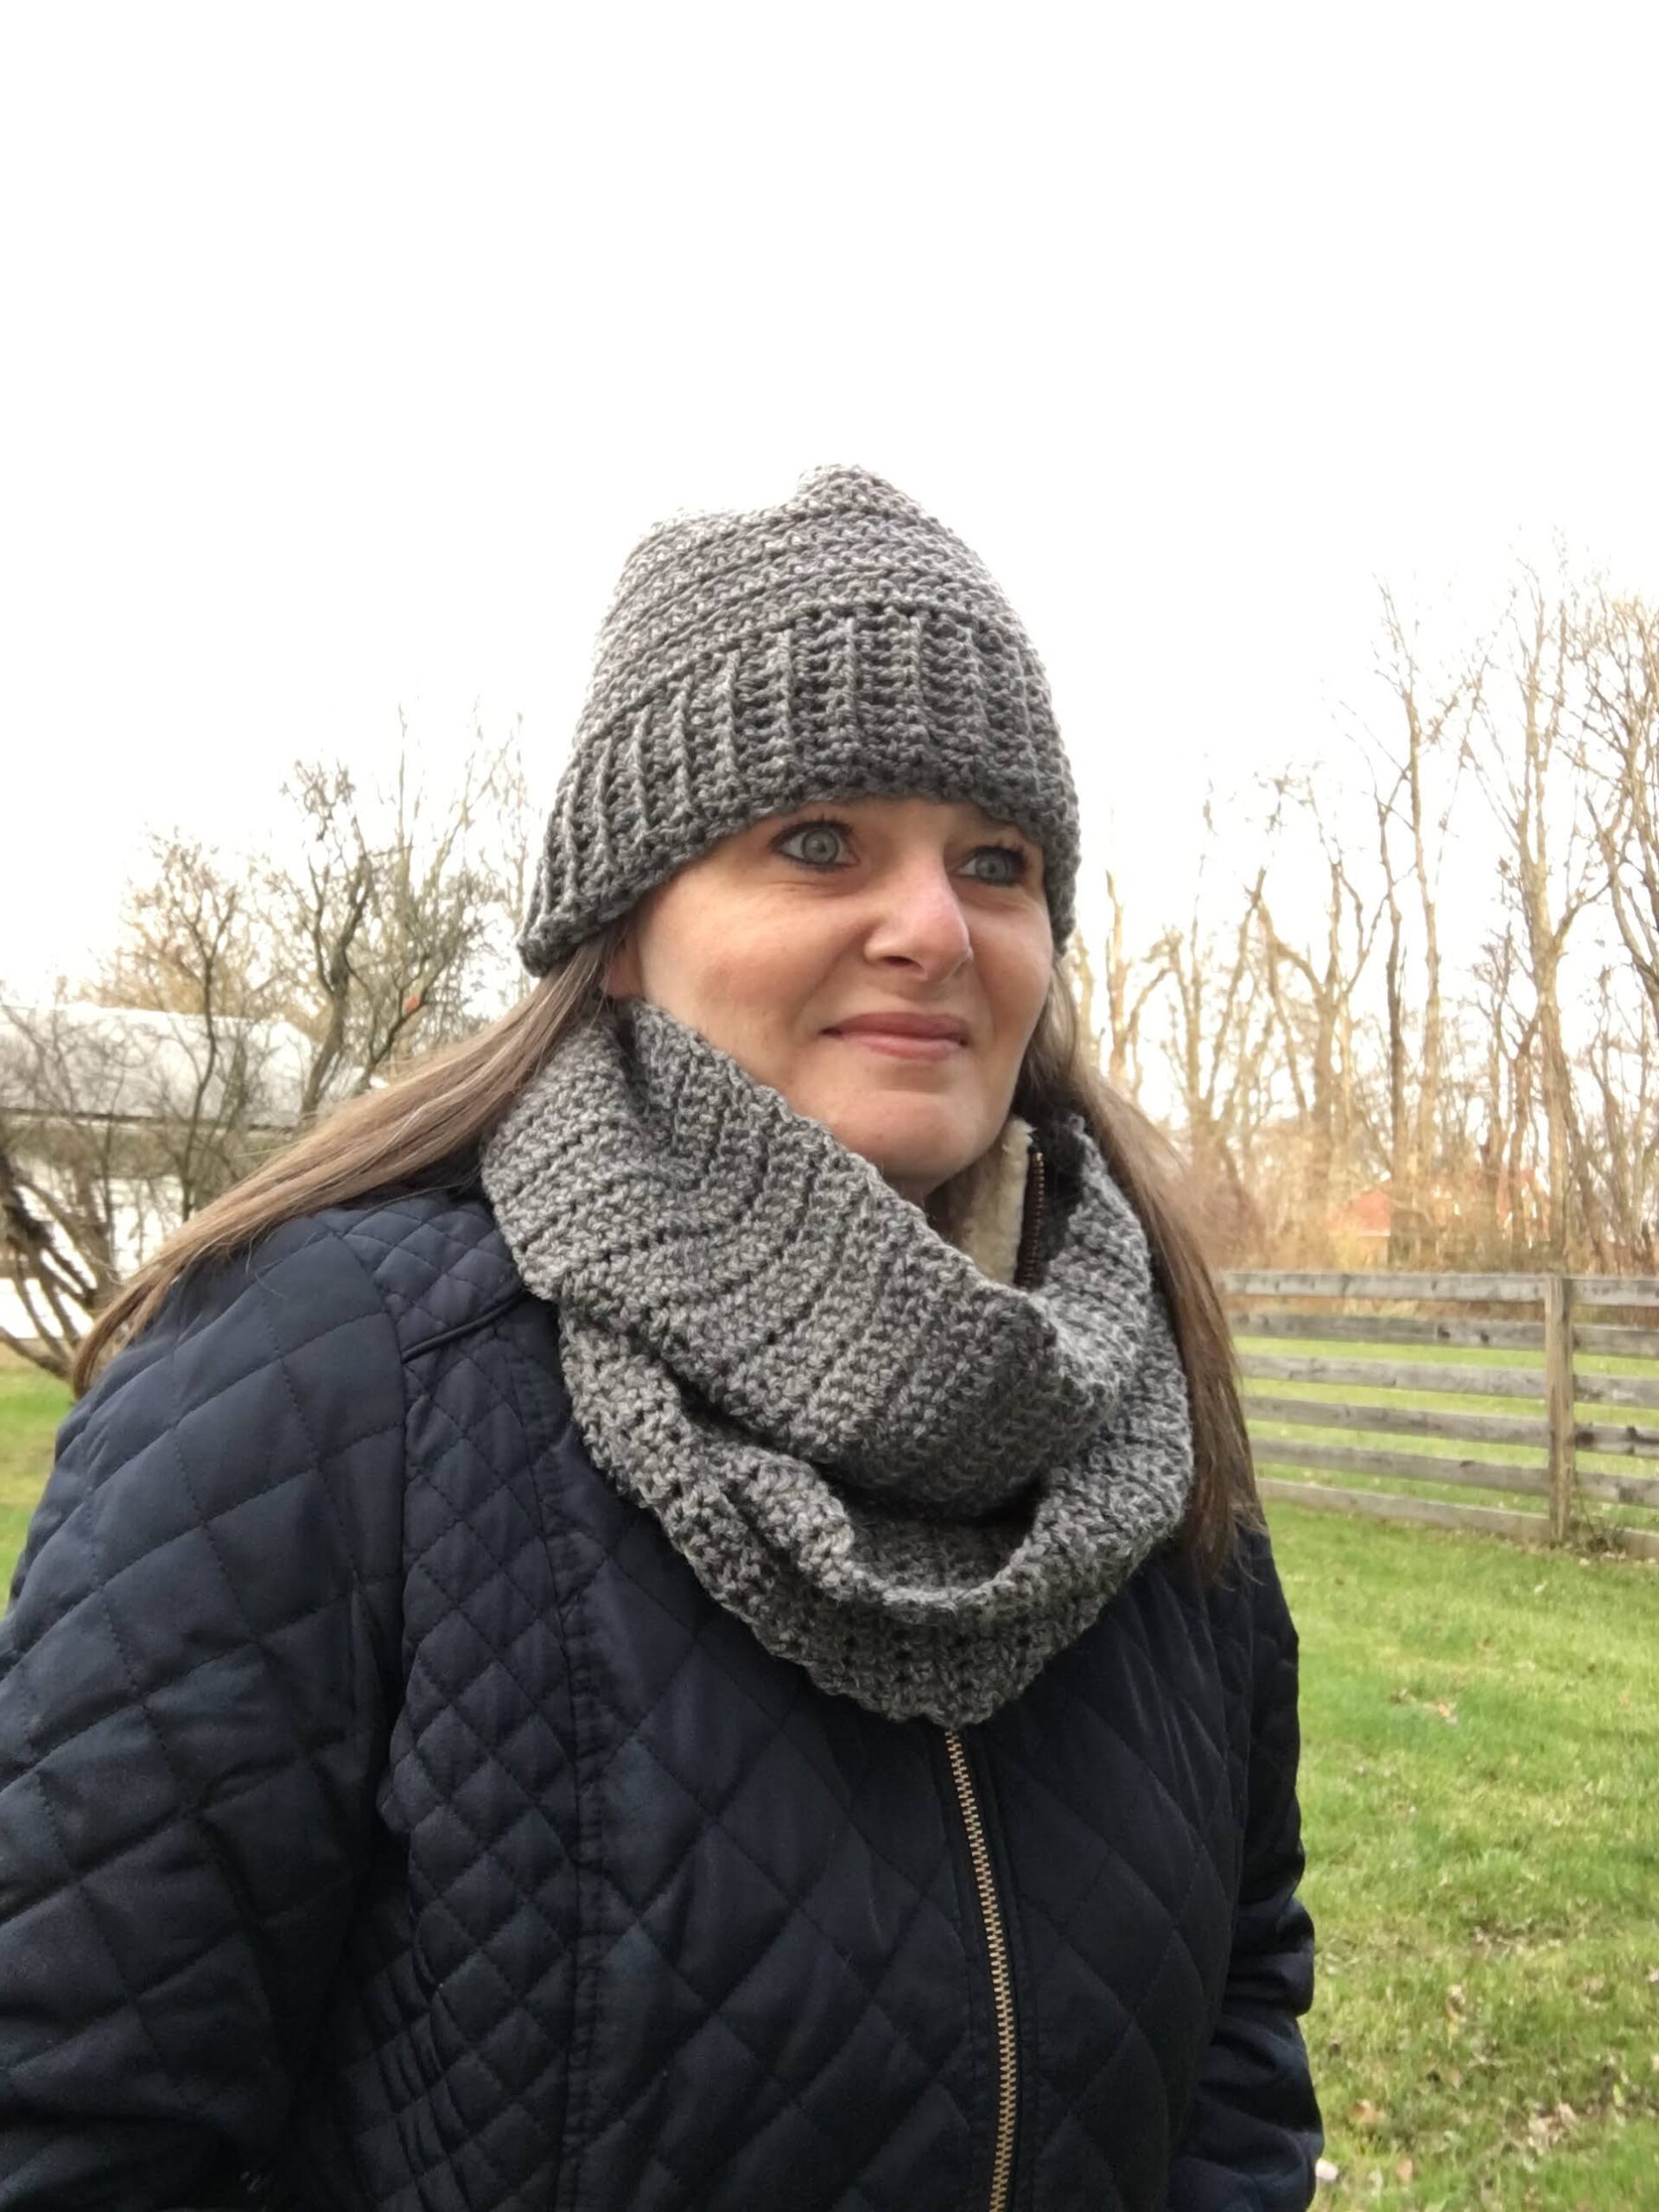
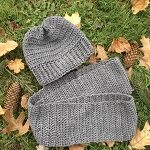
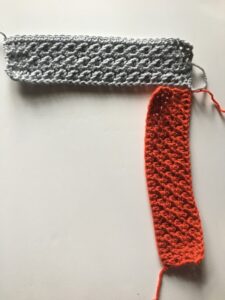
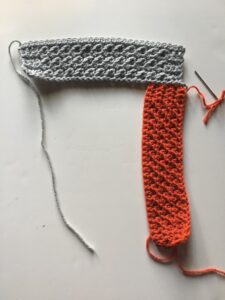
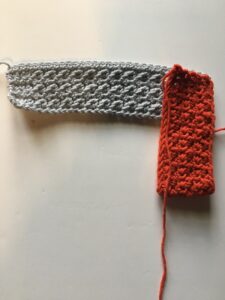
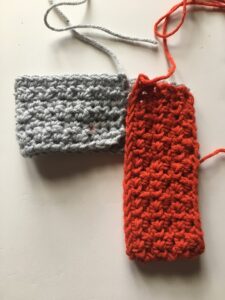
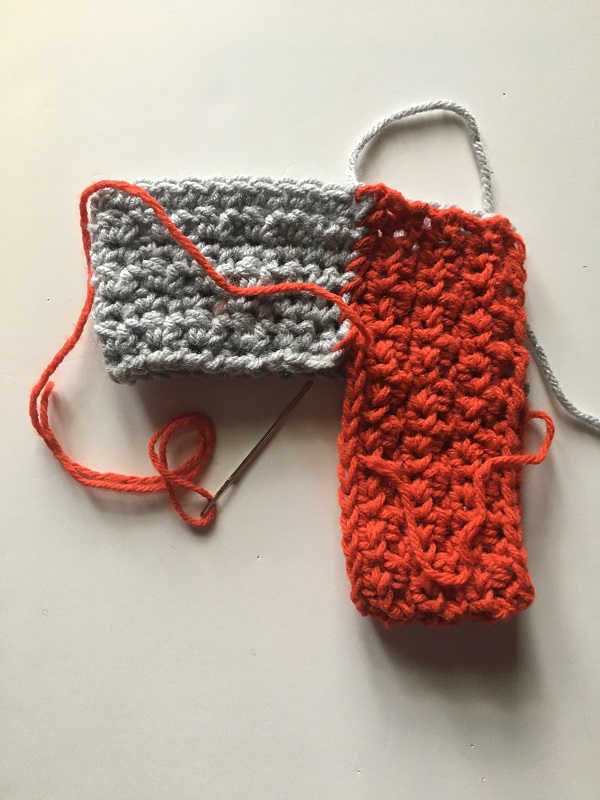
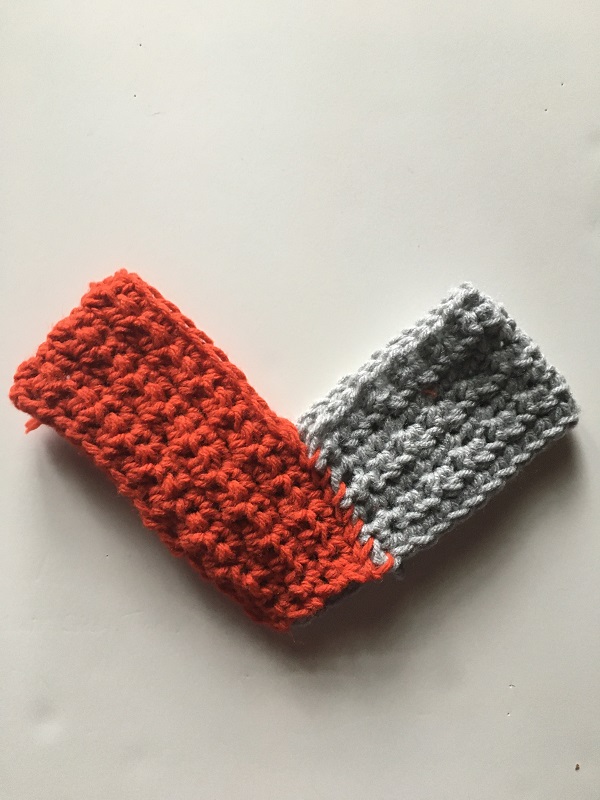
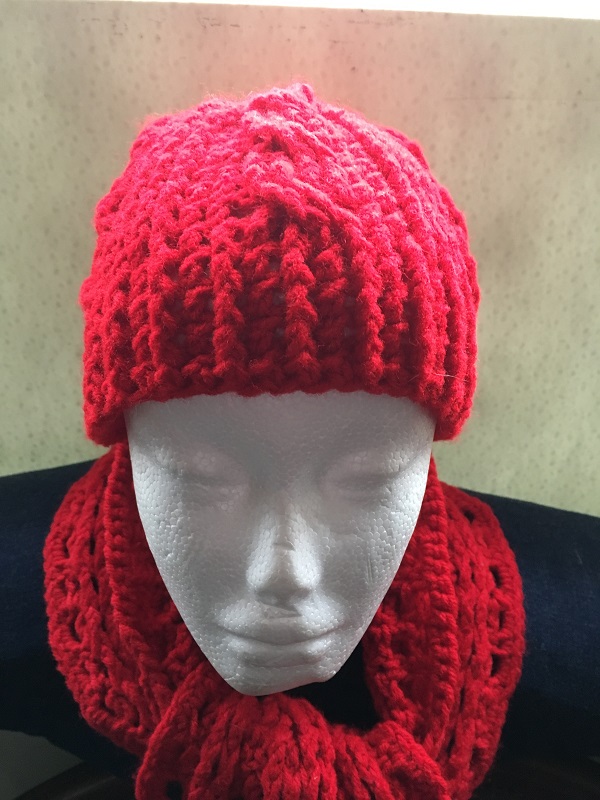
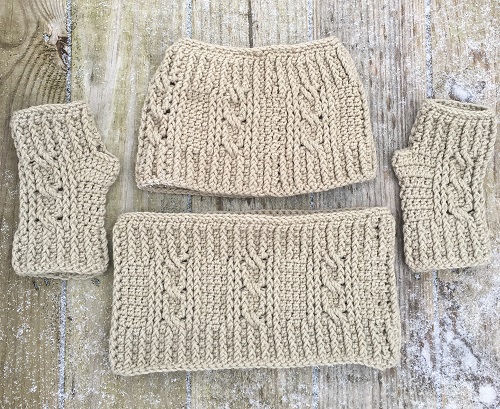
In this post I want to share with you a Unisex crochet design, the Herringbone Beanie and Cowl Set.
In the Herringbone Crochet Set you will find 3 sizes to choose from: Teen, Small & Large Adult. The good thing about this crochet pattern is that it can be customized to fit your style, size, and color! The stitch count is a multiple of 6, so it you want to make a smaller or larger size, you can use the multiple of 6.
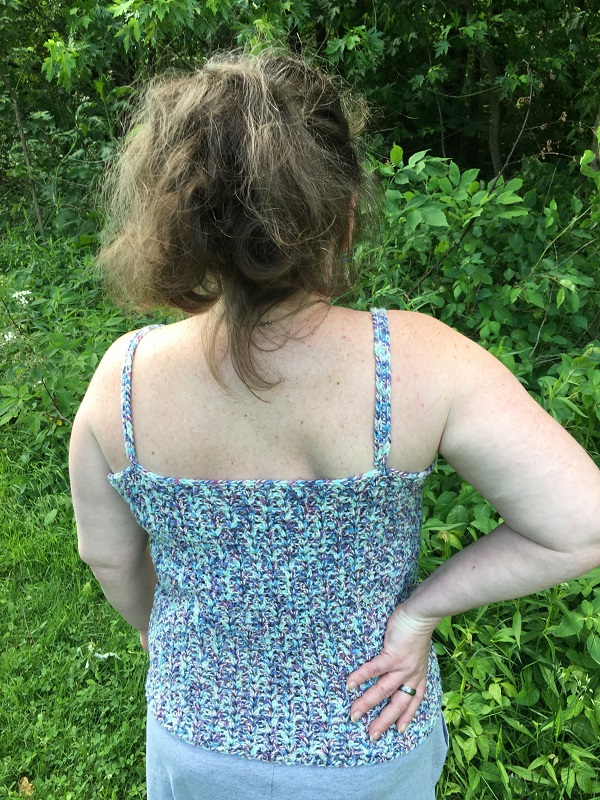
As I stated above, the Herringbone Beanie and Cowl Set Crochet Pattern is a Unisex crochet pattern. My husband and I modeled the set, so as you can see it fits men and women. You will find some wonderful versions from my testers of the set at the bottom of this post.
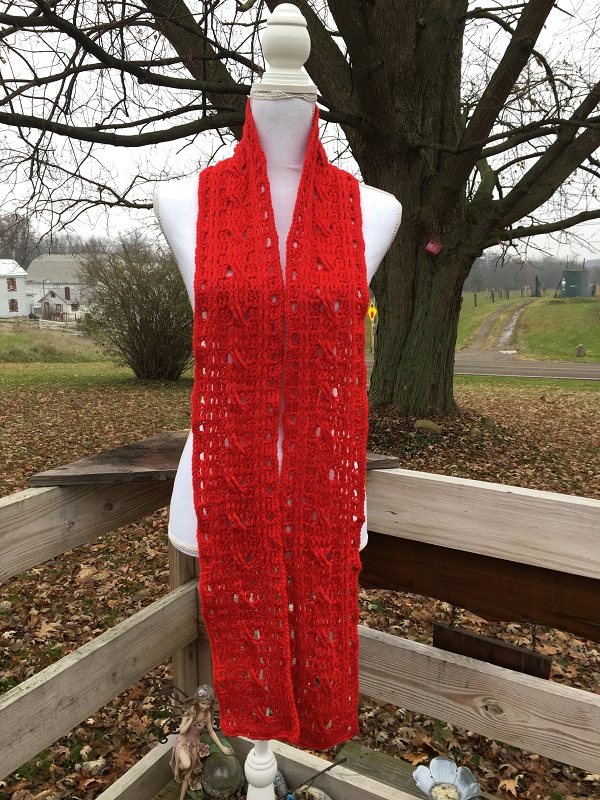
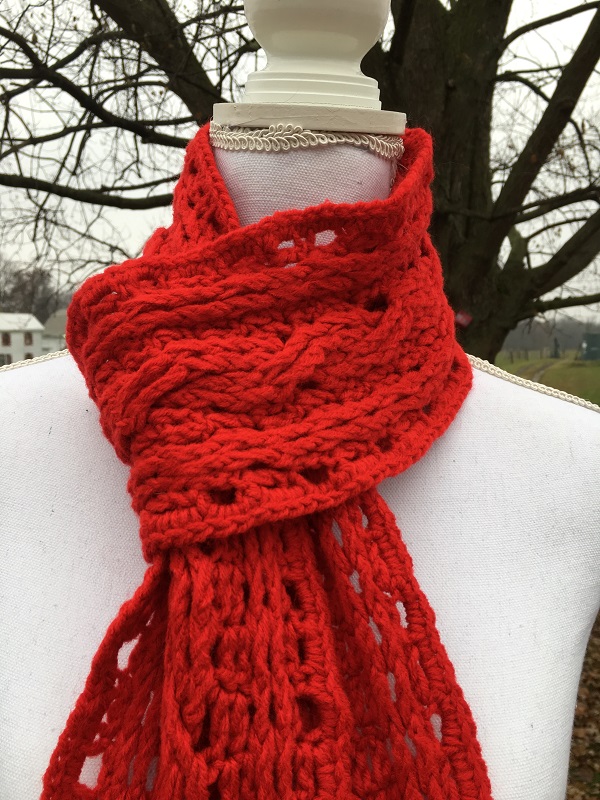
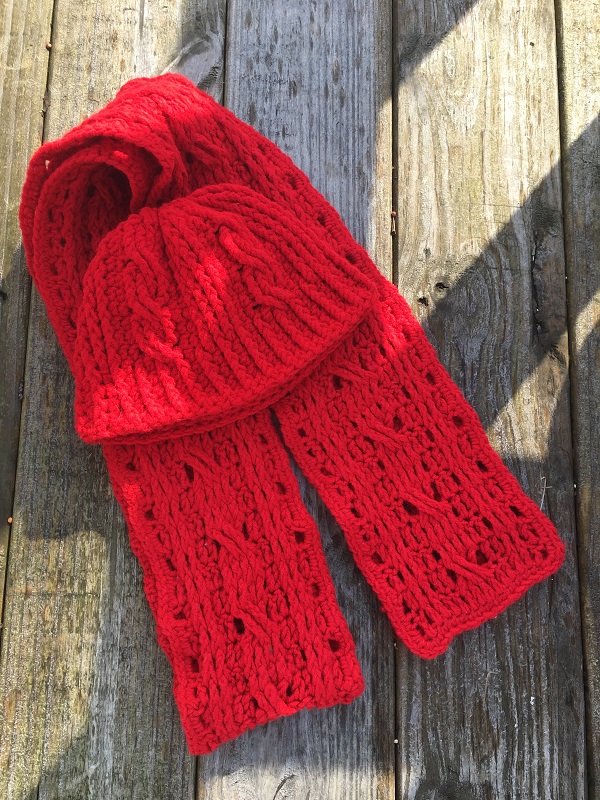
Unisex Herringbone Hat & Scarf Set
Unisex Herringbone Set
You can find my crochet patterns at these locations listed below.
Materials: US Hook I/5.5 mm 100-300 yards of #4 Worsted Weight Yarn Scissors Tapestry Needle
Gauge: US Hook I/5.5 mm
8 HHDC x 6 Rows = 2 inch
Notes: Ch 1 does not count as a stitch
Gauge Swatch: R1: Ch 9, sc in 2nd st and sc in each st across. Ch1 R2: Turn. HHDC in each st across. Ch 1 R3-6: Repeat R2
Abbreviations: CH = Chain SS = Slip Stitch SC = Single Crochet BLO = Back Loop Only HHDC = Herringbone Half Double Crochet SC BLO = Single Crochet in Back Loop Only HDC2TOG = Half Double Crochet 2 Together FHDC = Foundation Half Double Crochet
Special Stitches:
To make the HHDC stitch: 1. Yarn over, insert hook into the next stitch and pull up a loop (3 loops on hook) 2. Pull first loop straight through the second (similar to a slip stitch) 3. Yarn over, pull through two remaining loops on hook.
Special Notes: The stitch count is a multiple of 6 if you need a smaller or larger size. Pattern written for: Teen, Sm Adult, Lg Adult Be sure to count your stitches once and awhile. It is important once you start the decreasing to have the right stitch count.
Video Tutorials:
YouTube Video Tutorial for HHDC here
YouTube Video Tutorial for SC in BLO here.
YouTube Video Tutorial for HDC2TOG here. YouTube Video Tutorial for FHDC here.
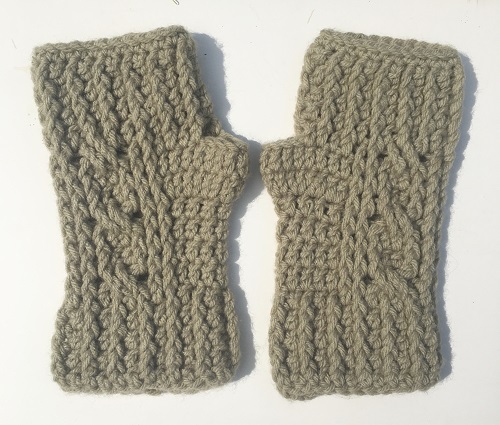
If you would like to purchase the pdf copy of the crochet pattern you can find it at Ravelry or Etsy. There is an additional crochet pattern for matching fingerless gloves that you can find at my stores.
Brim
R1: Chain 11, SC in the 2nd chain and each ch across. Ch 1 and Turn. 10 SC
R2: sc in 1st st, sc in blo in the next 8 st, and sc in the last st. Ch 1 and Turn. 10 SC
R3: Repeat R2 for a total of 54 (60, 66) Rows
Join Brim: Holding both ends together without twisting, sl together through blo loop of the previous row and foundation row.
Body
R1: Ch 1, work HHDC across the side of each row, sl in 1st HHDC st to join. Ch 1 and Turn. 54 (60, 66)
R2: HHDC in the 1st st and in each st around. Ss in 1st HHDC to join. Ch 1 and Turn. 54 (60, 66)
R3: HHDC in each remaining st around. Ss in 1st HHDC to join. Ch 1 and Turn. 54 (60, 66)
Repeat R2-R3 until hat measures 6 – 6.5” ( 6.5 – 7” or 7 – 7.5”) inches, including the Brim. Move on to Decrease Rows.
Decrease Rows
R1: Ch 1 and Turn. * HHDC in the next 6 (8,9) st, HDC2TOG* Repeat from * to * around. Ss into 1st to join. Ch 1 and Turn. 48 , 54, 60 stitches
R2: *HHDC in the next 5 (7, 8) st, HDC2TOG* Repeat from * to * around. Ss into 1st st join. Ch 1 and Turn. 40 (48, 54) st
R3: HHDC in the next 4 (6, 7) st, HDC2TOG* Repeat from * to * around. Ss into 1st st join. Ch 1 and Turn. 34 (42, 48) st
R4: HHDC in the next 3 (5, 6) st, HDC2TOG* Repeat from * to * around. Ss into 1st st join. 28 (36, 42) st Do not fasten off.
Leave a long tail of 6-10 inches for weaving the top of the hat closed. You will weave the top of the Beanie closed by using your Tapestry Needle.
You will go into the 2 loops created by the dc using the long tail you have left. You will go back and forth weaving the long tail between the 2 loops until you reach the end.
At the end you will pull the long tail tight, closing the top of the Beanie. Pull tight and go into the 1st st and create a knot, tying off the long tail.
If you are having trouble here is the YouTube Video Tutorial showing the process.
Fasten off and weave in ends.
Herring-Bone Cowl
R1: FHDC 14 (16, 18)
Optional: Chain 16 (18, 20) hdc in the 4th chain and each remaining stitch. Turn 14 (16, 18)
R2: Ch 1. HHDC in 1st st and remaining stitches across. Turn 14 (16, 18)
R3: Ch 1. HHDC in 1st st and remaining stitches across. Turn 14 (16, 18)
Body of Scarf
R4: Ch 1. HHDC in 1st st and remaining stitches across. Turn 14 (16, 18)
Repeat R4 until the scarf measures 44” ( 56”, 68”) inches or until your desired length. If you would like to leave it as a Scarf, fasten off and weave in the ends. For the Cowl, do not fasten off, move to the closing of the cowl.
Closing the Cowl
R1: Ch 1 and place HDC in each st across. 14 (16, 18)
Join Ends: Holding both ends together without twisting, slst together through blo loop of the previous row and foundation row.
Fasten off and weave in ends. You are done!
Unisex Herringbone Hat & Scarf Set
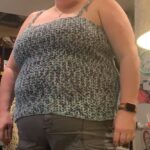
Crafty Grandma
Candice
Brucene
Unisex Herringbone Set
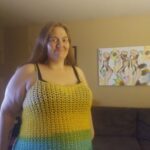
Reinisch
Unisex Herringbone Set
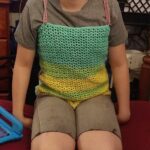
Karen
Herringbone Beanie & Cowl Set FREE Crochet Pattern
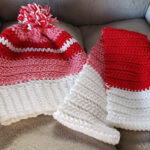
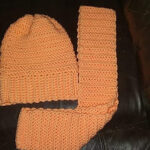
As you can see above the different versions from my wonderful testers! Thanks a bunch ladies!
You can find my crochet patterns at these locations listed below.
Thank you for your interest in this crochet pattern! Check out some of my patterns at my Ravelry Store Jo’s Crafty Hook Designs or LoveCraft or Etsy Shop JosCraftyHook or at my website joscraftyhook.com! While you are at my website be sure to subscribe to my Newsletter. This way you will be notified when I release another pattern or giveaway or blog post!
If you have any questions or concerns about this pattern or any other pattern please find me at Joey Lea Baird on Facebook or email me at jo@joscraftyhook.com
You are free to sell or gift the item, please do NOT claim this design as your own. If you share your finished product, please acknowledge me as the designer. Please forward any one who would like to do this crochet pattern or any of my patterns to the Ravelry Store or to LoveCraft or to my Etsy shop, or to my website. The web addresses for any place to connect with me are listed below.
Every purchase of my patterns helps! It allows me to buy more yarn so I can create and design more Handmade Crocheted Creations for you to enjoy.
I would LOVE to see your version of my designs! You can “Hook It” at my Ravelry Jo’s Crafty Hook Designs OR add a pic using the hashtag #nellieponcho or #joscraftyhook or #jo_bear38 or at anyone of the places below that allows you to connect with me! Comments, Feedback, etc. are ALWAYS welcome at my website www.joscraftyhook.com!
If you would like to make a donation to Jo’s Crafty Hook and help me with the costs of running my website, crocheting new designs I would greatly appreciate it!
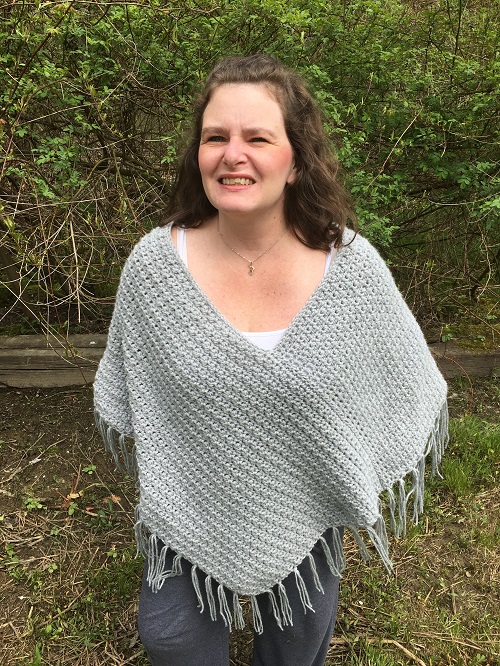
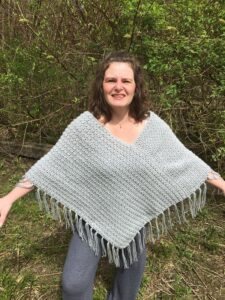
Today I am SO excited to be sharing with you the Nellie Poncho Free Crochet Pattern! I designed the Nellie Poncho in the Spring of 2020 after learning a new stitch while testing for another crochet designer. The Nellie Poncho uses the N Stitch, once you get the hang of it I promise you will LOVE it too!
Below you will find a free copy of the Nellie Poncho crochet pattern.
Nellie Poncho
The Nellie Poncho Free Crochet Pattern has 5 sizes to choose from, so I am sure you can crochet this for yourself or any woman/teen in your life! Also in this crochet pattern you will find picture and video tutorials on how to crochet the N Stitch and on how to sew your 2 panels together.
This Nellie Poncho can be warn in any season no matter where you are in the world. It is perfect for those chilly Spring days, those chilly Summer evenings, in the crispy Fall air, and of course in those cold Winter seasons.
So let’s get started!
This post contains affiliate links
Be sure to sign up for my Newsletter where you will receive messages about New Crochet Pattern Releases; FREE Crochet Patterns; Collaborations and more! For signing up to my Newsletter you will receive a FREE premium crochet pattern!
800-1200 yards #4 Worsted Weight Yarn US Hook J or 6 mm US Hook H or 5 mm Tapestry Needle Scissors
Gauge: 12 st x 12 rows = 4”
Gauge Swatch: R1: FSC 12 turn Optional: Ch 13, sc in the 2nd ch from hook and each st across. turn R2: Ch 1, sc in the same st, sc in the next st, and hdc in the next st. NS to the last 3 stitches. Hdc in the next st and sc in the last 2 stitches. R3: Ch 1, sc in the same st and each st across. R4-R13: Repeat R2 & R3.
Abbreviations/Stitches: FSC = Foundation Single Crochet CH = Chain SC = Single Crochet ST(S) = Stitch(es) NS = N Stitch SP = Space RS = Right Side WS = Wrong Side
Special Stitch: The N Stitch
Sk 1 st
hdc in the next st
insert hook from the top to the bottom of the front loop of the skipped stitch
YO, pull up a loop,
YO, pull through one loop
YO, insert the hook back into the same st as the hdc, YO, pull up a loop,
YO, pull through all 4 loops on hook.
Notes: Stitch count is a multiple of 2 Ch 1 does not count as a stitch Photo Tutorials are attached to the pattern. I made them larger to show the steps of the Construction. There are 5 Construction Steps, so please scroll down for each. The sizes are Small (Medium, Large, XLarge and 2XLarge) consecutively Poncho may need to be Blocked
Video Tutorials: N Stitch Right Handed Version here. N Stitch Left Handed Version here. Foundation Single Crochet Right Handed Version here. Foundation Single Crochet Left Handed Version here. How to Assemble a Poncho here.
Size Chart
Size
Width
Length
Small
18”
26”
Medium
20”
28”
Large
22”
30”
XLarge
24”
32”
2XLarge
26”
34”
Nellie Poncho Crochet Pattern
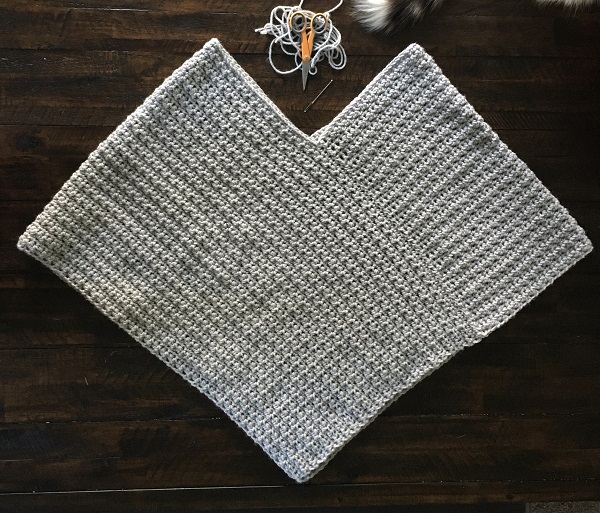
Panel 1 (make 2)
R1: FSC 100 (106, 112, 118, 124) st Optional: chain 101 (107, 113, 119, 125), sc in 2nd chain and each st across. 100 (106, 112, 118, 124) st
R2 (RS): ch 1 and sc in same st. sc in the 2nd st, hdc in the next st and NS to the last 3 st. hdc in the next st and sc in the last 2 st.
R3 (WS): Ch 1, sc in the same st and each st across.
R4 – 43 (47, 51, 55, 59): Repeat R2 & R3
Fasten off and weave in ends.
Construction:
Step 1:
Place both Panels Right Side down with Wrong Side Up. Line them up a side panel along the bottom of another panel.
Step 1 Example
Step 2:
Whip Stitch Together or use whichever stitch you prefer in attaching the Panels together.
Step 2 Example
Step 3:
Fold Whipped Stitch Piece to Outer Edge (Top of the Panel.)
Step 3 Example
Step 4:
Fold Outer Edge to Join Whipped Stitch Piece
Step 4 Example
Step 5:
Whip Stitch or use whichever stitch you prefer to sew Closed.
Step 5 Example
Finished Example
Embellish Your Nellie Poncho
Fringe
Fringe (Optional)
Cut pieces of yarn 10”-12” long
Use 2 strands of yarn for each section of Fringe. If you want a heavier Fringe add more pieces of yarn to suit you.
Put the ends together and create a loop that can be threaded into the edges of the Poncho. Knot pieces of Fringe onto the Poncho. This will give you 4 strands of yarn to create the Fringe.
You can use your crochet hook to pull the loops through the edges of the Poncho and then thread the fringe through the loop. Pull tight to create your knot. Make sure to pull the loop in the same direction. This helps all of your knots to match.
Neck Border (Optional):
Switch to H or 5 mm Hook
Attach yarn in any stitch along the Neck Opening, slip stitch, chain 1 and sc in the same stitch. sc in each stitch around.
For a Smaller Neck Opening, add 2-3 more rows of Single Crochet.
@Jo’s Crafty Hook 2024
That’s it, you have created your own version of the Nellie Poncho!
You can also find many types of crochet patterns that are Free on my website.
Be sure to sign up for my Newsletter where you will receive messages about New Crochet Pattern Releases; FREE Crochet Patterns; Collaborations and more! For signing up to my Newsletter you will receive a FREE premium crochet pattern!
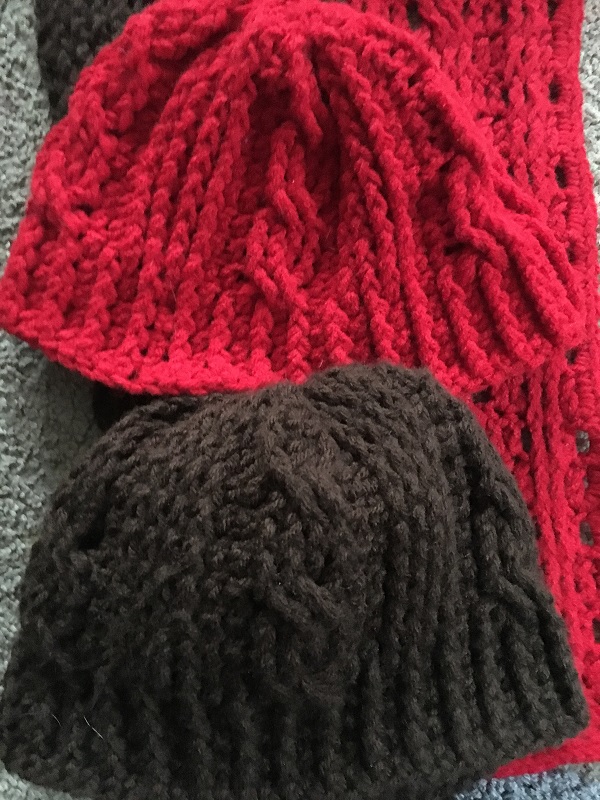
The Twisted Twizzler Set crochet pattern is a great crochet pattern if you LOVE doing Cables/Braids like I do. If you do then this set is perfect for you! If you haven’t had much practice with Cables, that’s ok too! I have supplied Video Tutorials to help you crochet the stitches used in this set!
In this post the Twisted Twizzler Set contains a hat and a scarf crochet pattern. The crochet patterns for the hat and scarf have multiple sizes, so you can do one for each member of your family and friends. The hat and scarf sizes range from newborn to adult large. This crochet pattern is part of my Twisted Line of Head Gear, where all the crochet patterns are unisex, which means that the finished items can be worn by men and women.
You can find all of the crochet patterns in my Twisted Line of Head Gear at any of the locations below:
Beanie Materials: US Hook H or 5 mm 300-500 yds of #4 Worsted Weight Yarn Scissors Tapestry Needle
Gauge:
US Hook H or 5mm
16 FPDC x 10 rows = 4″
Abbreviations: CH = Chain
DC = Double Crochet SS = Slip Stitch FPTRC = Front Post Triple Crochet FDC = Foundation Double Crochet FPDC2TOG = Front Post Double Crochet 2 Together
Notes: Ch 1 does NOT count as a stitch
Ch 3 counts as a double crochet
Video Tutorials:
FDC Video Tutorial here FPDC Video Tutorial here
FPTRC Video Tutorial here
Special Stitches:
Front Post Double Crochet – Double Crochet going around the Front Post of the DC in the Previous Row. Front Post Triple Crochet –Front Post Triple or Treble Crochet–Yarn over (YO) hook two times. Insert hook behind post of stitch (st). YO hook, pull up a loop, four loops on hook. YO hook, pull through 2 loops, 3 loops on hook. YO hook, pull through 2 loops, 2 loops on hook. YO hook, pull through last two loops.
Special Notes:
Stitch multiple after the band is 12, so if your band is too tight or too loose try going up or down in hook size instead of adjusting stitch count.
Pattern written for: NB-6mth (6-12 mth, 12-24 mth, 2-5 yrs, 5-10 yrs, Small Adult & Large Adult)
Hat Band Lengths: 12” (14, 16, 16, 19, 19, 21)
Twisted Twizzler Beanie
Twisted Twizzler Beanie
Band for NB-6 mth, 6 mth-12 mth, 12-24 mth, & 2-5 yrs: **Larger Sizes Below**
Using H Hook
R1: Fdc 36 (48, 60, 60) join.
R2: Ch 3, fpdc in the next st *dc in the next st, fpdc in the next st* Repeat from * to * around. ss to join. (36, 48, 60, 60) st
R3-R4: Repeat the last round (dc in dc and fpdc in fpdc). Ss to join. (36, 48, 60, 60)
Hat for NB-6 mth, 6 mth-12 mth, 12-24 mth, & 2-5 yrs
R5: Ch 2, fpdc in the same st, fpdc in next st, dc in next 2 st, skip 2 st, fptrc in the next 2 st, fptrc in each of the previous 2 skipped st, dc in next 2 st, fpdc in the next 2 st. *fpdc in the next 2 st, dc in next 2 st, skip 2 st, fptrc in the next 2 st, fptrc in each of the previous 2 skipped st, dc in next 2 st, fpdc in the next 2 st.* Repeat from * to * around. ss in fpdc to join. (36, 48, 60, 60) st
R6-R7: Ch 2 and fpdc in the same st, fpdc in the next st, dc in next 2 st, fpdc in next 4 st, dc in next 2 st, fpdc in next 2 st, *fpdc in next 2 st. dc in next 2 st, fpdc in next 4 st, dc in next 2 st, fpdc in next 2 st,* Repeat from * to * around. ss fpdc to join (36, 48, 60, 60) st
For SizesNB-6 mth, 6 mth-12 mth, 12-24 mth Stop here and go to Decrease Rows
For Sizes 2-5 yrs
R8-R9: Repeat R6-R7 once and go to Decrease Rows.
Decrease Row
R1: Ch 2 and fpdc in the same st, fpdc in the next st, dc2tog in next 2 st, skip 2 st, fptrc in the next 2 st, fptrc in each of the previous 2 skipped st, dc2tog in next 2 st, fpdc in next 2 st. *fpdc in next 2 st, dc2tog in next 2 st, skip 2 st, fptrc in the next 2 st, fptrc in each of the previous 2 skipped st, dc2tog in next 2 st, fpdc in next 2 st.* Repeat from * to * around. ss fpdc to join
R2: Ch 2 and fpdc in the same st, *fpdc in the next st, dc in next st, fpdc in next 4 st, dc in the next st, fpdc in the next st, fpdc2tog,* Repeat from * to * around. ss in fpdc to join. (36, 48, 60, 72) st
R3: Ch 2 and fpdc2tog in the same and next st, *dc in the next st, fpdc in the next 4, dc in the next st, fpdc3tog across the next 3 st,* Repeat from * to * around. Ss fpdc2tog to join.
Leave a long tail to weave through the stitches to close the hat. **If you are wanting a Messy Bun Hat instead of a Beanie, do NOT use a long tail to weave in the ends. The beanie can be left open here to make a Messy Bun Hat.**
Fasten off and weave in ends.
Band for: 5-10 yr, Teen, Sm & Large Adult: **Smaller Sizes Above**
Band: Using H Hook
R1: Fdc 60 (60, 72, 84) join.
R2: Ch 3, fpdc in the next st *dc in the next st, fpdc in the next st* Repeat from * to * around. ss to join. (60, 60, 72, 84) st
R3-R5: Repeat the last round (dc in dc and fpdc in fpdc). Ss to join. (60, 60, 72, 84)
Hat for: 5-10 yr, Teen, Sm & Large Adult
R6: Ch 2, fpdc in the same st, fpdc in next st, dc in next 2 st, skip 2 st, fptrc in the next 2 st, fptrc in each of the previous 2 skipped st, dc in next 2 st, fpdc in the next 2 st. *fpdc in the next 2 st, dc in next 2 st, skip 2 st, fptrc in the next 2 st, fptrc in each of the previous 2 skipped st, dc in next 2 st, fpdc in the next 2 st.* Repeat from * to * around. ss in fpdc to join. (60, 72, 84) st
R7-R8: Ch 2 and fpdc in the same st, fpdc in the next st, dc in next 2 st, fpdc in next 4 st, dc in next 2 st, fpdc in next 2 st, *fpdc in next 2 st. dc in next 2 st, fpdc in next 4 st, dc in next 2 st, fpdc in next 2 st,* Repeat from * to * around. ss fpdc to join (60, 72, 84) st
R9-R14: Repeat R6-R8 ending with R8
For 5-10yrs old Stop Here and go to Decrease Rows
R15-R17: Repeat R6-R8 ending with R8 For remaining sizes Stop Here and go to Decrease Rows
Decrease Rows
R1: Ch 2 and fpdc in the same st, fpdc in the next st, dc2tog in next 2 st, skip 2 st, fptrc in the next 2 st, fptrc in each of the previous 2 skipped st, dc2tog in next 2 st, fpdc in next 2 st. *fpdc in next 2 st, dc2tog in next 2 st, skip 2 st, fptrc in the next 2 st, fptrc in each of the previous 2 skipped st, dc2tog in next 2 st, fpdc in next 2 st.* Repeat from * to * around. ss fpdc to join
R2: Ch 2 and fpdc in the same st, *fpdc in the next st, dc in next st, fpdc in next 4 st, dc in the next st, fpdc in the next st, fpdc2tog,* Repeat from * to * around. ss in fpdc to join. (36, 48, 60, 72) st
R3: Ch 2 and fpdc2tog in the same and next st, *dc in the next st, fpdc in the next 4, dc in the next st, fpdc3tog across the next 3 st,* Repeat from * to * around. Ss fpdc2tog to join.
Leave a long tail to weave through the stitches to close the hat. **If you are wanting a Messy Bun Hat instead of a Beanie, do NOT use a long tail to close the Beanie. The beanie can be left open here to make a Messy Bun Hat.**
Fasten off and weave in ends.
Twisted Twizzler Scarf
Scarf Materials:
US Hook I or 5.50 mm 450-600 yds of #4 Worsted Weight Yarn Scissors Tapestry Needle
Gauge: US Hook I or 5.5mm
4 HDC x 2 rows = 1 inch
Size: 35-72” Length 7-9” Width
Abbreviations: CH = Chain SS = Slip Stitch SC = Single Crochet HDC = Half Double Crochet FPDC = Front Post Double Crochet BPDC = Back Post Double Crochet
Notes: Ch 1 does not count
Ch 2 counts as a double crochet Chain 3 counts as a DC-Double Crochet in the stitch count at the end of a Row.
Video Tutorials: FPTRC instructions on YouTube here FPDC & BPDC instructions on YouTube here.
Special Stitches:
Front Post Double Crochet – Double Crochet going around the Front Post of the DC in the Previous Row. Back Post Double Crochet – Double Crochet going around the Back of the DC in the Previous Row. Front Post Triple Crochet –Front Post Triple or Treble Crochet–Yarn over (YO) hook two times. Insert hook behind post of stitch (st). YO hook, pull up a loop, four loops on hook. YO hook, pull through 2 loops, 3 loops on hook. YO hook, pull through 2 loops, 2 loops on hook. YO hook, pull through last two loops.
Twisted Twizzler Scarf
Twisted Twizzler Scarf
R1: Chain 26, dc in 4th ch from hook, dc in the next 22 ch. Turn (24 dc)
R2: Ch 3, dc in the next 23 st. Turn (24 dc)
R3: Ch 3, dc in the next 3 st, fpdc in the next 2 st, dc in the next 4 st, skip 2 st, fptrc in the next 2 st, fptrc in each of the previous 2 skipped stitches, dc in the next 4 st, fpdc in the next 2 st, and dc in the last 4 st. Turn (16 dc + 4 fpdc + 4 fptrc)
R4: Ch 3, dc in the next 3 st, bpdc in the next 2 st, dc in the next 4 st, bpdc in the next 4 st, dc in the next 4 st, bpdc in the 2 st, and dc in the last 4 st. Turn (16 dc + 8 bpdc)
R5: Ch 3, dc in the next 3 st, fpdc in the next 2 st, dc in the next 4 st, fpdc in the next 4 st, dc in the next 4 st, 2 fpdc in the next 2 st, and dc in the last 4 st. (16 dc + 8 fpdc)
R6: Ch 3, dc in the next 3 st, bpdc in the next 2 st, dc in the next 4 st, bpdc in the next 4 st, dc in the next 4 st, bpdc in the 2 st, and dc in the last 4 st. Turn (16 dc + 8 bpdc)
R7: Ch 3, dc in the next 3 st, fpdc in the next 2 st, dc in the next 4 st, skip 2 st, fptrc in the next 2 st, fptrc in each of the previous 2 skipped st, dc in the next 4 st, fpdc in the next 2 st, and dc in the last 4 st. Turn (16 dc + 4 fpdc + 4 fptrc)
R8: Ch 3, dc in the next 3 st, bpdc in the next 2 st, dc in the next 4 st, bpdc in the next 4 st, dc in the next 4 st, bpdc in the next 2 st, and dc in the last 4 st. Turn (16 dc + 8 bpdc)
R9: Ch 3, dc in the next 3 st, fpdc in the next 2 st, dc in the next 4 st, fpdc in the next 4 st, dc in the next 4 st, fpdc in the next 2 st, and dc in the last 4 st. Turn (16 dc + 8 fpdc)
R10: Ch 3, dc in the next 3 st, bpdc in the next 2 st, dc in the next 4 st, bpdc in the next 4 st, dc in the next 4 st, bpdc in the next 2 st, and dc in the last 4 st. Turn (16 dc + 8 bpdc)
Do NOT fasten off!
For Ages 2-3 Repeat R7-R10 until the Scarf measures 33” then add Border
For Ages 4-10 Repeat R7-R10 until the Scarf measures 45” then add Border
For Ages Teen Repeat R7-R10 until the Scarf measures 57” then add Border
For Small Adult Repeat R7-R10 until the Scarf measures 67” then add Border
For Large Adult Repeat R7-R10 until the Scarf measures 70” then add Border
Border:
R1-R2: Ch 3 and dc in each st across. Turn 24 dc After R2 do not turn.
At the end of your last Row, chain 1 and put 2 sc in the end post of the last row you crocheted.
Add 1 sc in the dc space and 2 sc in the end posts until you get to a corner.
Once you are at the corner (you will have just added 2 sc in the last end post) chain 1 then add 2 sc in the corner space.
Sc evenly across the beginning chain row until you come to the next corner. Chain 1, sc in same st, and then repeat 2 sc in end posts and 1 sc in dc space until you get at the next corner.
Once you are at the corner (you will have just added 2 sc in the last end post) chain 1 then add 2 sc in the corner space.
Sc in each dc until you come to the last corner and add 2 sc in the last dc.
Fasten off and weave in ends with Tapestry Needle.
Twisted Twizzler Set
You can find my crochet patterns at these locations listed below. Ravelry Lovecraft Etsy
I would LOVE to see YOUR version of the Twisted Twizzler Hat and Scarf! You can post it on Instagram @joscraftyhook, @jo_bear38, #twistedtwizzlerset, #twistedtwizzlerhatandscarf, or #jostwisted.
Find me, Jo of Jo’s Crafty Hook and Jo’s Crafty Hook Designs at any one of these places listed below!
Thank you for interest in my Twisted Twizzler Set Crochet Pattern! Check out the other FREE crochet patterns on my website. While you are at my website be sure to subscribe to my Newsletter. This way you will be notified when I release another pattern, giveaways, blog hops, sales and more!
[yikes-mailchimp form=”1″]
If you have any questions or concerns about this pattern or any other pattern please find me at Jo’s Crafty Hook Designs on Facebook or email me at jo@joscraftyhook.com
You are free to sell or gift the Twisted Twizzler Set. Please forward anyone who would like to do the Twisted Twizzler Set crochet pattern or any of my patterns to the Ravelry Store, my Etsy shop, or LoveCraft. The web addresses for any place to connect with me are listed above.
Every purchase of my patterns helps! It allows me to buy more yarn so I can create and design more Handmade Crocheted Creations for you to enjoy.
I would LOVE to see your version of my Twisted Twizzler Set! You can “Hook It” at my Ravelry Jo’s Crafty Hook Designs OR add a pic at anyone of the places above that allows you to connect with me! Please use the hashtags: #jostwisted #twistedtwizzlerset or #twistedtwizzlerscarf and #twistedtwizzlerhat.
Comments, Feedback, etc. are ALWAYS welcome at my website www.joscraftyhook.com!
Hello everyone! Thank you for stopping by! I hope you are here to join me in taking part in my Twisted Cindy Set CAL! In this CAL or Crochet-A-Long it will be taking place in the Facebook Group Connie’s Crochet Guild. I am SO excited because this is the first CAL Connie Elder has done inside the group and she has asked me to host it! Please be aware that you will need to be a member of Connie’s Crochet Guild to take part in this CAL. If you are NOT a member you can join here.
This page contains affiliate links. You can make a purchase using these links that I provide where I may receive compensation (at no added cost to you.) These are needed to keep my website and pattern stores going so I can provide quality designs just for you!
In this CAL I will be sharing my Twisted Cindy Messy Bun Set crochet patterns which contains a Messy Bun Hat, a Cowl, and Fingerless Gloves. The sizes in this set range from 0-6 months up to Adult Large. I hope you will be able to find a size that is right for you, your family or friends! With the weather getting cooler this CAL is a great way to help you get a head start on your cooler weather accessories!
Each Wednesday of the month, starting Sept. 16th I will be adding a pattern from the set. The first week will be the Hat, the second week (Sept 23rd) will be the Cowl and the third week (Sept 30th) will be the Gloves. I will post the web address at Connie’s Crochet Guild on each Wednesday.
On each Sunday I will post a reminder of what is happening each week. On Sunday I will also have a place marked where you can share your WIPs for each week. If you have ANY questions, Sunday’s post will be the perfect place for you to ask them. If you prefer you can also email me at jo@joscraftyhook.com.
If you would still like to participate in the CAL but you would prefer to download a pdf copy of the crochet pattern you can purchase the Twisted Cindy Messy Bun Hat Set for 50% off at Ravelry. You can use the Coupon Code: TWISTEDCAL and receive 50% off the crochet pattern. If you prefer to use Etsy, the pattern is already 50% off, no coupon code needed.
Be sure to sign up for my Newsletter so you don’t miss out on the things I have planned for October 2020 until February 2021! I will be participating in blog hops, CALs, featured events and more, so don’t miss out!
[yikes-mailchimp form=”1″]
Let’s get started!!!
Materials:
900-1200 yards of #4 Worsted Weight Yarn
US G Hook or 4.5mm
US H Hook or 5mm
Scissors
Tapestry Needle
Gauge:
US H Hook or 5mm
15 FPDC x 5 rows = 4″
Special Stitches: Front Post Double Crochet – Double Crochet going around the Front Post of the DC in the Previous Row.
Front Post Triple Crochet –Front Post Triple or Treble Crochet–Yarn over (YO) hook two times. Insert hook behind post of stitch (st). YO hook, pull up a loop, four loops on hook. YO hook, pull through 2 loops, 3 loops on hook. YO hook, pull through 2 loops, 2 loops on hook. YO hook, pull through last two loops.
Single Crochet 2 Together – sc2tog also stands for Single Crochet Decrease. – insert hook into next stitch, yarn over and pull up a loop, insert hook into next stitch, yarn over and pull up a loop, yarn over and pull through all 3 loops on hook.
Front Post Double Crochet and Double Crochet Decrease – yarn over, fpdc around the next fpdc, yarn over and pull through leaving 2 loops on hook, yarn over, insert hook into the next dc, yarn over and pull through leaving 2 loops on hook, yarn over and pull through all 3 loops.
Special Notes:
Stitch multiple after the band is 12, so if your band is too tight or too loose try going up or down in hook size instead of adjusting stitch count.
Pattern written for: NB-6mth (6-12 mth, 12-24 mth, 2-5 yrs, 5-10 yrs, Teen/Sm Adult, Lg Adult)
Hat Band Lengths: 12” (14, 16, 16, 19, 19, 21)
There are helpful Video Tutorials in each section of the Messy Bun Hat
R2: Ch 3, fpdc in the next st *dc in the next st, fpdc in the next st* Repeat from * to * around. ss to join. (36, 48, 60, 60, 72, 72, 84) st
R3-R4: Repeat the last round (dc in dc and fpdc in fpdc). Ss to join. (36, 48, 60, 60)
Hat Body:
R5: Ch 3, dc in next st, *fpdc in next 2 st, skip 2 st, fptrc in the next 2 st, fptrc in each of the previous 2 skipped stitches, fpdc in next 2 st, dc in next 4 st.* Repeat from * to * around. Dc in last 2 st. ss to join. (36, 48, 60, 72) st
R6-R7: Ch 3, dc in next st, *fpdc in next 3 st, dc in next 2 st, fpdc in next 3 st, dc in next 4 st.* Repeat from * to * around. Dc in last 2 st. ss to join (36, 48, 60, 72) st
R8: Ch 3, dc in next st, *fpdc in next 2 st, skip 2 st, fptrc in the next 2 st, fptrc in each of the previous 2 skipped stitches, fpdc in next 2 st, dc in next 4 st.* Repeat from * to * around. Dc in last 2 st. ss to join. (36, 48, 60, 72) st
Switch to G Hook
R9-R10: Ch 3, fpdc in the next st *dc in the next st, fpdc in the next st* Repeat from * to * around. ss to join. (36, 48, 60, 72) st
Decrease Row
R11: Ch 3, fpdc in fpdc and dc in dc 2 times, fpdc and dc dec, *fpdc in fpdc and dc in dc in the next 10 st, fpdc and dc dec* Repeat from * to * around. Ss to join.
Top of the Hat-Decreasing
R1-R2: ch 1, sc in same sp and in the next 3 st, sc2tog, *sc in the next 4 st., sc2tog,* Repeat from * to * around. Ss to join
Fasten off and weave in ends.
Larger sizes Messy Bun Hat
5-10 yr, Sm & Large Adult Hat
Band:
Using H Hook
R1: Fdc 72 (72, 84) join.
R2: Ch 3, fpdc in the next st *dc in the next st, fpdc in the next st* Repeat from * to * around. ss to join. 72 (72, 84) st
R3-R5: Repeat the last round (dc in dc and fpdc in fpdc). Ss to join. 72 (72, 84)
R6: Ch 3, dc in next st, *fpdc in next 2 st, skip 2 st, fptrc in the next 2 st, fptrc in each of the previous 2 skipped stitches, fpdc in next 2 st, dc in next 4 st.* Repeat from * to * around. Dc in last 2 st. ss to join. 72 (72, 84) st
Hat Body:
R7-R8: Ch 3, dc in next st, *fpdc in next 3 st, dc in next 2 st, fpdc in next 3 st, dc in next 4 st.* Repeat from * to * around. Dc in last 2 st. ss to join (60, 72, 72, 84) st
R9: Ch 3, dc in next st, *fpdc in next 2 st, skip 2 st, fptrc in the next 2 st, fptrc in each of the previous 2 skipped stitches, fpdc in next 2 st, dc in next 4 st.* Repeat from * to * around. Dc in last 2 st. ss to join. (60, 72, 72, 84) st
R10-R11: Ch 3, dc in next st, *fpdc in next 3 st, dc in next 2 st, fpdc in next 3 st, dc in next 4 st.* Repeat from * to * around. Dc in last 2 st. ss to join 72 (72, 84) st
R12: Ch 3, dc in next st, *fpdc in next 2 st, skip 2 st, fptrc in the next 2 st, fptrc in each of the previous 2 skipped stitches, fpdc in next 2 st, dc in next 4 st.* Repeat from * to * around. Dc in last 2 st. ss to join. 72 (72, 84)st
Switch to G Hook
R13-R15: Ch 3, fpdc in the next st *dc in the next st, fpdc in the next st* Repeat from * to * around. ss to join. 72 (72, 84) st
Decrease Row
R16: Ch 3, fpdc in fpdc and dc in dc 2 times, fpdc and dc dec, *fpdc in fpdc and dc in dc in the next 10 st, fpdc and dc dec* Repeat from * to * around. Ss to join.
Top of the Hat:
R1-R2: ch 1, sc in same sp and in the next 3 st, sc2tog, *sc in the next 4 st., sc2tog,* Repeat from * to * around. Ss to join
Fasten off and weave in ends.
That is it for Week 1! On Sunday be sure to share your gathered supplies with us at Connie’s Crochet Guild! We would LOVE to see your yarns, colors, and more!
Please take part and have fun in the Twisted Cindy Messy Bun Set CAL. Be sure to finish each item of the CAL! There will be prizes and giveaways for the finished sets on October 7, 2020!
Week 2 of the Twisted Cindy Set CAL is here! Today we will start the Twisted Cindy Cowl crochet pattern! While you are waiting for Week 3 you can check out the FREE crochet patterns on my website, and check out all the places to find my other crochet designs.
I hope to see you back here on September 30th to start Week 3 of the Twisted Cindy Set CAL! Remember to crochet the whole set so you can be entered in the drawing to win some GREAT prizes and for a chance to have your set featured on my website! The deadline for the whole set is October 7, 2020. This gives you enough time to finish the set and be entered in the drawing!
Let’s get started on the Twisted Cindy Cowl Crochet Pattern!
Twisted Cindy Cowl
Pattern written for: NB-6mth (6-12 mth, 12-24 mth, 2-5 yrs, 5-10 yrs, Teen/Sm Adult, Lg Adult)
R2: Ch 3, fpdc in the next st *dc in the next st, fpdc in the next st* Repeat from * to * around. ss to join. (48, 60, 60, 72, 72) st
R3: Repeat the last round (dc in dc and fpdc in fpdc). Ss to join. (48, 60, 72, 72) st
R4: Ch 3, dc in next st, *fpdc in next 2 st, skip 2 st, fptrc in the next 2 st, fptrc in each of the previous 2 skipped stitches, fpdc in next 2 st, dc in next 4 st.* Repeat from * to * around. Dc in last 2 st. ss to join. (48, 60, 72, 72) st
R5-R6: Ch 3, dc in next st, *fpdc in next 3 st, dc in next 2 st, fpdc in next 3 st, dc in next 4 st.* Repeat from * to * around. Dc in last 2 st. ss to join (48, 60, 72, 72) st
R7: Ch 3, dc in next st, *fpdc in next 2 st, skip 2 st, fptrc in the next 2 st, fptrc in each of the previous 2 skipped stitches, fpdc in next 2 st, dc in next 4 st.* Repeat from * to * around. Dc in last 2 st. ss to join. (48, 60, 72, 72, 84, 84, 96) st
R8-R9: Ch 3, dc in next st, *fpdc in next 3 st, dc in next 2 st, fpdc in next 3 st, dc in next 4 st.* Repeat from * to * around. Dc in last 2 st. ss to join (48, 60, 72, 72) st
R10: Ch 3, dc in next st, *fpdc in next 2 st, skip 2 st, fptrc in the next 2 st, fptrc in each of the previous 2 skipped stitches, fpdc in next 2 st, dc in next 4 st.* Repeat from * to * around. Dc in last 2 st. ss to join. (48, 60, 72, 72) st
R11: Ch 3, fpdc in the next st *dc in the next st, fpdc in the next st* Repeat from * to * around. ss to join. (48, 60, 60, 72, 72) st
R12: Repeat the last round (dc in dc and fpdc in fpdc). Ss to join. (48, 60, 72, 72) st
R13: ch 1, sc in same sp and each st around. Ss to join. (48, 60, 72, 72) st
Fasten off. Weave in ends using Tapestry Needle.
5-10 yr, Sm & Large Adult Cowl
Using H Hook
R1: Fdc 84 (84, 96) join.
R2: Ch 3, fpdc in the next st *dc in the next st, fpdc in the next st* Repeat from * to * around. ss to join. (84, 84, 96) st
R3-R5: Repeat the last round (dc in dc and fpdc in fpdc). Ss to join. (84, 84, 96) st
R6: Ch 3, dc in next st, *fpdc in next 2 st, skip 2 st, fptrc in the next 2 st, fptrc in each of the previous 2 skipped stitches, fpdc in next 2 st, dc in next 4 st.* Repeat from * to * around. Dc in last 2 st. ss to join. (84, 84, 96) st
R7-R8: Ch 3, dc in next st, *fpdc in next 3 st, dc in next 2 st, fpdc in next 3 st, dc in next 4 st.* Repeat from * to * around. Dc in last 2 st. ss to join (84, 84, 96) st
R9: Ch 3, dc in next st, *fpdc in next 2 st, skip 2 st, fptrc in the next 2 st, fptrc in each of the previous 2 skipped stitches, fpdc in next 2 st, dc in next 4 st.* Repeat from * to * around. Dc in last 2 st. ss to join. (84, 84, 96) st
R10-R11: Ch 3, dc in next st, *fpdc in next 3 st, dc in next 2 st, fpdc in next 3 st, dc in next 4 st.* Repeat from * to * around. Dc in last 2 st. ss to join (84, 84, 96) st
R12: Ch 3, dc in next st, *fpdc in next 2 st, skip 2 st, fptrc in the next 2 st, fptrc in each of the previous 2 skipped stitches, fpdc in next 2 st, dc in next 4 st.* Repeat from * to * around. Dc in last 2 st. ss to join. (84, 84, 96) st
R13: Ch 3, fpdc in the next st *dc in the next st, fpdc in the next st* Repeat from * to * around. ss to join. (84, 84, 96) st
R14-R16: Repeat the last round (dc in dc and fpdc in fpdc). Ss to join. (84, 84, 96) st
R17: ch 1, sc in same sp and each st around. Ss to join. (84, 84, 96) st
Fasten off. Weave in ends using Tapestry Needle.
Week 3 of the Twisted Cindy Set CAL is here!
Today we will be doing the Fingerless Gloves Crochet Pattern. Thank you for joining us for the final week of the CAL! I really appreciate all the love and support you all have shown me! I’d really LOVE for you all to swing by Connie’s Crochet Guild to thank her and to let her know what a Blast this has been for you!
Be sure to get your Sets done by October 7, 2020, this is the deadline to win prizes for your versions of the Twisted Cindy Set!
**Using H Hook–if fit is too loose trying going down a Hook size.
Wrist Band
R1: Fdc 14 (16, 18) join.
R2: Ch 3, fpdc in the next st *dc in the next st, fpdc in the next st* Repeat from * to * around. ss to join. (14, 16, 18) st
R3: Repeat the last round (dc in dc and fpdc in fpdc). Ss to join. (14, 16, 18) st
Glove Body
R4: Ch 3, dc in next 2 (3, 4) st, fpdc in next 2 st, skip 2 st, fptrc in the next 2 st, fptrc in each of the previous 2 skipped stitches, fpdc in next 2 st, dc in next 3 (4, 5) st. ss to join. (14, 16, 18) st
R5-R6: Ch 3, dc in next 2 (3, 4) st, fpdc in next 3 st, dc in next 2 st, fpdc in next 3 st, dc in next 3 (4, 5) st. ss to join (14, 16, 18) st
R7: Ch 3, dc in next st, fpdc in next 2 st, skip 2 st, fptrc in the next 2 st, fptrc in each of the previous 2 skipped stitches, fpdc in next 2 st, dc in next 3 (4, 5) st. ss to join. (14, 16, 18) st
Thumb Shaping
R8: Ch 3, 2 dc in next 2 (3, 4) st, fpdc in next 3 st, dc in next 2 st, fpdc in next 3 st, dc in next (3, 4, 5) st. ss to join (16, 19, 22) st
R9: Ch 3, dc in next 4 (6, 8) st, fpdc in next 3 st, dc in next 2 st, fpdc in next 3 st, dc in next (3, 4, 5) st. ss to join (16, 19, 22) st
Thumb Decreases
R10: Ch 3, dc in the next 2 (3, 4) st, skip the next 4 (6, 8) st, fpdc in next 2 st, skip 2 st, fptrc in the next 2 st, fptrc in each of the previous 2 skipped stitches, fpdc in next 2 st, dc in next 3 (4, 5) st. ss to join. (14, 16, 18) st
Top Band
R11: Ch 3, fpdc in the next st *dc in the next st, fpdc in the next st* Repeat from * to * around. ss to join. (14, 16, 18) st
R12: Repeat the last round (dc in dc and fpdc in fpdc). Ss to join. (14, 16, 18) st
R13: ch 1, sc in same sp and each st around. Ss to join. (14, 16, 18) st
R2: Ch 3, fpdc in the next st *dc in the next st, fpdc in the next st* Repeat from * to * around. ss to join. (14, 16, 18) st
R3: Repeat the last round (dc in dc and fpdc in fpdc). Ss to join. (14, 16, 18) st
Glove Body
R4: Ch 3, dc in next 5 (7, 9) st, fpdc in next 2 st, skip 2 st, fptrc in the next 2 st, fptrc in each of the previous 2 skipped stitches, fpdc in next 2 st, dc in next 6 (8, 10) st. ss to join. (14, 16, 18) st
R5-R6: Ch 3, dc in next 5 (7, 9) st, fpdc in next 3 st, dc in next 2 st, fpdc in next 3 st, dc in next 6 (8, 10) st. ss to join (14, 16, 18) st
R7: Ch 3, dc in next st, fpdc in next 2 st, skip 2 st, fptrc in the next 2 st, fptrc in each of the previous 2 skipped stitches, fpdc in next 2 st, dc in next 6 (8, 10) st. ss to join. (14, 16, 18) st
Thumb Shaping
R8: Ch 3, dc in next 2 (3, 4) st, fpdc in next 3 st, dc in next 2 st, fpdc in next 3 st, 2 dc in next (3, 4, 5) st, dc in the last st. ss to join (16, 19, 22) st
R9: Ch 3, dc in next 3 (4, 5) st, fpdc in next 3 st, dc in the next 2 st, fpdc in next 3 st, dc in next 4 (6, 8) st. ss to join. (16, 19, 22) st
Thumb Decreases
R10: Ch 3, dc in the next 2 (3, 4) st, fpdc in next 2 st, skip 2 st, fptrc in the next 2 st, fptrc in each of the previous 2 skipped stitches, fpdc in next 2 st, dc in the next 3 (4, 5) st, skip the next 4 (6, 8) st, dc in next 3 (4, 5) st. ss to join. (14, 16, 18) st
Top Band
R11: Ch 3, fpdc in the next st *dc in the next st, fpdc in the next st* Repeat from * to * around. ss to join. (14, 16, 18) st
R12: Repeat the last round (dc in dc and fpdc in fpdc). Ss to join. (14, 16, 18) st
R13: ch 1, sc in same sp and each st around. Ss to join. (14, 16, 18) st
Fasten off. Weave in ends using Tapestry Needle.
5-10 yr, Sm & Large Adult Gloves **Smaller sizes above**
Using H Hook
First Glove
Wrist Band
R1: Fdc 20 (24, 28) join.
R2: Ch 3, fpdc in the next st *dc in the next st, fpdc in the next st* Repeat from * to * around. ss to join. (20, 24, 28) st
R3-R5: Repeat the last round (dc in dc and fpdc in fpdc). Ss to join. (20, 24, 28) st
Glove Body
R6: Ch 3, dc in next 5 (7, 9) st, fpdc in next 2 st, skip 2 st, fptrc in the next 2 st, fptrc in each of the previous 2 skipped stitches, fpdc in next 2 st, dc in next 6 (8, 10) st. ss to join. (20, 24, 28) st
R7-R8: Ch 3, dc in next 5 (7, 9) st, fpdc in next 3 st, dc in next 2 st, fpdc in next 3 st, dc in next 6 (8, 10) st. ss to join (20, 24, 28) st
R9: Ch 3, dc in next 5 (7, 9) st, fpdc in next 2 st, skip 2 st, fptrc in the next 2 st, fptrc in each of the previous 2 skipped stitches, fpdc in next 2 st, dc in next 6 (8, 10) st. ss to join. (20, 24, 28) st
Thumb Shaping
R10: Ch 3, 2 dc in next 5 (7, 9) st, fpdc in next 3 st, dc in next 2 st, fpdc in next 3 st, dc in next 6 (8, 10) st. ss to join (26, 32, 38) st
R11: Ch 3, dc in next 10 (14, 18) st, fpdc in next 3 st, dc in the next 2 st, fpdc in next 3 st, dc in next 6 (8, 10) st. ss to join. (26, 32, 38) st
Thumb Decreases
R12: Ch 3, dc in the next 2 (3, 4) st, skip the next 5 (7, 9) st, dc in the next 3 (4, 5) st, fpdc in next 2 st, skip 2 st, fptrc in the next 2 st, fptrc in each of the previous 2 skipped stitches, fpdc in next 2 st, dc in next 6 (8, 10) st. ss to join. (20, 24, 28) st
Top Band
R13: Ch 3, fpdc in the next st *dc in the next st, fpdc in the next st* Repeat from * to * around. ss to join. (20, 24, 28) st
R14-R16: Repeat the last round (dc in dc and fpdc in fpdc). Ss to join. (20, 24, 28) st
R17: ch 1, sc in same sp and each st around. Ss to join. (20, 24, 28) st
Fasten off. Weave in ends using Tapestry Needle.
5-10 yr, Sm & Large Adult Gloves **Smaller sizes above**
Second Glove
Wrist Band
R1: Fdc 20 (24, 28) join.
R2: Ch 3, fpdc in the next st *dc in the next st, fpdc in the next st* Repeat from * to * around. ss to join. (20, 24, 28) st
R3-R5: Repeat the last round (dc in dc and fpdc in fpdc). Ss to join. (20, 24, 28) st
Glove Body
R6: Ch 3, dc in next 5 (7, 9) st, fpdc in next 2 st, skip 2 st, fptrc in the next 2 st, fptrc in each of the previous 2 skipped stitches, fpdc in next 2 st, dc in next 6 (8, 10) st. ss to join. (20, 24, 28) st
R7-R8: Ch 3, dc in next 5 (7, 9) st, fpdc in next 3 st, dc in next 2 st, fpdc in next 3 st, dc in next 6 (8, 10) st. ss to join (20, 24, 28) st
R9: Ch 3, dc in next 5 (7, 9) st, fpdc in next 2 st, skip 2 st, fptrc in the next 2 st, fptrc in each of the previous 2 skipped stitches, fpdc in next 2 st, dc in next 6 (8, 10) st. ss to join. (20, 24, 28) st
Thumb Shaping
R10: Ch 3, dc in next 5 (7, 9) st, fpdc in next 3 st, dc in next 2 st, fpdc in next 3 st, 2 dc in next 5 (7, 9) st, dc in the last st. ss to join (26, 32, 38) st
R11: Ch 3, dc in next 5 (7, 9) st, fpdc in next 3 st, dc in next 2 st, fpdc in next 3 st, dc in next 10 (14, 18) st, dc in the last st. ss to join (26, 32, 38) st
Thumb Decreases
R12: Ch 3, dc in the next 5 (7, 9) st, fpdc in next 2 st, skip 2 st, fptrc in the next 2 st, fptrc in each of the previous 2 skipped stitches, fpdc in next 2 st, dc in the next 3 (4, 5) st, skip the next 5 (7, 9) st, dc in next 3 (4, 5) st. ss to join. (20, 24, 28) st
Top Band
R13: Ch 3, fpdc in the next st *dc in the next st, fpdc in the next st* Repeat from * to * around. ss to join. (20, 24, 28) st
R14-R16: Repeat the last round (dc in dc and fpdc in fpdc). Ss to join. (20, 24, 28) st
R17: ch 1, sc in same sp and each st around. Ss to join. (20, 24, 28) st
** Twisted Cindy Set CAL – Prize Announcement **
We have 3 lucky winners! The PRIZES are:
Tami Mascho – 1st Place – Mystery Box and a Crochet Pattern of your choice
Stephanie Elaine – 2nd Place – $30 Jo’s CraftyHook Ravelry store credit
Kristen Temple Taylor – 3rd Place – $20 Jo’s Crafty Hook Ravelry store credit
Below you will find their version of the Twisted Cindy Set. Thank you all for Crocheting-A-Long with me!
If you haven’t yet, be sure to sign up for my Newsletter. I have some GREAT things scheduled in October 2020-February 2021! There will be more FREE crochet patterns here on my website, Blog Hops, helpful instruction classes, another spotlight interview and more!
[yikes-mailchimp form=”1″]
You can find the ad-free pdf crochet patterns at any of the places listed below.
Thank you for your interest in this crochet pattern! Check out some of my patterns at my Ravelry Store Jo’s Crafty Hook Designs or Love Craft Jo’s Crafty Hook Designs or my Etsy Shop JosCraftyHook or at my website joscraftyhook.com! While you are at my website be sure to subscribe to my Newsletter. This way you will be notified when I release another pattern, have a giveaway and more!
If you have any questions or concerns about this pattern or any other pattern please find me at Jo’s Crafty Hook Designs on Facebook or email me at jo@joscraftyhook.com
You are free to sell or gift the item, please do NOT claim this design as your own. Please forward any one who would like to do this crochet pattern or any of my patterns to my Etsy shop, the Ravelry Store, or to my website. The web addresses for any place to connect with me are listed below.
Every purchase of my patterns helps! It allows me to buy more yarn so I can create and design more Handmade Crocheted Creations for you to enjoy.
I would LOVE to see your version of my designs! You can “Hook It” at my Ravelry Jo’s Crafty Hook Designs OR add a pic on my Facebook Page Jo’s Crafty Hook Designs OR at anyone of the places below that allows you to connect with me! Comments, Feedback, etc. are ALWAYS welcome at my website www.joscraftyhook.com!
Jo’s Crafty Hook will be featured in another Blog Hop on August 24, 2020 called the Fall in Love with Autumn Blog Hop. The Fall in Love with Autumn Blog Hop will be going from August 1, 2020 until September 1, 2020. Raelynn of Itchin for Some Stitchin will be hosting the Fall in Love with Autumn Blog Hop, you can find out more about her here!
This page contains affiliate links. You can make a purchase using these links that I provide where I may receive compensation (at no added cost to you.) Purchases you make will help keep my website, Etsy Shop, and my Ravelry Store going and provide quality designs just for you!
The blog hop will feature 32 designers, a different one each day. These crochet and knit designs will consist of things like my Wrapped in Diamonds Wrap, Hats, Scarves, Home Decor, and SO much more! The picture below explains how the blog hop works.
Be sure to sign up for my Newsletter so you don’t miss out on FREE crochet patterns, blog hops, giveaways, and more!
[yikes-mailchimp form=”1″]
Below is the list of crochet designers that will be taking part in the Fall in Love with Autumn Blog Hop:
Be sure to check in each day to take advantage of these crochet designers designs as they will only be good for 24 hours. I know I will be downloading some (or ALL) of these designs myself! lol Click on the button below to take you to the Fall in Love with Autumn Blog Hop.
If you don’t want wait or to come back each day, you can purchase the Fall in Love with Autumn Blog Hop Bundle. You will receive 35 crochet and 2 knit patterns. When you purchase this bundle, 5 of these patterns are bonus patterns that are not available during this blog hop. I saved the best part for last! If you purchase the bundle, you will be saving 90% off of what the patterns would normally cost! How SWEET is that?!? You can purchase the Fall in Love with Autumn Bundle here.
To get my Wrapped in Diamonds Wrap on August 24, 2020 you can use the Coupon Code: LOVEFALL to get a free pdf crochet pattern from my Ravelry Store Jo’s Crafty Hook Designs. You can find the Wrapped in Diamonds Wrap by clicking on the button below. Be sure to use the Coupon Code: LOVEFALL on 8/24/2020.
You can find my crochet patterns at these locations listed below.
Thank you for your interest in this crochet pattern! Check out some of my patterns at my Ravelry Store Jo’s Crafty Hook Designs or Etsy Shop JosCraftyHook or at my website joscraftyhook.com! While you are at my website be sure to subscribe to my Mailing List and Newsletter. This way you will be notified when I release another pattern or blog post!
If you have any questions or concerns about this pattern or any other pattern please find me at Jo’s Crafty Hook Designs on Facebook or email me at jo@joscraftyhook.com
You are free to sell or gift the item, please do NOT claim this design as your own. Please forward any one who would like to do this crochet pattern or any of my patterns to my Etsy shop, the Ravelry Store, or to my website. The web addresses for any place to connect with me are listed below.
Every purchase of my patterns helps! It allows me to buy more yarn so I can create and design more Handmade Crocheted Creations for you to enjoy.
I would LOVE to see your version of my designs! You can “Hook It” at my Ravelry Jo’s Crafty Hook Designs OR add a pic on my Facebook Page Jo’s Crafty Hook Designs OR at anyone of the places below that allows you to connect with me! Pictures, Comments, Feedback, etc. are ALWAYS welcome at my website www.joscraftyhook.com!
Jo’s Crafty Hook is taking part of The Preemie Crochet Challenge. The Preemie Crochet Challenge runs the whole month of August. This is a first annual event being sponsored by Sunflower Cottage Crochet to bring awareness to the challenges faced with premature babies. The Preemie Crochet Challenge 2020 is a charitable event to help preemie babies, families, charities, and the NICU or neonatal intensive care unit at a local hospital.
This page contains affiliate links. You can make a purchase using these links that I provide where I may receive compensation (at no added cost to you.) Purchases you make will help keep my website, Etsy Shop, and my Ravelry Store going and provide quality designs just for you!
The event is like a blog hop. There are 31 crochet designers that will have a free pattern for you to download. Each pattern you download is a pledge you are taking. You are pledging to make at least one item that you download and donate to a family, hospital or charity in November for Preemie Awareness Month.
I designed a blanket specifically for this event, the Sweet Dreams Preemie Blanket. In designing the blanket I incorporated a new stitch that I had just learned, the Crunch Stitch.
I used 490 yards of Premier Sweet Roll in the Color Gelato Pop. I really love the feel and color of this yarn! I used and US I Hook or 5.5 mm Hook. The size of the Sweet Dreams Preemie Blanket is 23” x 23” The blanket can be made bigger or smaller using the stitch count of 2. The Crunch Stitch always starts with a half double crochet and ends with a slip stitch.
Sweet Dreams Preemie Blanket
I wanted to help raise awareness of this event because I remember the struggles my aunt and uncle went through when their baby was born premature. I remember that they didn’t have all of the items a baby needs. I remember my cousin was kept in the hospital in the NICU because he was having problems with his heart. When my cousin came home he was still hooked to a heart monitor. Even though I was a teenager at the time the family was not expecting these problems. He is a healthy young man now. The family came together and supported my aunt and uncle through these times.
Because this cause is so worthy of our time and sacrifice I have decided to extend the free pdf copy of my crochet pattern. From August 10th – August 17, 2020. To take advantage of free pattern, click on the button below and that will take you to my pattern at Ravelry. Use the Coupon Code: PREEMIE2020 at check out.
I would LOVE to see your version of the Sweet Dreams Preemie Blanket! You can add your Project to my crochet pattern at Ravelry. You can also find me on Instagram, Facebook, and Twitter. You will find all of the places to connect with me below. When sharing your version please use #sweetdreamspreemieblanket. Thank you for stopping by Jo’s Crafty Hook! The button below will take you back to the Preemie Crochet Challenge.
You can find my other crochet patterns at these places:
Thank you for your interest in this crochet pattern! Check out some of my patterns at my Ravelry Store Jo’s Crafty Hook Designs or Etsy Shop JosCraftyHook or at my website joscraftyhook.com! While you are at my website be sure to subscribe to my Mailing List and Newsletter. This way you will be notified when I release another pattern or blog post!
If you have any questions or concerns about this pattern or any other pattern please find me at Jo’s Crafty Hook Designs on Facebook or email me at jo@joscraftyhook.com
You are free to sell or gift the item, please do NOT claim this design as your own. Please forward any one who would like to do this crochet pattern or any of my patterns to my Etsy shop, the Ravelry Store, or to my website. The web addresses for any place to connect with me are listed below.
Every purchase of my patterns helps! It allows me to buy more yarn so I can create and design more Handmade Crocheted Creations for you to enjoy.
I would LOVE to see your version of my designs! You can “Hook It” at my Ravelry Jo’s Crafty Hook Designs OR add a pic on my Facebook Page Jo’s Crafty Hook Designs OR at anyone of the places below that allows you to connect with me! Pictures, Comments, Feedback, etc. are ALWAYS welcome at my website www.joscraftyhook.com!
I have a brand new crochet pattern that I want to talk to you about today, the Shelly Crop Top! The Shelly Crop Top is being featured in another Blog Hop! It’s called the Bralettes, Bandeaus, and Crop Tops OH MY!. This blog hop is being sponsored by Pam Carr of Carroway Crochet!
This page contains affiliate links. You can make a purchase using these links that I provide where I may receive compensation (at no added cost to you.) Purchases you make will help keep my website, Etsy Shop, and my Ravelry Store going and provide quality designs just for you!
Each day of the Bralettes, Bandeaus, and Crop Tops OH MY! blog hop you can find either a bralette, a bandeau, or a crop top crochet pattern being featured by an awesome crochet designer! Some of the crochet patterns that you find each day will either be a free or a paid pattern.
On my day, July 20, 2020 I will be offering a $2 discount off a pdf copy of my Shelly Crop Top crochet pattern. You can get my crochet pattern for $3 on July 20, 2020 starting at midnight EST. All you need to do is click on the button below and you will be directed to Ravelry. You will need to use a Coupon Code: OHMY to get the $2 discount. That’s it!
Please sign up for my Newsletter. As a first time subscriber you will receive a special discount. As a new subscriber you will be informed about blog hops, roundups, sales, and coupons. Find out the news ahead of time and receive the special discount!
[yikes-mailchimp form=”1″]
Here is a little bit of information on the Shelly Crop Top to help you decide if you would like to do the Shelly Crop Top crochet pattern.
The Shelly Crop Top is the newest crochet pattern in my Wrapped in Love Line eBook of crochet patterns. All of the crochet patterns inside the eBook can be found in one place, at my Etsy Shop JosCraftyHook here.
Wrapped In Love Headband
Lindsay Silvestrini
Ombre Wave Tank Top
Wrapped In Love Set
Love Gloves
Summer of Love Crochet Pattern
In designing the crochet pattern I used Lion Brand Mandala yarn when crocheting my crop top. You can use any 3 Ply Lightweight yarn or DK weight yarn. I used an I crochet hook or a 5.5mm hook.
The crop top is crocheted as one piece. You start from the bottom and crochet up to the top, working in the round. The crop top is seamless. The only sewing involved is of the front and back straps. The cool thing about the straps is that the pattern repeats in the straps design.
There is even a Video Tutorial in my YouTube library that shows you how to do the repeat rows that make up the crop top. If you check out the Video Tutorial please Subscribe to my YouTube channel. You will be notified when I create more designs, helpful tips and more. You can Subscribe here. You can find the video tutorial here.
Be sure to stop back by Jo’s Crafty Hook where you can find FREE crochet patterns, Roundups, and latest designs that you can find on my website! Thank you for stopping by Jo’s Crafty Hook and reading about my newest design the Shelly Crop Top! If you have any questions about the Shelly Crop Top or anything else, you can email me at jo@joscraftyhook.com.
You can click on the button below and it will take you back to Carroway Crochet and the Bralettes, Bandeaus, and Crop Tops OH MY! Blog Hop.
Find me, Jo of Jo’s Crafty Hook Designs at any one of these places listed below!
Thank you for your interest in this crochet pattern! Check out some of my patterns at my Ravelry Store Jo’s Crafty Hook Designs or Etsy Shop JosCraftyHook or at my website joscraftyhook.com! While you are at my website be sure to subscribe to my Mailing List and Newsletter. This way you will be notified when I release another pattern or blog post!
If you have any questions or concerns about this pattern or any other pattern please find me at Jo’s Crafty Hook Designs on Facebook or email me at jo@joscraftyhook.com
You are free to sell or gift the item, please do NOT claim this design as your own. Please forward any one who would like to do this crochet pattern or any of my patterns to my Etsy shop, the Ravelry Store, or to my website. The web addresses for any place to connect with me are listed below.
Every purchase of my patterns helps! It allows me to buy more yarn so I can create and design more Handmade Crocheted Creations for you to enjoy.
I would LOVE to see your version of my designs! You can “Hook It” at my Ravelry Jo’s Crafty Hook Designs OR add a pic on my Facebook Page Jo’s Crafty Hook Designs OR at anyone of the places below that allows you to connect with me! Pictures, Comments, Feedback, etc. are ALWAYS welcome at my website www.joscraftyhook.com!
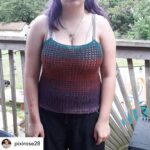
Jo’s Crafty Hook Designs is taking part in another crochet pattern giveaway during this last week of July 2020. I am taking part in the Hooked on Summer Pattern Giveaway is being sponsored by Carroway Crochet. Each week a group of crochet designers’ designs are being featured and their patterns are being given away for free. Find out how you can grab a copy of my Vee Cami crochet pattern below!
This page contains affiliate links. You can make a purchase using these links that I provide where I may receive compensation (at no added cost to you.) Purchases you make will help keep my website, Etsy Shop, and my Ravelry Store going and provide quality designs just for you!
[yikes-mailchimp form=”1″]
The picture below describes how the Hooked on Summer Pattern Giveaway works. There is also a button below that you can click on that will take you to the crochet patterns being given away for free. You can also stop by Carroway Crochet and get the full scoop.
Click on the button below and it will take you to the Hooked on Summer Pattern Giveaway. There you will be shown how you can find each week’s free crochet patterns.
July 24, 2020 thru July 31, 2020 you can find my Vee Cami as a free PDF crochet pattern. Click on the button below my pic to get a free PDF copy of the Vee Cami crochet pattern. The button below will take you to my Ravelry Store Jo’s Crafty Hook Designs. Use the Coupon Code at checkout: HOOKEDONSUMMER to receive your free copy.
The Vee Cami is one of my newest released crochet patterns. There are 9 sizes to choose from. Sizes consist of XSmall up to 5XLarge. The length can be adjusted to fit as a crop top or even a longer cami. This crochet pattern is Beginner Friendly. The stitches consist of the foundation single crochet or the chain stitch if you prefer and the double crochet. that’s it!
Inside the crochet pattern you will find picture tutorials and video tutorials for right and left handed instructions for the foundation single crochet. The cami consist of 2 panels that are sewn together along the sides. The thin straps are then added. The straps are thin just like regular camisoles so it can be worn comfortably under a jacket or sweater or any way you prefer.
You can find my other crochet patterns at the links below.
Thank you for stopping by Jo’s Crafty Hook for the Hooked on Summer Pattern Giveaway! I hope you enjoy each week’s free crochet patterns! Please direct all your yarn friends to this Hooked on Summer Pattern Giveaway!
I would really LOVE to give a shout out to all of my wonderful pattern testers! Thank you Elaine Gialouris, Christina Anderson, Xander Valdez, Melanie Morrell, Amber Kidwell Dupre, and Brucene Plass! As you can see they did an Awesome job!
Elaine Gialouris
Christina Anderson
Xander DB Valdez
Melanie Morrell
Amber Kidwell Dupre
Brucene Plass
If you have liked what you have seen here at Jo’s Crafty Hook, be sure to sign up for my Newsletter. By signing up you will receive notices regarding more pattern giveaways, free crochet patterns, sales, coupons, and more! Just fill out the form below so you don’t miss out on the goodies at Jo’s Crafty Hook!
[yikes-mailchimp form=”1″]
Find me, Jo of Jo’s Crafty Hook at any one of these places listed below!
Thank you for your interest in this crochet pattern! Check out some of my patterns at my Ravelry Store Jo’s Crafty Hook Designs or Etsy Shop JosCraftyHook or at my website joscraftyhook.com! While you are at my website be sure to subscribe to my Newsletter. This way you will be notified when I release another pattern or blog post!
If you have any questions or concerns about this pattern or any other pattern please find me at Jo’s Crafty Hook Designs on Facebook or email me at jo@joscraftyhook.com
You are free to sell or gift the item, please do NOT claim this design as your own. Please forward any one who would like to do this crochet pattern or any of my patterns to my Etsy shop, the Ravelry Store, or to my website. The web addresses for any place to connect with me are listed below.
Every purchase of my patterns helps! It allows me to buy more yarn so I can create and design more Handmade Crocheted Creations for you to enjoy.
I would LOVE to see your version of my designs! You can “Hook It” at my Ravelry Jo’s Crafty Hook Designs OR add a pic on my Facebook Page Jo’s Crafty Hook Designs OR at anyone of the places above that allows you to connect with me! Pictures, Comments, Feedback, etc. are ALWAYS welcome at my website www.joscraftyhook.com!
If you would like to donate to Jo’s Crafty Hook you can definitely do so. Any amount would help me to keep my website going, help me with buying yarn for new designs, and even offering more free crochet patterns to my website! Thank you very much for your support!
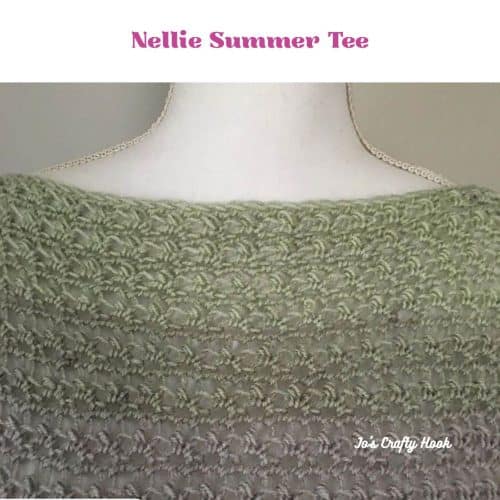
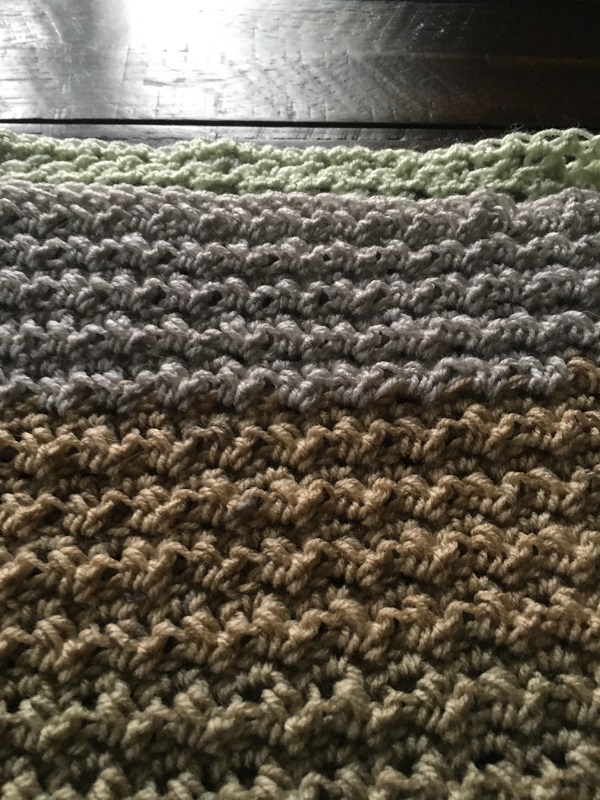
Today I would LOVE to share with you another free crochet pattern by Jo’s Crafty Hook Designs! The Nellie Summer Tee Free Crochet Pattern started with a new stitch, the N-Stitch. I learned the N-Stitch during the Spring while testing for another great crochet designer group, Sunflower Cottage Crochet.
This page contains affiliate links.
If you have never crocheted the N-Stitch, I have a great one you can find on my YouTube Channel.
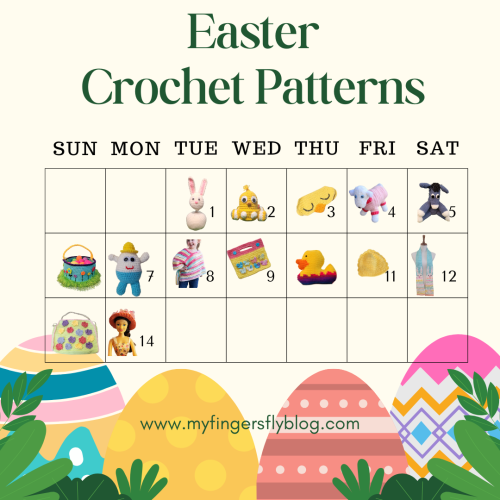
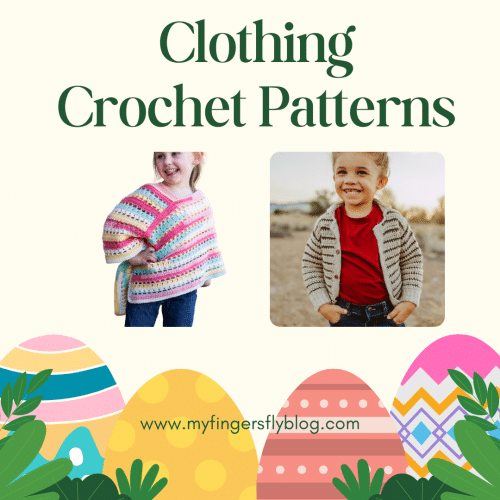
Easter and Spring is a great time to add new items to your wardrobe. My Fingers Fly is hosting an Easter Advent Calendar Event that has FREE crochet patterns to help you crochet these things.
Day 8 – Clothing
The Nellie Summer Tee Crochet Pattern is being featured in the Easter Advent Calendar Event along with clothing from My Fingers Fly. You can find free crochet patterns her, the Pinstripe Sweater and the Tutti Frutti Poncho.
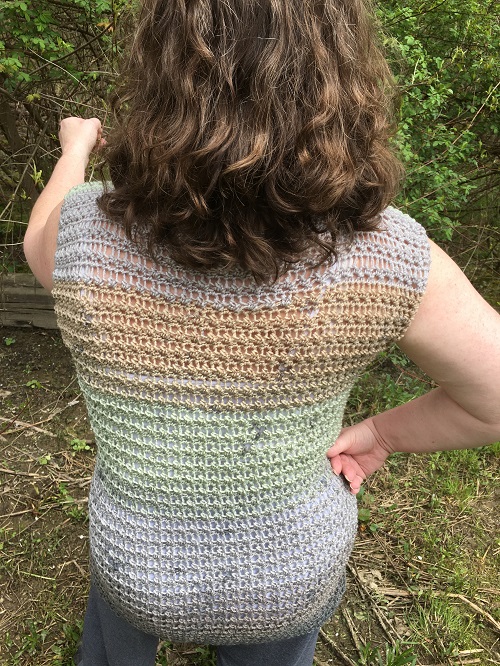
My crochet pattern testers fell in LOVE with the N-Stitch just like I did! I would LOVE to give them a BIG shout out because they worked really hard on this design. There were many hiccups because of the trying times we are in right now. There were yarn delivery delays, finding time to finish the test, and just trying to function during these troubled times.
I appreciate EVERY single one of them! They are Jolanta Urb, Anita Reinisch, L. Holly George, and Laina Mann Malcolm. Below are their versions of the Nellie Summer Tee.
Jolanta Urb
Anita Reinisch
L. Holly George
Nellie Summer Tee
Nellie Summer Tee Crochet Pattern
If you would like to receive news when I release another free crochet pattern, or take part in another giveaway, or when I am having a sale please use the form below to sign up for my Newsletter.
Nellie Summer Tee Free Crochet Pattern
Nellie Summer Tee Crochet Pattern
Finished Sizes
Size
Bust Size
Width of Panel
Length of Panel
Neck Opening
Armhole Opening
XSmall
34
16”
22”
9.5”
6.5”
Small
36
18”
24”
10”
7”
Medium
38
20”
24”
10”
7”
Large
42
22”
26”
11”
7.5’
XLarge
46
24”
26”
11”
7.5”
2XLarge
50
26”
28”
11.5”
8”
3XLarge
54
28”
28”
11.5”
8.5”
4XLarge
58
30”
30”
12”
9”
5XLarge
62
32”
32”
12”
9.5”
Materials:
800-1400 yards #3 Light Weight Yarn or DK Yarn US Hook J or 6 mm Tapestry Needle Scissors Stitch Markers
Gauge: 12 stitches x 12 rows = 4”
Gauge Swatch: You will be crocheting a 6” x 6” Swatch and use the N Stitch repeats to find your 4”
R1: fsc 18 or chain 19 and s in 2nd chain from hook and each st across. Ch 1 and Turn. R2: sc in 1st, hdc, and N stitch until 2 st remain. Hdc in the next st and sc in the last st. Ch 1 and Turn. R3: sc in 1st and each st across. R4-R17: Repeats R2-R3 R18: Repeat R2 once more
Abbreviations/Stitches:
FSC = Foundation Single Crochet CH = Chain SC = Single Crochet ST(S) = Stitch(es) NS = N Stitch SP = Space RS = Right Side WS = Wrong Side
Special Stitch: The N Stitch
Sk 1 st
hdc in the next st
insert hook from the top to the bottom of the front loop of the skipped stitch
YO, pull up a loop,
YO, pull through one loop
YO, insert the hook back into the same st as the hdc, YO, pull up a loop,
YO, pull through all 4 loops on hook.
The Left Handed Version of the N-Stitch
Notes:
Stitch count is a multiple of 2 Ch 1 does not count as a stitch The sizes are XSmall (Small, Medium, Large, XL, 2X, 3X, 4X, 5X) consecutively
Video Tutorials:
N Stitch Right Handed Version here. N Stitch Left Handed Version here. Foundation Single Crochet Right Handed Version here. Foundation Single Crochet Left Handed Version here.
If you found my Video Tutorials helpful, please subscribe to my YouTube Channel so you can be notified when I release another helpful tutorial.
Optional: Chain 49 (55, 61, 67, 73, 79, 85, 91, 97), sc in 2nd chain and each st across. Turn. 48 (54, 60, 66, 72, 78, 84, 90, 96) st
R2 (RS): Ch 1 and sc in same st, hdc in the next st and NS to the last 2 st. Hdc in the next st and sc in the last st. Turn
R3 (WS): Ch 1, sc in the same st and each st across. Turn
R4 – 67 (73, 73, 79, 79, 83, 83, 89, 95): Repeat R2 & R3 or until you reach your corresponding length. 22 (24, 24, 26, 26, 28, 28, 30, 32)
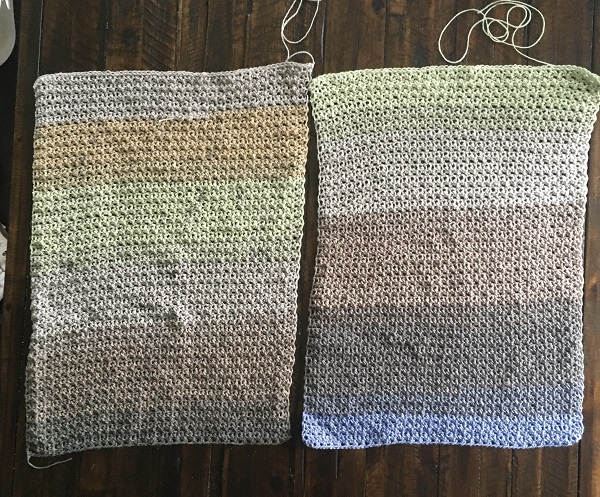
Leave a long tail for sewing shoulders closed.
Sides:
Lay Right Sides of the panels facing each other.
Use the Table at the top of the pattern for the size of your Armholes. I measured from the top of the panels and placed Stitch Markers where you will stop when sewing sides closed.
Start at the bottom of the panels and sew the sides together using the Whip Stitch, or Mattress Stitch until you get to the Armholes.
If you would like more room at the hips, leave a 2”-4” slit at the bottom on each size of the Panels. I made a 2” slits.
Shoulders:
Using the Table at the top of the pattern, find the size of the neck hole opening.
Place your Stitch Marker where you want to stop the opening on both sides of the top.
Sew the panels together using the Whip Stitch or whichever method you prefer to sew the shoulders closed.
If you have any questions regarding the Nellie Summer Tee Free Crochet Pattern, please don’t hesitate to contact me at jo@joscraftyhook.com. I would LOVE to hear what you think of the Nellie Summer Tee, so please leave a comment or feedback below.
Below are the testers’ version of their Nellie Summer Tee. Please share YOUR version of the Nellie Summer Tee with me on Instagram, Facebook, or any of the social media sites listed below. Please use #nelliesummertee or #joscraftyhookdesigns when you do share your version with me.
Jolanta Urb
Anita Reinisch
L. Holly George
Nellie Summer Tee Crochet Pattern
Nellie Summer Tee
Find me, Jo of Jo’s Crafty Hook Designs at any one of these places listed below!
Thank you for your interest in this crochet pattern! Check out some of my patterns at my Ravelry Store Jo’s Crafty Hook Designs or Etsy Shop JosCraftyHook or at my website joscraftyhook.com! While you are at my website be sure to subscribe to my Mailing List and Newsletter. This way you will be notified when I release another pattern or blog post!
If you have any questions or concerns about this pattern or any other pattern please find me at Jo’s Crafty Hook Designs on Facebook or email me at jo@joscraftyhook.com
You are free to sell or gift the item, please do NOT claim this design as your own. Please forward any one who would like to do this crochet pattern or any of my patterns to my Etsy shop, the Ravelry Store, or to my website. The web addresses for any place to connect with me are listed below.
Every purchase of my patterns helps! It allows me to buy more yarn so I can create and design more Handmade Crocheted Creations for you to enjoy.
I would LOVE to see your version of my designs! You can “Hook It” at my Ravelry Jo’s Crafty Hook Designs OR add a pic on my Facebook Page Jo’s Crafty Hook Designs OR at anyone of the places below that allows you to connect with me! Pictures, Comments, Feedback, etc. are ALWAYS welcome at my website www.joscraftyhook.com!
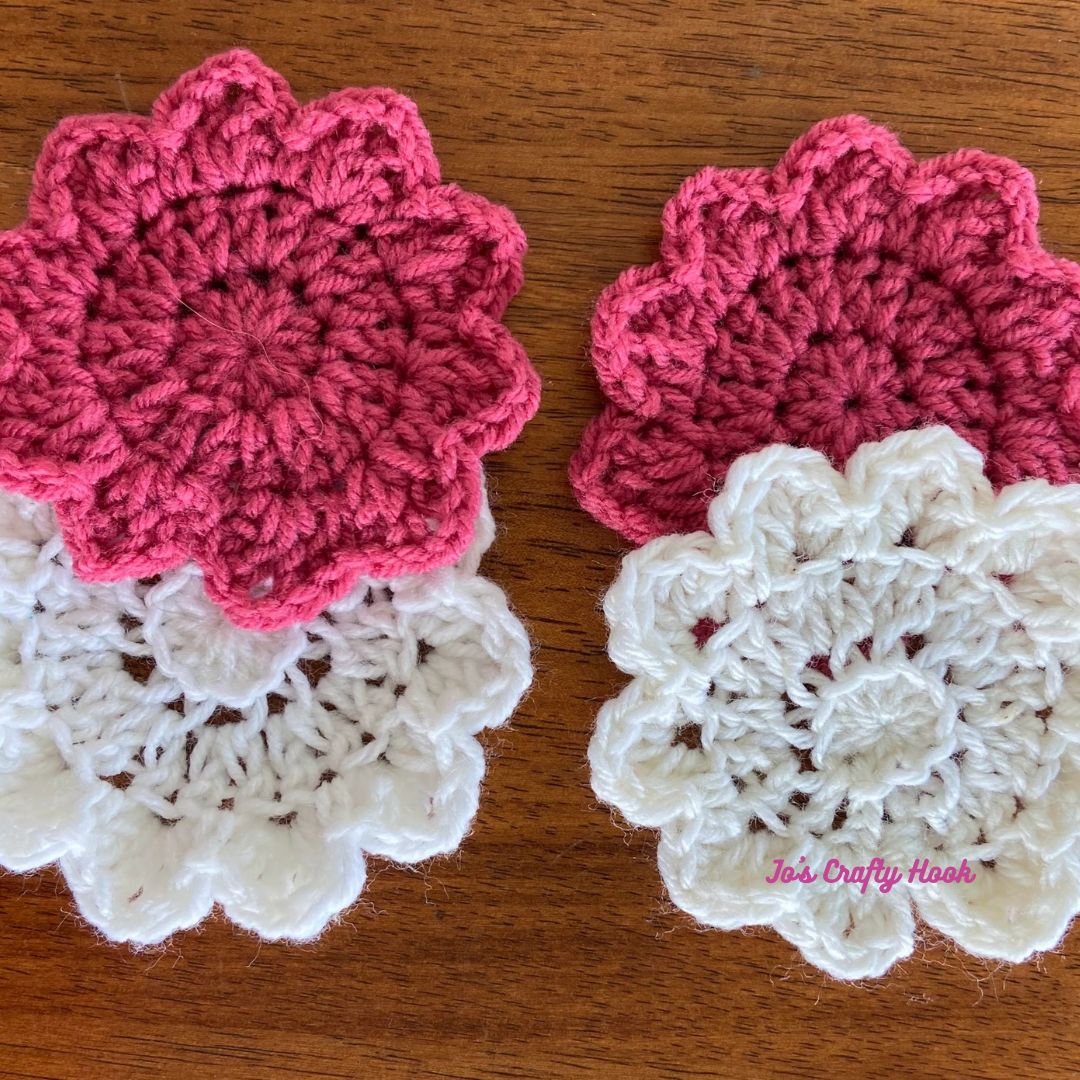
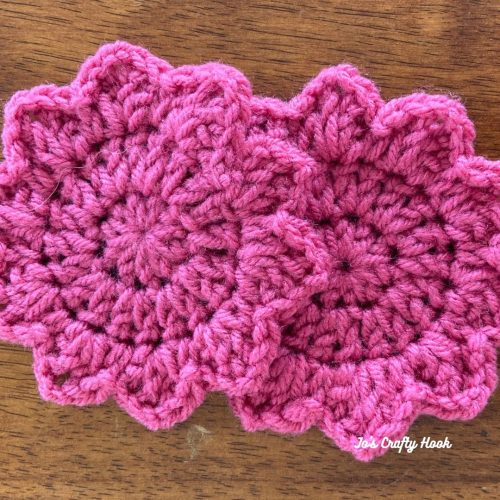
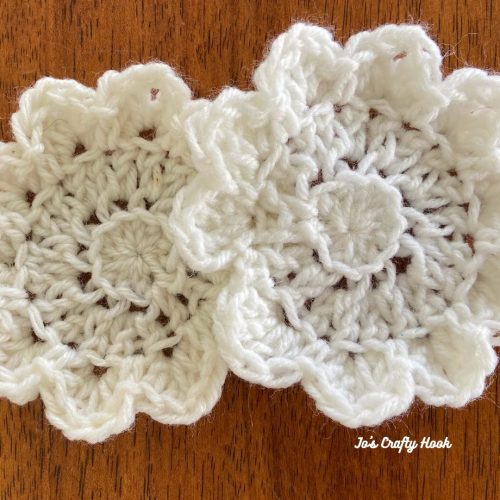
Today we are making the Star Flowers I used in my version of the Blooming Flowers Wall Hanging. I made 4 of each of the 2 versions below.
The Star Flowers Crochet Pattern works up super fast! There are only 3 rounds. There are 2 versions of the Star Flowers Crochet Pattern, so you can make as many of these as you like to add to your wall hanging.
Yesterday we made the Large Flower Blossoms. If you missed yesterday’s flower, you can find the Large Flower Blossom Crochet Pattern HERE on my website.
This page contains affiliate links.
Shop LoveCrafts and find beautiful colors of yarn to use for your flowers!
If you have missed any of the days of the Blooming Flowers Wall Hanging CAL, I do have a Blooming Flowers Wall Hanging eBook you can get at a discounted price of $3 at my Ravelry Store.
My finished Blooming Flowers Wall Hanging
2 Free Versions of Star Flowers Crochet Pattern below
Star Flowers
Star Flowers
Information Needed for Both Versions
Materials: 10-15 yards of #4 ply Worsted Weight Yarn
US J or 6 mm Crochet Hook
Tapestry Needle
Scissors
Abbreviations/Stitches Used:
ch = chain
sc = single crochet
scblo = single crochet in back loop only
hdc = half double crochet
dc = double crochet
dcblo = double crochet in back loop only
sl st = slip stitch
rep = repeat
Size: 4”x 4″ round
Notes:
ch 3 counts as a double crochet If you would like you can change colors after each round.
1st Version of the Star Flower Crochet Pattern
R1: Make a Magic Circle, 10 hdc in Magic Circle. Pull Magic Circle closed. sl st in 1st st to join. (10 hdc)
R2: ch 3, dc in same st, 2 dc in each st around. sl st in top of ch-3 to join. (20 dc)
R3: ch 3, dc in same st. ch 1, 2 dc in same st (1st Shell Made), sc in next st, *(2 dc, ch 1, 2dc) all in the next st (2nd Shell Made), sc in next st. rep from * around. sl st in top of ch-3 to join. (10 Shells)
Fasten off and weave in ends.
You are done! These work up so fast you can make them in under 10 minutes!
2nd FREE Version of the Star Flowers Crochet Pattern
2nd Version
R1: Make a Magic Circle, 10 hdc in Magic Circle. Pull Magic Circle tight to close. sl st in 1st hdc to join. (10 hdc)
R2: ch 3, dc in same st, 2 dcblo in each st around. sl st in top of ch 3 to join. (20 dc)
R3: (ch 3, dc, ch 1, 2 dc) all in same sp (1st Shell Made), scblo in next st, (2 dcblo, ch 1, 2 dcblo) all in next st (2nd Shell Made), scblo in next st. rep from * around. sl st in top of ch 3 to join. (10 Shells & 10 sc)
Fasten off and weave in ends
You are done! Use any type of yarn, they work up in less than 10 minutes!


 If you have never crocheted the