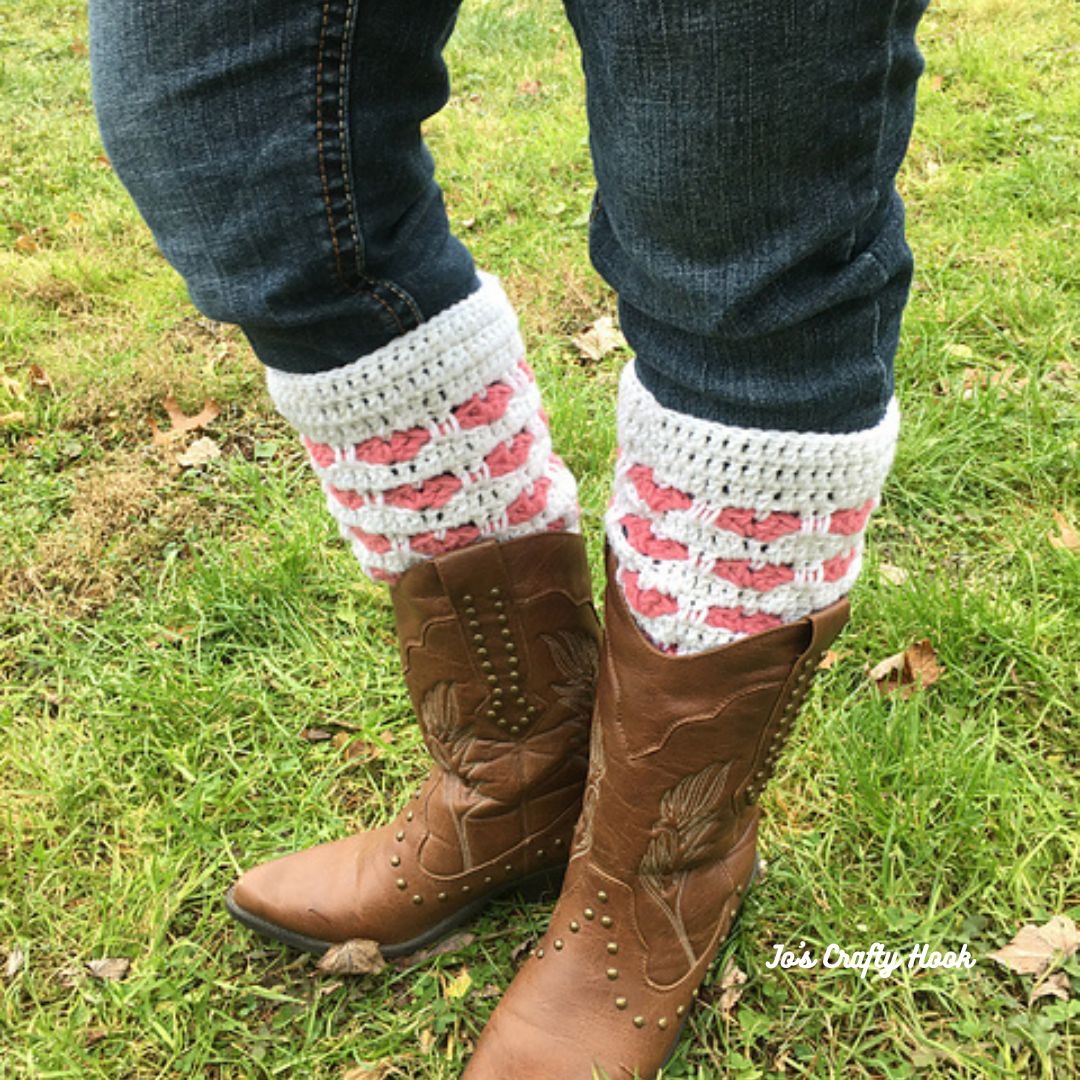
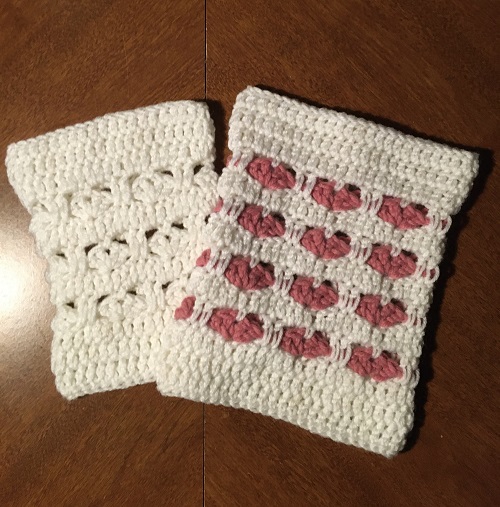
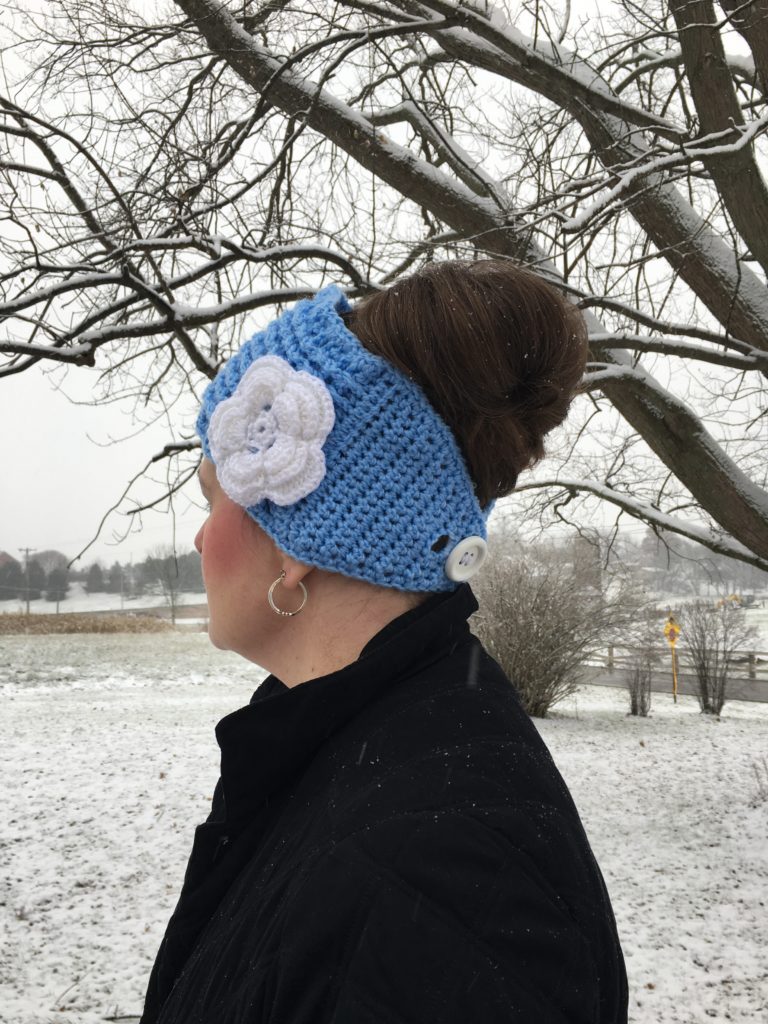
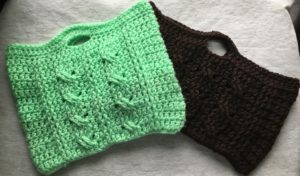
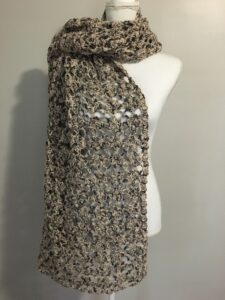
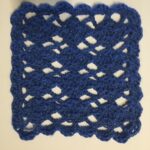
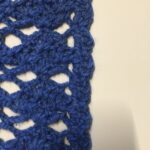
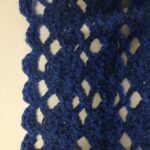
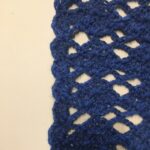
Who doesn’t love ❤️ dressing up their wardrobe? Why not dress up your boots as well? In today’s post you will find a FREE copy the Wrapped in Love Boot Cuffs Crochet Pattern. This is a great crochet pattern to make for Valentine’s Day or any time of the year.
Wrapped in Love Boot Cuffs
This post contains affiliate links.
Don’t miss out on what Jo’s Crafty Hook will be doing by signing up for my Newsletter. When you sign up you will receive a FREE premium crochet pattern sent right to your inbox!
You can get a premium copy of my Wrapped in Love Boot Cuffs crochet pattern for a small fee at my Ravelry Store. Inside the crochet pattern you will find written instructions for 5 sizes and Picture and Video Tutorials all in a PDF you can keep going back to.
Wrapped in Love Boot Cuffs Crochet Pattern
Wrapped in Love Boot Cuffs
Materials: US H Hook or 5 mm MC-200-400 yards of #4 Worsted Weight Yarn CC-10-40 yards of #4 Worsted Weight Yarn Scissors Tapestry Needle
Gauge: US H Hook or 5 mm Hook
8 dc x 4 rows = 2″
Stitches Used: ch = chain ch sp = chain space st = stitch sc = single crochet dc = double crochet sl st = slip stitch alt ch 2 = alternate chain 2 fdc = foundation double crochet ldc = long double crochet beg shell = beginning shell shell = shell MC = Main Color CC = Contrasting Color
Special Stitches:
Beginning Shell = alt ch 2, dc, ch 1, 2 dc all in the same stitch
Shell = 2 dc, ch 1, 2 dc all in the same stitch
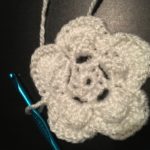
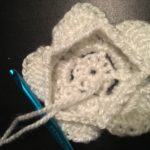
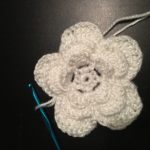
beg shell here
shell here Changing Colors here long double crochet here
Notes:
The boot cuffs are worked in the round. Slip stitch into the 1st stitch, the chain space or the stitch specified.
alt ch 2 DOES count as a dc.
Shell rows create the heart.
If you want to change colors for the hearts, you would do it on the shell rows.
There are helpful hints for using the MC and CC below the Adult Size pattern.
Sizes are for child, teen, small adult, medium adult, and large adult. ………………………………………………………………………………………………………………
Wrapped in Love Boot Cuffs – Child Size Crochet Pattern
Be sure to measure you calf before you crochet the cuffs. You also need to take into account that you will be wearing the boot cuffs over you pant legs.
Boot Cuffs:
If you want to do a bigger size or see how to change colors for the hearts, you can purchase a pdf copy of the crochet pattern for $3 from Ravelry.
There are helpful hints for using the MC and CC below the Adult Large size
There are Video Tutorials showing you how to crochet the Repeat Rows on my YouTube Channel
Child Size:
Leave a long tail for sewing the foundation row closed.
R1: fdc 28 sl st in beginning fdc to join. 28 fdc
Optional: ch 30, dc in 4th ch from hook and in each remaining st. sl st in 1st ch to join. 28 dc
Use Tapestry Needle to close FDC.
R2: alt ch 2 and dc around. 28 dc
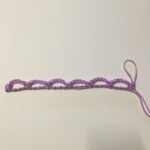
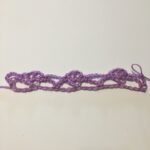
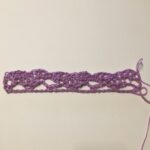
R3: sl st into 1st dc. [alt ch 2, dc, ch 1, 2 dc all in the same stitch. (beg shell) made] ch 2, skip 6 st, 2 dc, ch 1. 2 dc all in the same stitch. (shell made). *ch 2, skip 6 st, shell in next st.* Repeat from * to * around. ch 2 and sl st in top of alt ch 2 of beg shell. 4 shells
R4: sl st over to ch 1 sp of beg shell, ch 1, sc in same st., *ch 2, skip 2 dc from previous row, 1 ldc in next 2 st, ch 2, sc in ch 1 space of next shell.* Repeat from * to * around. sl st in sc to join.
R5: alt ch 2 in first st and dc in each remaining st. 28 dc
R6-R8: Repeat R3-R5
R9-R10: alt ch 2 in first st and dc in each remaining st around. 28 dc
Fasten off and weave in the ends. ………………………………………………………………………………………………………………
You can find more of my crochet patterns at these locations listed below.
Don’t miss out on what Jo’s Crafty Hook will be doing by signing up for my Newsletter. When you sign up you will receive a FREE premium crochet pattern sent right to your inbox!
Find me, Jo of Jo’s Crafty Hook at the places listed below.
The Autumn Hues Wrap crochet pattern uses basic crochet stitches and can be customizable. You can make a Scarf, Table Runner, Motif Squares and more. You will find the Autumn Hues Wrap as a free crochet pattern below.
This slideshow requires JavaScript.
My Autumn Hues Wrap Crochet Pattern is being featured in the All About Fall Blog Hop hosted by Carroway Crochet on September 6, 2023. You can get a FREE premium copy for 24 hours, starting at 11a EST on September 6-7, 2023.
This post contains affiliate links. If you make a purchase using these links I may receive compensation (at no added cost to you.)
**While you are here why not sign up for my Newsletter by using the Subscribe button in the Right Hand Corner**
From September 1-29, 2023 you will find some great Fall crochet patterns you get can for free for 24 hours. Visit the All About Fall Blog Hop each day to find out how.
If you would like ALL of these premium crochet patterns ALL in one place, you can purchase the All About Fall Bundle for $12.99. This bundle contains ALL 29 premium crochet patterns being offered in the All About Fall Blog Hop.
So on my day, September 6, 2023, visit the Main Post to get the Coupon Code needed for your free copy of my Autumn Hues Wrap Crochet Pattern.
Then from September 6-7, 2023 from 11a EST to 11a EST visit my Ravelry Store to get you a FREE premium copy of the Autumn Hues Wrap Crochet Pattern!
Also, you will find more awesome crochet designs each day at the All About Fall Blog Hop or by purchasing the All About Fall Bundle for $12.99!
Autumn Hues Wrap Free Crochet Pattern
Information Needed to Crochet the Autumn Hues Wrap
Skill Level: Beginner
US Terminology
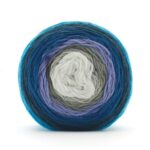
Yarn Used: I used 8 colors of Worsted or Aran Weight Yarn in a variety of brands.
One Size: 21” x 68”
Materials: US H or 5 mm Crochet Hook 800-1000 yds of 4 ply Worsted or Aran Weight Yarn Scissors Tapestry Needle
Abbreviations/Stitches Used: ch = chain sc = single crochet dc = double crochet sl st = slip stitch sp = space rep = repeat
Notes: ch 3 counts as a double crochet The stitch count is a multiple of 7 + 2 I used the Chirpy Picot Stitch from Crochet ‘n’ Create
Special Stitches: Picot – ch 3, sc in 3rd ch from hook. Shell – (2 dc, ch 2, 2 dc) all in the same space.
Gauge: US H Crochet Hook or 5 mm 16 st x 8 rows = 4”
Autumn Hues Wrap Free Crochet Pattern below
4” x 4” Gauge Swatch: R1: ch 16, shell in 6th ch from hook, * picot (see notes) sk 6 ch, shell in next ch. rep from * until last 3 ch. sk 2 ch, dc in last ch. ch 3 and turn.. R2: shell in next ch 2 sp, *work picot, shell in next ch-2 sp, rep from * until last ch-2 sp of last ch-5 sp. work picot, shell in the ch-2 sp, dc in the top of ch 3. ch 3 and turn R3-R8: shell in the next ch-2 sp, * work picot, shell in next ch-2 sp. rep from * to the last ch-2 sp and ch 3, work picot, shell in ch-2 sp, dc in top of ch 3. turn.
Customizing: Width: To create a wider wrap add multiples of 7. Length: Use your Height plus 4” – 8” to reach your desired length by continuing to repeat R3. After you have reached your desired length, move on to the border.
R1: ch 86, shell in 6th ch from hook, * picot, sk 6 ch, shell in next ch. * rep from * until last ch 3. sk 2 , dc in last ch. ch 3, turn. R2: shell in next ch-2 sp, *work picot, shell in next ch-2 sp. rep from * until last ch-2 sp and the ch-5 sp, work picot, shell in ch-2 sp, dc in top of ch 3. ch 3, turn. R3: shell in the next ch-2 sp. * work picot, shell in next ch-2 sp, rep from * until last ch-2 sp and ch 3, work picot, shell in the ch-2 sp, dc in top of ch 3. ch 3, turn. Repeat R3 until you reach your desired length. Last Row: ch 1, sc in the same st. sc in next st, *ch 6, sk picot, sc in ch-1 sp of shell. rep from * until the last 2 st, sc in the last 2 st. 51 st Do not turn after your final row.
Border: down the side: shell in the last st of final row and turn to the side of wrap, *picot, sk next side post, shell in the next side post. repfrom * until the corner. shell in the corner. bottom: turn to crochet in the starting ch. *picot, shell in the next ch-6 sp. rep from * until the corner. shell in the ch-3 sp of the corner. up the 2nd side: turn to crochet up the 2nd side. *picot, sk side post, shell in the next side post. rep from * until the corner. shell in the corner. top: turn to crochet across the top, *picot, shell in next ch-6 sp. rep from * until the starting corner. sl st in 1st dc of shell to join. Fasten off and weave your ends.
My crochet pattern tester, Nancy McKain, did use the design to make a Table Runner because she lives in Arizona, who would want to wear a wrap in that weather?!? 😀
I would LOVE to see your finished version! Share your pics with me at any of my social media sites above using the hashtags below. You can find all of my social media sites at the beginning of the pattern.
The Shades of Autumn Blog Hop hosted by Agat Gootie of Made by Gooties started already, October 1, 2021. I am collaborating in this event and I am giving away a free pdf copy of my Acacia Skirt Crochet Pattern on October 5, 2021!
This post contains affiliate links. If you make a purchase using these links I may receive compensation (at no added cost to you.)
The image below tells you how the Shades of Autumn Blog Hop works.
To get the free crochet pattern offered daily by a different crochet designer, you will visit the blog hop from Made by Gootie by clicking on the image below.
The Acacia Skirt Crochet Pattern was released in early September. I am so proud of this new design, as this is my first skirt crochet pattern. Let me tell ya, it won’t be my last!
This new design has a technique I have never used before, it uses your body type. It can be customized to fit you from your waist to your hips to the body of the skirt! There are also 3 length suggestions inside the pattern that you can choose from or you can crochet it to fit your own custom length.
On October 5, 2021, my day, be sure to visit the round up post to get the Coupon Code needed to get a free pdf copy of my Acacia Skirt crochet pattern. Click on the image below and you will be directed to my pattern at Ravelry where at Checkout you can insert the Coupon Code provided.
Be sure to sign up for my Newsletter while you are here at my website. As a new subscriber you will receive news about upcoming sales, new free crochet patterns, giveaways and more!
[yikes-mailchimp form=”1″]
You can find out more information about the Acacia Skirt crochet pattern below. There you can decide for yourself if you want a free pdf copy of the pattern.
If you decide you don’t have time to visit the blog hop daily, you can purchase the Shades of Autumn Blog Hop Bundle. Inside the bundle you will find 22 crochet patterns, instead of 20 for $8.99. This is 90% off the retail price of all 22 crochet patterns! Also before checkout Agat is offering her 5 Mindless Crochet Stitches eBook for 25% off! Click on the image below to purchase a copy of the Shades of Autumn Blog Hop Bundle!
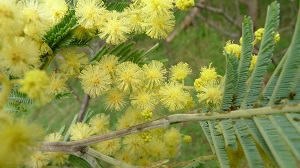
The name of the skirt is a little different. I used the Wattle Stitch as the main stitch for the body of the skirt. When you think of the word wattle, you think of that fleshy, flabby stuff that is found on roosters or turkeys lol that is not the definition I wanted for the skirt. lol So I looked up the meaning of wattle and that is where I found out the name Acacia. An acacia is a type of flower that can be found in Australia and the branches and stalks are used for a type of fencing or walls. Below is a picture of an acacia flower.
If you don’t crochet or don’t have the time to make one for yourself or family or friends, I would be more than happy to crochet one for you! You can fill out the Custom Order Form below or email me at jo@joscraftyhook.com and we can discuss how to make it to fit your style, size, and color(s)!
[wpforms id=”644″]
Below you will find some details about the acacia skirt that are part of the pattern and can help you decide if you would like to crochet this skirt for yourself or someone you know.
Notes: The waistband is worked in the round. The rest of the skirt is worked in rows and are joined. Alt ch 2 or ch 2 counts as a half double crochet. There are 3 parts to the skirt, the Waist, the Hips, and the Body. Sizes range from 24” 26” 28” 30” 32” 34” 36” 38” 40” consecutively. If you need a wider waist, you can use the gauge and adjust your stitch count accordingly.
There are 2 types of ties for the waistband that can be found at the end of the pattern as another option to add to your skirt.
Gauge: US H Hook or 5mm 12 hdc x 12 rows = 4”
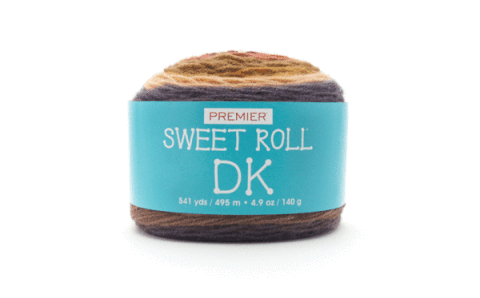
I used Lion Brand Mandala Yarn, if you can not find that or would like to try a new kind of Light/DK Weight Yarn, you can try Premier’s Sweet Rolls DK. I just bought some in Iceberg and let me tell ya………it is Heavenly! You can get 10% off your order until 10/4/21. Click on the image below and use my affiliate link to buy some today!
I have also used Paintbox DK from LoveCrafts on more than one occasion. Their yarn is SO dreamy! They actually have a sale going on, 10% off their Paintbox Cotton DK 5 Colorway or Stylecraft DK 5 Colorway this week. Click on the image below and use my affiliate link to buy some today!
If you would like to purchase a copy of the Acacia Skirt crochet pattern, it can be found at my Ravelry Store and Etsy Shop. If you are not an email subscriber, then now would be the perfect time to sign up! As a new subscriber, you will get $3 off to be used at my Ravelry Store, so you can apply this to the purchase of the Acacia Skirt Crochet Pattern!
[yikes-mailchimp form=”1″]
I am SO proud of my testers and their versions of the Acacia Skirt! They all customized the pattern to fit their size and length preference. Thank you Kami Jones, Beth Bjerklie, Rachael Knights, Sallyanne Fisher, Becky Cupin, Danielle Hanken Tetreault, and Emily Funk! Check out their gorgeous work below!
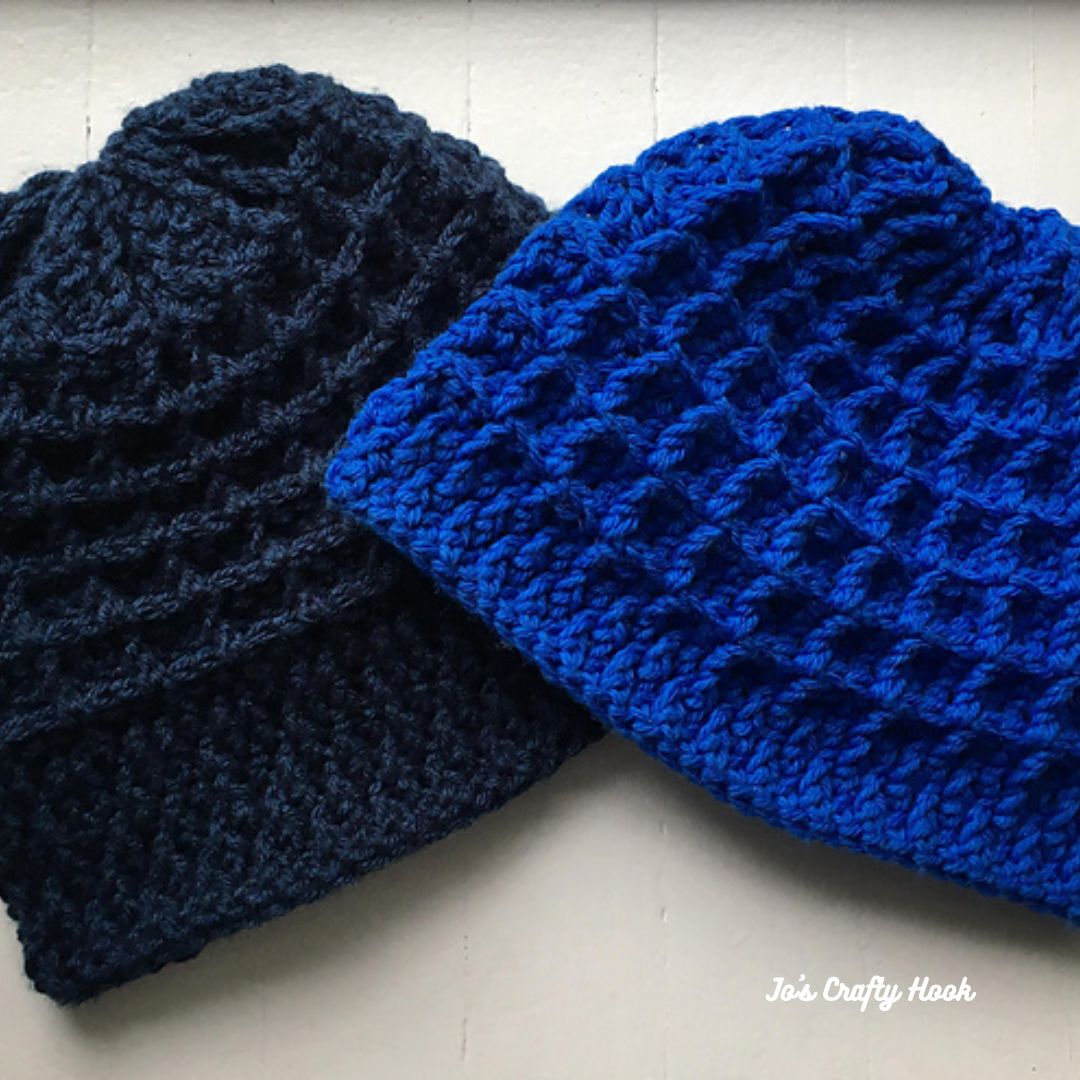
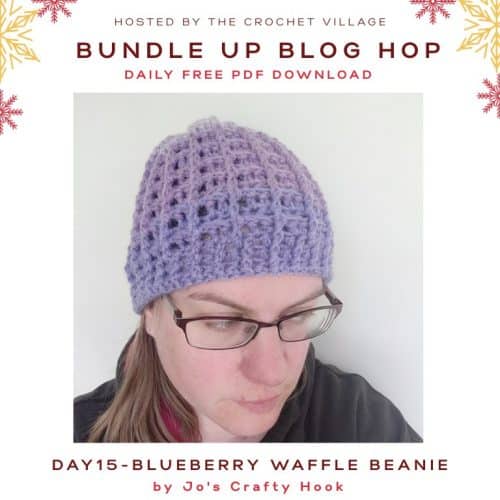
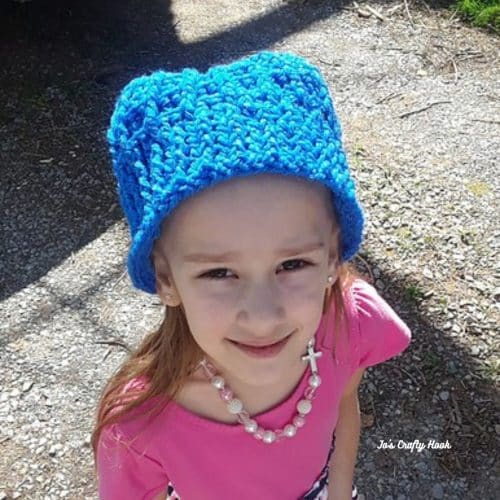
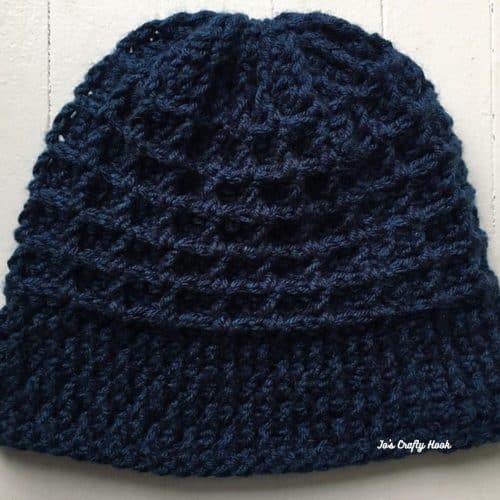
The BlueBerry Waffle Beanie Crochet Pattern uses the Waffle Stitch that creates a beautiful textured look.
I designed the BlueBerry Waffle Beanie with 2 versions for Lion Brand’s #HatNotHate drive that increases awareness about Bullying. Here is what Lion Brand has to say about #HatNotHate:
“With #HatNotHate Lion Brand Yarn hopes to increase awareness on the impact of bullying has on children, teens and adults by rallying together and crafting blue hats to proudly wear throughout the month of October, National Bullying Prevention Month. With your help we hope to create a new “craftivist” movement to send the message that bullying in unacceptable.”
If you would like to donate your version(s) of the BlueBerry Waffle Beanie, the address is listed below the BlueBerry Waffle Beanie Free Crochet Patterns.
This page contains affiliate links
Be sure to sign up for my Newsletter and receive a FREE premium copy of my Rolling Shells Infinity Scarf Crochet Pattern. You will also receive messages about New Crochet Pattern Releases; FREE Crochet Patterns; Collaborations and more!
Visit the Landing Page below. Once you subscribe you will receive a Thank You email with the link to the crochet pattern sent right to your inbox!
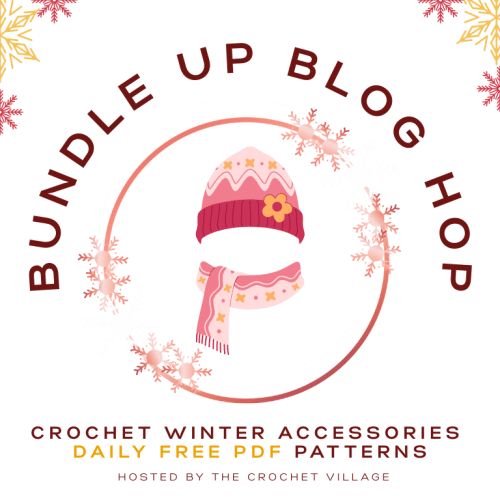
My BlueBerry Waffle Beanie Crochet Pattern is being featured in this great blog hop!
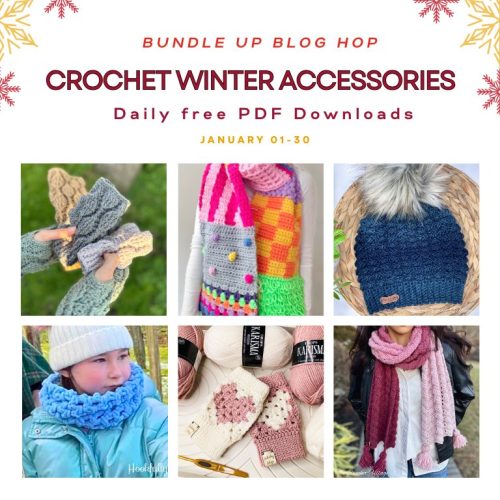
From now until December 30, 2026 you can take advantage of daily FREE crochet patterns during the Bundle Up Blog Hop 2026 hosted by The Crochet Village.
My Featured Day is January 11-12, 2026
For 24 hours you can get a FREE premium copy of my BlueBerry Waffle Beanie Crochet Pattern as part of the Bundle Up Blog Hop 2026!
Materials: US H Crochet Hook/5.0 or 5 mm
US I Crochet Hook/5.5mm 150-400 yards of 4 ply Worsted or Aran Weight Yarn Scissors Tapestry Needle
Gauge: US Hook H/5.0 or 5 mm 8 FPDC/BPDC x 5 Rows = 2 inch
Abbreviations: CH = Chain Sl St = Slip Stitch DC = Double Crochet FDC = Foundation Double Crochet FPDC = Front Post Double Crochet BPDC = Back Post Double Crochet DC2TOG = Double Crochet 2 Together
Notes: Ch 3 does count as a DC
Ch 1 does NOT count as a stitch
DC2TOG instructions from YouTube here. FDC instructions on YouTube here.
FPDC instructions on YouTube here.
BPDC instructions here.
Special Stitches: Front Post Double Crochet – Double Crochet going around the Front Post of the DC in the Previous Row. Back Post Double Crochet – Double Crochet going behind the Front Post of the DC in the Previous Row. Double Crochet 2 Together – when you double crochet two together, you are taking what were two double crochet stitches and turning them into just one double crochet stitch. This is also known as a decrease.
Special Notes:
Stitch multiple after the band is 3, so if your band is too tight or too loose try going up or down in hook size instead of adjusting stitch count.
Pattern written for: NB-6mth (6-12 mth, 12-24 mth, 2-4 yrs, 5-10 yrs, Teen/Sm Adult, Med Adult, Lg Adult)
Brim is worked in the round.
Waffle Stitch is worked as rows.
If Height of Hat is NOT met, Repeat R6-R7 until Height is met. Remember you will be adding 1.5”-2.5” for Decreasing.
If Height IS Hat IS met, end with R7 repeat, skip the rest of the Rows and go to Decrease Rows. Remember you will be adding 1.5”-2.5” when decreasing.
If Height of Hat is NOT met after adding all the Rows, you can use more Decrease Rows below.
Ad-Free Copy of the BlueBerry Waffle Beanie Crochet Pattern
Version 1
Brim:
R1: Fdc 48 (57, 60, 69, 78, 81, 87, 90) join.
R2: Ch 3, fpdc in the next st *dc in the next st, fpdc in the next st* Repeat from * to * around. sl st to join. (48, 57, 60, 69, 78, 87, 90) st
R3: Ch 2, fpdc in the same st, *dc in the next st, fpdc in the next st* Repeat from * to * around. sl st to join. (48, 57, 60, 69, 78, 81, 87, 90) st
Waffle Stitch:
R4: Ch 3, dc in same stitch and each stitch around. sl st to join.
R5:Ch 3, turn, dc in the next st. *fpdc around the post of the next stitch, dc in the next two st.* Repeat from * to * around. sl st to join.
R6: Ch 3, turn, dc in the next st. Fpdc around the post of the next st, dc in the next 2 st.* Repeat from * to * around. sl st to join.
Ages 0-6 mth, 6-12 mth, 12-24 mth
R7-R10: Repeat R5-R6 twice then go to Decrease Rows
Ages 2-4 yrs
R7-R12: Repeat R5-R6 three times then go to Decrease Rows
Ages 5-10 yrs
R7-14: Repeat R5-R6 four times then go to Decrease Rows
Tween/Small Adult
R7-14: Repeat R5-R6 four times then go to Decrease Rows
Medium Adult
R7-R16: Repeat R5-R6 five times and go to Decrease Rows
Large Adult
R7-R18: Repeat R5-R6 six times and go to Decrease Rows
Decrease Rows:
R1: Ch 2, fpdc in the next st, *dc2tog in the next 2 dc, (fpdc in the next st, dc in the next 2 st) twice* Repeat from * to * around. sl st to join. turn
R2: Ch 3, *bpdc in the next st, (dc in the next st, bpdc in the next 2 st) twice.* Repeat from * to * around. sl st to join. turn
R3: Ch 2 *fpdc in the next st, dc in the next st, fpdc in the next st, dc2tog, fpdc in the next st, dc in the next 2 st* Repeat from * to * around. sl st to join. turn
R4: Ch 3, bpdc in the next st, dc in the next st, bpdc in the next st, dc in the next st, bpdc in the next 2 st, *(dc in the next st, bpdc in the next st) twice then dc in the next st, bpdc in the next 2 st* Repeat from * to * around. sl st to join.
If you are wanting your Hat to be a Messy Bun do NOT sew the Crown of the Hat closed.**If Height of Hat is NOT met, please see more Decrease Rows below.
Leave a 6-8” tail for sewing the Crown of the Hat closed.
Sew the crown closed being sure to pull your long tail tight once you’ve reached the 1st st.
Fasten off and weave in ends with Tapestry Needle.
You can add a Pom Pom if you would like.
Extra Decrease Rows
Decrease Rows to meet the Hat’s Height.
R1: Ch 3 and turn, *dc2tog in the next 2 dc, fpdc.* Repeat from * to * around. sl st to join.
R2-R4: Ch 3 and turn. *dc in the next st, fpdc in the next st .* Repeat from * to * around. sl st to join.
You can Repeat R2-R4 in continuing to add Height to your Hat.
Leave a 6-8” tail for sewing the Crown of the Hat closed.
Sew the crown of the hat closed being sure to pull long tail tight once you’ve reached the 1st st.
Fasten off and weave in ends with Tapestry Needle.
You can add a Pom Pom if you would like.
You can make a Messy Bun Version. See instructions above.
Lion Brand’s #HatNotHate campaign asks for blue hats to be donated for kids to wear against Bullying in October! Find out more about Lion Brand’s #HatNotHate campaign here!
Send your hats to: #HATNOTHATE 140 Kero Road Carlstadt, NJ 07072
If you would like to make a donation to Jo’s Crafty Hook and help me with the costs of running Jo’s Crafty Hook, any help would be greatly appreciated!
Find me, Jo of Jo’s Crafty Hook at the places listed below.
I just LOVE Spring! I LOVE to see all the trees and flowers blooming! No matter what kind of flower it is, I LOVE them all! This is why I am happy to share with your some beautiful flower designs in this Crochet Flower Roundup!
There are a combination of FREE crochet patterns or PAID crochet patterns in the Crochet Flower Roundup. You will be directed to either a designer’s website where you can get their FREE pattern at their website OR you will be directed to a designer’s store where you can purchase their PAID patterns.
This post contains affiliate links. If you make a purchase using these links I may receive compensation (at no added cost to you.)
Be sure to sign up for my Newsletter while you are here at my website. As a new subscriber you will receive news about upcoming sales, new free crochet patterns, giveaways and more!
[yikes-mailchimp form=”1″]
I would LOVE for you to share your version of any designer’s flower pattern. You can also support these designers. There are a number of ways for you to do this. You can comment on their designs; give their pattern love while you are at their stores; stop by their social media sites and let them know how much you like their pattern; or leave them a message when purchasing their designs. Watch the Video below to see the designs that are being shared in this Crochet Flower Roundup.
If you sign up for my Newsletter, you get a Special Bonus, $3 off to be used at my Ravelry Store! You can use your BONUS to get a fee pdf copy of the Peony Flower Bunting/Wall Hanging that is being shared in the Crochet Flower Roundup. If you don’t want to use the BONUS on the bunting, you can still use it at my Ravelry Store.
If you already receive my Newsletter you can take advantage of the 40% off as part of the Anniversary Celebration Sale that is going on at both of my shops! But you can only get this discount until June 30, 2021.
So be sure to sign up to my Newsletter and visit my Ravelry Store or Etsy Shop to get the 40% off as part of the Anniversary Celebration Sale!
Reusable Makeup Remover Flower – Regina P Designs PAID PATTERN
Reusable Flower Face Scrubbies – Made by Gootie FREE ON WEBSITE
Thank you for stopping by Jo’s Crafty Hook’s Crochet Flower Roundup! I hope you have found some beautiful flower designs that you will crochet! If you enjoyed this roundup, please feel free to leave a comment and let me know!
There is still more to come in the future, so stay tuned in!
If you would like to make a donation to Jo’s Crafty Hook and help me with the costs of running Jo’s Crafty Hook, any help would be greatly appreciated!
Find me, Jo of Jo’s Crafty Hook at any one of these places listed below!
Spring is in the air and Easter is just around the corner. I love to see trees are sprouting their new leaves, flowers starting to bloom, and hearing the birds sing!
I LOVE to bring fresh flowers in the house; I LOVE their smell; and their colors! So in today’s post I will be sharing with you my Peony Flower Free Crochet Pattern! This way you can surround yourself with flowers all time!
This post contains affiliate links. If you make a purchase using these links I may receive compensation (at no added cost to you.)
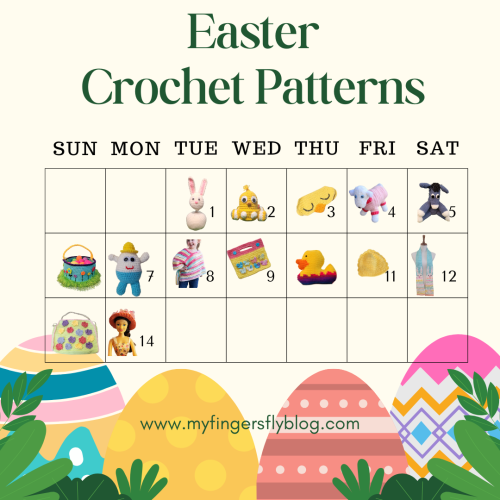
The Easter Advent Calendar Event runs from April 1-14, 2025 and features free crochet patterns for adorable and cute crochet patterns for Chicks, Easter Basket, Eggs and so much more!
April 13th – Easter Advent FREE Home Decor Crochet Patterns
My Peony Flower Crochet Pattern is being featured April 13th as part of the Flowers day and the FREE crochet pattern can be found below.
Spring Flowers Crochet Pattern – ViVaCrochet
Floral Handbag Crochet Pattern – My Fingers Fly
Free Crochet Blossom Flower Pattern – Pocket Yarnlings
Snowdrop Crochet Pattern – Concrete Gems Crochet
Arche de Fleurs Planter Holder Crochet Pattern-Dreams in Yarn
May Flower Coasters Crochet Pattern – Marsha YarnDoodles
Heart Flower Cloth Crochet Pattern – Marsha YarnDoodles Day 8 – Blooming Flowers Wall Hanging CAL
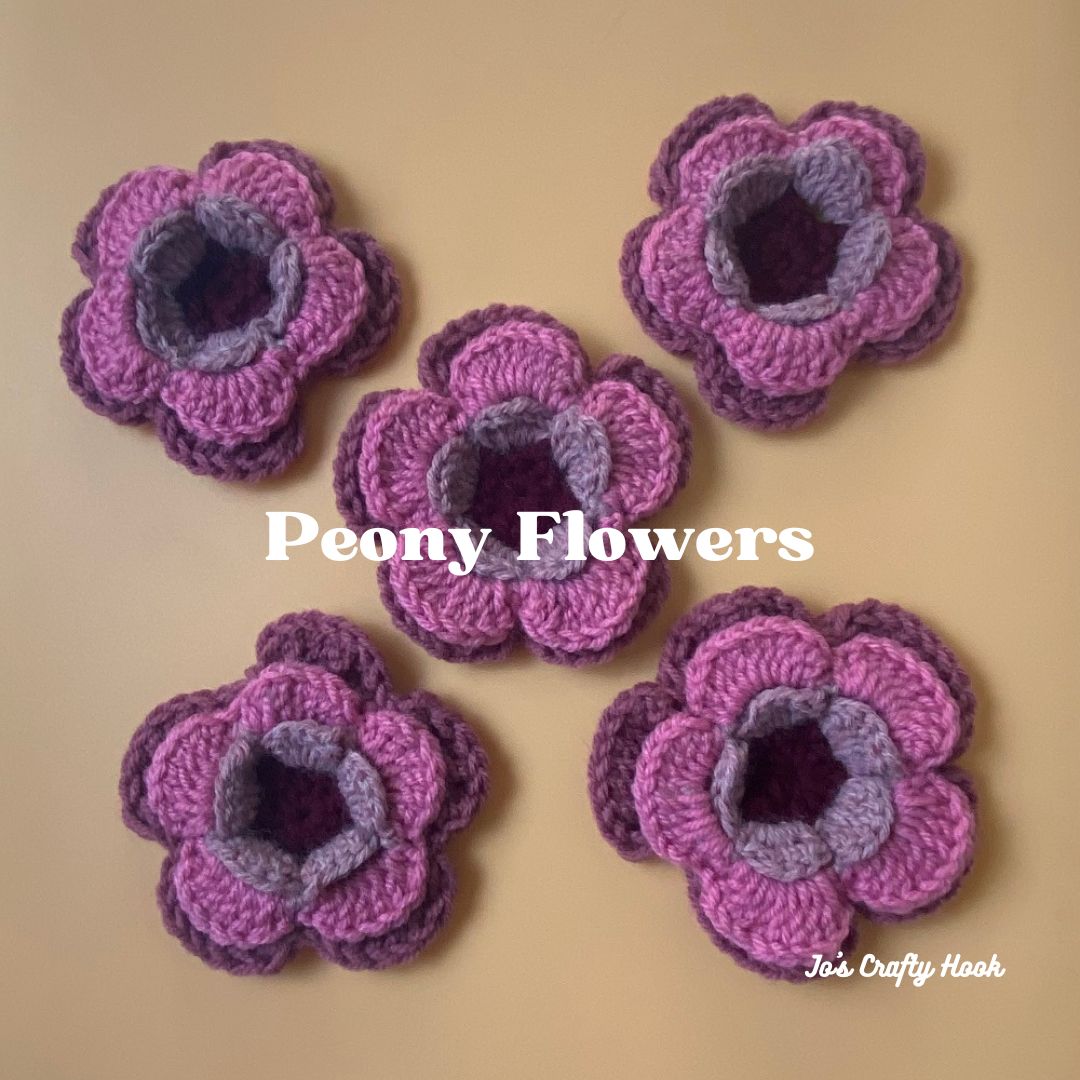
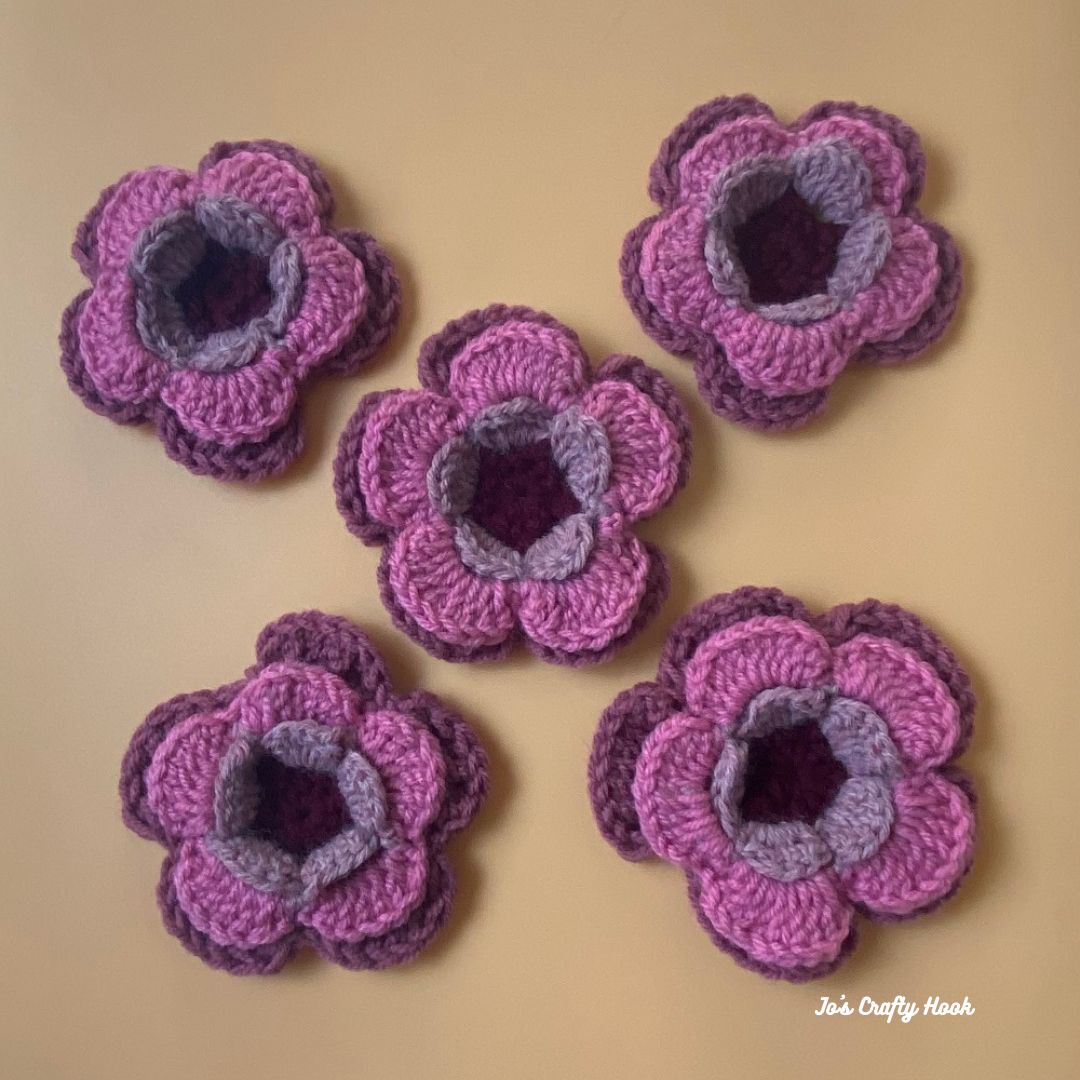
I made 5 Pink Peony Flowers in multiple colors, as appliques for my Blooming Flowers Wall Hanging.
If you would like to add different flowers to your wall hanging, I have a Blooming Flowers Wall Hanging eBook. It contains 6 additional flowers inside; along with a leaf applique crochet patterns and a Styrofoam Ring cover that can be found for $4 at my Ravlery Store.
There are SO many different ways you can use the peony flower crochet pattern. You can use them as appliques, add them to handbags, put them on headbands and SO much more! These crochet patterns are a GREAT scrap busting projects as well!
Information Needed
There are helpful picture tutorials for the flower below.
Beginner Friendly
US Terms
I used 200 yards of Red Heart Super Saver 4 ply Worsted Weight Yarn. (198 g/7 oz, 333 meters/364 yards)
Materials: US Hook H/5.00 mm 200-400 yards of 4 ply Worsted Weight Yarn Scissors Tapestry Needle Abbreviations/Stitches: ch = chain sp = space sk = skip sl st = slip stitch sc = single crochet dc = double crochet trc = triple crochet
Notes: I am a left handed so pictures may look different than yours. ch 1 does not count as a stitch.
The flowers are worked in the round.
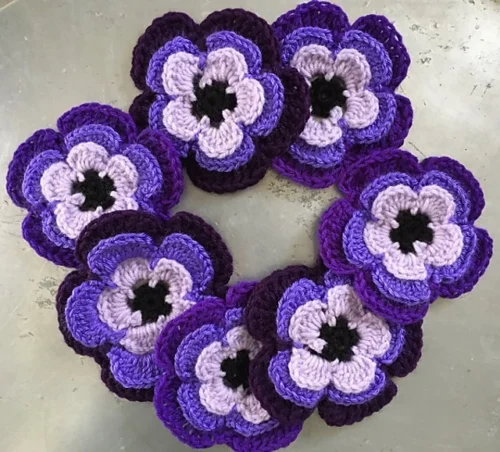
Peony Flower Free Crochet Pattern
1 Color Peony
4 Color Peony Flowers
4 Color Peony Flower
1st layer of petals **I changed colors after each round of petals**
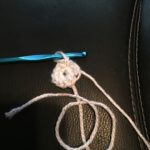
R1: Make a slip knot, ch 2, 10 sc in the 2nd ch from hook, sl st in 1st sc to join. 10 sc
R1
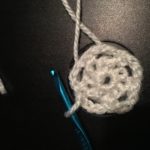
R2: ch1, sc in the same stitch, *ch 3, sk the next stitch, sc in the next st* Repeat from * to * until you have 5 ch 3 sp, sl st into 1st sc to join. You will work in the ch-3 sp in R3.
R2
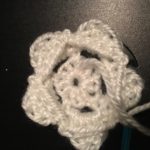
R3: *sc in ch-3, 5 dc, sc in the same ch-3 sp* Repeat from * to * until you have 5 petals. sl st in sc to join.
R3
R4: Ch 5, *going behind your petal, sl st in 1st sc on next petal, ch 5* Repeat from * to * until you have 5 ch-5 sp. sl st in 1st ch 5 sp to join.
R4
2nd layer of petals
R5: *ch 1, *sc in ch-5 sp, 9 dc, sc in the same ch-5 sp.* Repeat from * to * until you have 5 petals. sl st in 1st sc to join.
R5
R6: *ch 6, going behind your petal, sl st in 1st sc of next petal* Repeat from * to * until you have 5 ch-6 sp. sl st in 1st sc to join.
R6
3rd layer of petals
R7: ch 1 *sc in ch-6 sp, 9 trc, sc in same ch-6 sp.* Repeat from * to * until you have 5 petals. sl st in 1st sc to join. Do NOT fasten off.
R7
Fasten off and weave in ends.
That’s it! You have made your own Peony Flower!
Why not make more of these in a wide variety of colors to add an embellishment to headbands, hats, purses, and so many other things!
I used the Peony Flower on my Ribbon Ear Warmer. You can find it as a FREE Crochet Pattern here on my website, or it can be found at my Ravelry Store.
Rib-bon Ear Warmer
Or even make them smaller by using lighter weights of yarn.
I would 💖 to see what you create with your Peony Flowers!
Find more of my designs to make a Wall Hanging, a Flower Bunting, there are so many uses for flower appliques. Use the buttons below to find your perfect flower.
Find me, Jo of Jo’s Crafty Hook at the places listed below.
Mother’s Day is only a few days away! Lisa Ferrel of My Fingers Fly has included me and 4 other indie crochet designers in putting together a Mother’s Day Handbag Roundup!
The Mother’s Day Handbag Roundup includes 8 FREE crochet patterns for handbags that can be found on each of our websites. These crochet patterns are not just for Mother’s Day, but can be found all year long.
This page contains affiliate links. You can make a purchase using these links that I provide where I may receive compensation (at no added cost to you.) Purchases you make will help keep my website, my Ravelry Store, my Etsy Shop, and LoveCrafts going and provide quality designs just for you!
**If you like what you have read here, be sure to sign up for my Newsletter. You will be notified the next time I release a post, have a crochet pattern sale or giveaway, and more. Sign up below.**
[yikes-mailchimp form=”1″]
Lisa of My Fingers Fly shares her Floral Handbag Crochet Pattern. In addition to crocheting this handbag, Lisa has added a special lining. She also adds lobster claw clasps to add the perfect handle. The flowers add that special touch in the Floral Handbag design.
Floral Handbag Crochet Pattern
Angela Ader of Nine Inspired shares her Roxy Retro Circle Bag. The circle bag combines vintage and modern when using the granny square circle design. You can use your scrap yarn as well when crocheting the Roxy Retro Circle Bag.
Ashley Edmonds of Through The Loop Yarn Craft shares her Hampton Handbag. Ashley uses 24/7 cotton yarn from Lion Brand in designing this handbag. Ashley also uses the Herringbone Half Double Crochet stitch to bring definition to her Hampton Handbag.
Hampton Handbag
Ashley Parker of the Loopy Lamb shares her Bobblelicious Bag. As you can tell by the name Ashley uses the Bobble Stitch. In designing her bag, she uses Chunky yarn to make those Bobbles stand out! She also uses a beautiful teal color cotton liner inside of the Bobblelicious Bag.
Bobblelicious Bag
Whitney Dunning of Pine Tree Crochet shares her Rainbow Sprinkles Handbag. Ashley uses the Wattle Stitch and the Crab Stitch in designing her Rainbow Sprinkles Bag. The handbag is worked in the round and you can use any Red Heart Super Saver varigated yarn in crocheting your own bag.
Rainbow Sprinkles Handbag
Agat Rottman-Cassel of Made by Gootie shares her Chevron Bucket Bag. Agat designed this bag for the I Like Crochet magazine. The bag is worked in the round from bottom to top and uses the Ripple Stitch. Agat adds eyelets to the Chevron Bucket Bag for the drawstring to run through.
Chevron Bucket Bag
Lisa has another free crochet pattern on her website for a adorable Zebra Coin Purse. .This adorable pattern can be made in 3 hours. The Zebra Coin Purse is big enough to hold credit cards, money, drivers licenses and more.
Zebra Coin Purse
Whitney Dunning of Pine Tree Crochet shares another free handbag crochet pattern, the Grab and Go Clutch. This bag uses the Moss Stitch to create the beautiful design. The Grab and Go Clutch uses very little yarn, so you can use those scraps of yarn you have laying around.
Grab and Go Clutch
My free crochet pattern I am sharing is for my Sharon Bag. I designed this bag for my mom, Sharon, so she could carry around her iPad. In designing my handbag I used Cables/Braids using the Front Post and Back Post Double Crochet. The Sharon Bag is worked in the round going into both sides of your starting chain. There are 2 sizes to choose from, Small and Large.
Sharon Bag
You can find my Video Tutorial for the Front Post Double Crochet below.
You can also find my Video Tutorial for the Back Post Double Crochet below.
Thank you so much for stopping by Jo’s Crafty Hook! I would LOVE to see your versions on any bag you have crocheted from this Mother’s Day Handbag Roundup! You can share them at any of my Social Media sites below.
**Be sure to sign up for my Newsletter. You will be notified the next time I release a post, have a crochet pattern sale or giveaway, and more. Sign up below.**
[yikes-mailchimp form=”1″]
You can find all of my Ad-Free crochet patterns at any of the locations below:
If you would like to make a donation to Jo’s Crafty Hook and help me with the costs of running my website, crocheting new designs I would greatly appreciate it!
The Friendship CAL has started! I am so glad you are here with us as we start to share the afghan squares needed to make the Friendship Afghan! Me and 24 other crochet designers are collaborating in the Friendship CAL 2021 hosted by Helen and Sara from Sunflower Cottage Crochet.
This page contains affiliate links. You can make a purchase using these links that I provide where I may receive compensation (at no added cost to you.) Purchases you make will help keep my website, my Ravelry Store, my Etsy Shop, and LoveCrafts going and provide quality designs just for you!
What is this, you ask? The Friendship CAL will be a Crochet-A-Long where YOU can take part and crochet afghan squares to make a blanket. On every Wednesday, Friday, and Sunday from now until April 2021, there will be a 9″ x 9″ crochet square pattern released, it could be a free pdf or found free on the designers website. There will be 40 square crochet patterns released from 25 different crochet designers. My Diamonds Square will be featured in February!
Diamonds Squares
On each Wednesday, Friday and Sunday I will post the release of a NEW square crochet pattern. You can sign up to my Newsletter below and receive an email once a week letting you know there have been 3 new squares released, who designed them, and where you can find them. I will also update my website every time there is a new Square released.
[yikes-mailchimp form=”1″]
What are the Materials needed, you ask? The materials needed are:
3100 yards of 4 ply Worsted Weight Yarn or Aran Yarn for Squares 600 yards of 4 ply Worsted Weight Yarn or Aran Yarn for Joining/Border US Crochet G-J Hooks or 4mm – 6mm Tapestry Needle for Joining Squares Scissors Stitch Markers (optional)
This Friendship CAL is a perfect way for you to crochet a Scrap Busting Blanket. You can use up all of that left over yarn you have lying around from your other crochet projects! What an AWE-some idea, right?!?!
Also there will be a number of crochet Facebook Groups you can show off your Work-in-Progress at. You can share your Friendship CAL WIPs inside my newest Facebook Group Jo’s Crafty Hook-ers here.
I hope to see you there! Be sure to invite all of your crochet loving friends!
Again, you can receive an email notifying you weekly that there have been 3 new square crochet patterns released. Also my website will be updated every time a new crochet square pattern is released.
[yikes-mailchimp form=”1″]
If you would like to participate in the Friendship CAL, but do NOT want to wait around for the square releases, we do offer a Friendship CAL Bundle. You can get all 40 square crochet patterns in one place for only $10! To take advantage of the Bundle click here.
Now that you have all of your squares completed it is time to join your squares and add a border. There are a number of ways for you to join your squares and I have a couple of Video Tutorials that you might find helpful.
The first video show you how to join by sewing your squares together using the Running Stitch.
The second video shows you how to crochet your squares together by using a double crochet join.
After you have joined your squares it is time to choose a border. There are many helpful blog posts on Pinterest and video tutorials on YouTube to choose from. Below is a helpful Video Tutorial I made using the “Lollipop” technique. I found this border by combing Pinterest. You can find the original post for the Lollipop technique by My Crafts.
I would really like to hear about your experience with this Friendship Blanket CAL! How did you find the patterns? Which ones are your favorite? Did you find the CAL easy to follow? Would you like to see another one? You can add your comments below in the Comments section.
I would also LOVE to see your completed Friendship Blanket! You can share your completed blanket inside my Facebook Group Jo’s Crafty Hook-ers. You can share any progress pictures as well.
Stop by Sunflower Cottage Crochet and let Helen and Sara know what you thought about the CAL as well! I think they did a FAN-TAS-TIC job in organizing this event! I think all of the designers designs were fabulous! There has been a wide variety of techniques used in designing their squares as well! You can also stop by Helen and Sara’s Facebook Group and share your finished blankets as well!
Thank you for taking part in the Friendship Blanket CAL! I hope you were able to learn new techniques, new crochet stitches, got to know some of the designers better! I hope you enjoyed yourselves most of all! Again, please share your finished blankets at the Facebook Groups listed above.
If you have liked what you have seen on my website so far, why not sign up to my Newsletter? You can be notified when there is a new blog post; another free crochet pattern added to my website; when I have a sale; and more. Use the sign up form below.
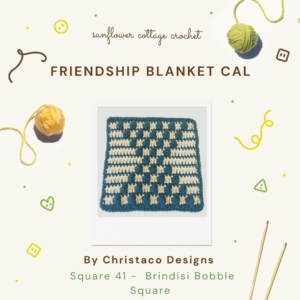
Crystal of Christa Co Designs brings you a very textured square, Brindisi Bobble Square, using the Bobble Stitch.
Crystal has supplied a row by row video tutorial to help you with her square. By using 2 colors in this square you will see not only bobbles, but stripes. You can decide if you want yours in one color or two. To find out more about Crystal’s Brindisi Bobble Square visit Christa Co Designs.
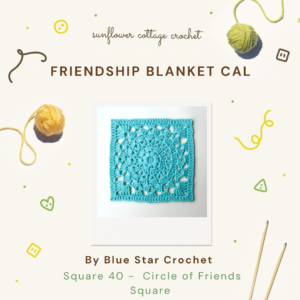
Square 40 – Friday, April 16, 2021 – Circle of Friends Square
Circle of Friends Square
Veronika of Blue Star Crochet brings you her Circle of Friends Square, another square that starts out as a circle. The basic crochet stitches are used in creating this lacy design.
Veronika’s square starts out as a circle which is meant to signify the circle of family and friends that surround you. Stop by Blue Star Crochet to find out more information about Veronika’s Circle of Friends Square and to get the free crochet pattern.
Pam of Carroway Crochet brings you a square using the Waffle Stitch. The waffle stitch consists of double crochet and front post double crochet. There are a number of helpful video tutorials on YouTube.
The waffle stitch creates a very textured look that of course looks like a waffle. The Waffle Stitch Square will be fast and easy to do once you get a hang of the 2 row repeat. To find the free pattern for the Waffle Stitch Square visit Carroway Crochet.
Square 38 – Sunday, April 11, 2021 – Friendship Square
Fellowship Square
Shannon of The Loophole Fox uses her favorite stitch in the Fellowship Square, the Crossed Double Crochet. If you have never tried this stitch, Shannon provides helpful video tutorial links on her website and inside the pdf pattern.
If you can double crochet, you can definitely do the crossed double crochet! This stitch gives you a lacy look, without being too open and has lots of texture. Shannon has used this stitch in some of her other designs. To find out how you can get a free copy of the Fellowship Square visit The Loophole Fox.
Square 37 – Friday, April 9, 2021 – Companion Square
Companion Square
Malena of Straight Hooked brings you a square, the Companion Square, that uses the V-Stitch and Double Crochet. All the v-stitch consists of is a dc, ch 1, dc.
Malena designed a super quick and easy square that you can crochet in about an hour! To get a free pdf copy of the Companion Square crochet pattern visit Straight Hooked. Malena has a helpful video tutorial you can use inside her post.
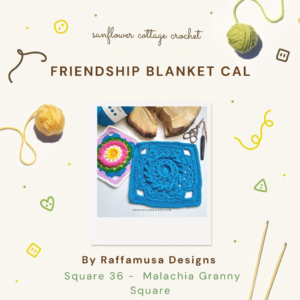
Raffaella of Raffamusa Designs designed a the Malachia Granny Square using the basic stitches that created a very textured square. There is a very helpful video tutorial to help you with this square.
Raffaella named her Malachia Granny Square after a story in a book using one of the character’s name to call her square. Raffaella’s design reminds her of a Rose Window. You can out more about the naming of her square and get a free pdf copy of the pattern while you are at Raffamusa Designs.
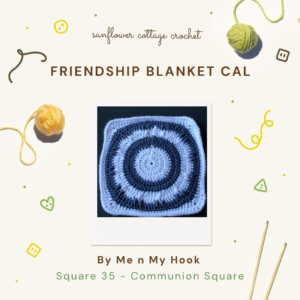
Square 35 – Sunday, April 4, 2021 – Communion Square
Communion Square
Bernadine from Me N My Hook brings you a solid granny square called the Communion Square. This square is beginner friendly and Bernadine has provided a very helpful video tutorial.
The name is very fitting for what we were trying to achieve as we were deciding on what to call this CAL. Communion means alliance, agreement, and friendly association. To get a free pdf copy of the Communion Square visit Me N My Hook.
Square 34 – Friday, April 2, 2021 – Integrity Square
Integrity Square
Colette of Creative Crochet Hook brings you her Integrity Square. Her square uses the star stitch that creates a lot of texture.
Colette also uses front post double crochet and back post double crochet. To find out how to get a free pdf copy of the Integrity Square visit Colette at Creative Crochet Hook.
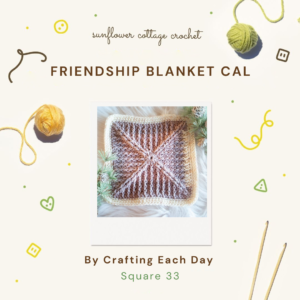
Square 33 – Wednesday, March 31, 2021 – Victoria Square
Victoria Square
Suzanne of Crafting Each Day brings you her Victoria Square. Her square is a version of the granny square with a twist. Suzanne uses cable stitches in her square named after her granny, Victoria.
As I tell anyone who hears the words cable stitches, don’t let that stop you from trying like it used to do me. Suzanne has provided a helpful video tutorial to help you work out those twists. Visit Suzanne’s website Crafting Each Day to get a free pdf copy of her Victoria Square.
Square 32 – Sunday, March 28, 2021 – Little Angel Square
Little Angel Square
Rachel from Desert Blossom Crafts brings you a square that has a lacy look. This square uses some unique crochet techniques.
Don’t let the word unique stop you from crocheting the Little Angel Square. Rachel has provided helpful picture and video tutorials to help you with these crochet stitches. Visit Desert Blossom Crafts and get a free pdf copy of the Little Angel Square.
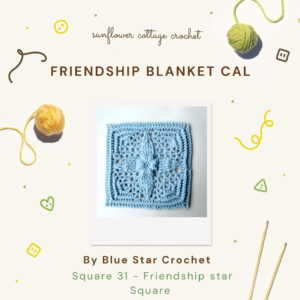
Square 31 – Friday, March 26, 2021 – Friendship Star Square
Friendship Star Square
Veronika of Blue Star Crochet brings you her Friendship Star Square. The square uses Popcorn and Cable stiches, along with basic stitches, to make the star stand out.
The meaning behind her design is very fitting, she says friends are like stars. You don’t have to see them to know they are there. Visit Veronika over at Blue Star Crochet to get a free pdf copy of her Friendship Star Square crochet pattern.
************************************************
Week 10
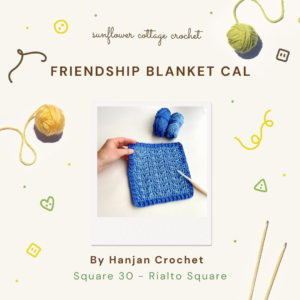
Square 30 – Wednesday, March 24, 2021 – Rialto Square
Rialto Square
Hannah from Han Jan Crochet brings you a square with a lot of texture, the Rialto Square that uses cable stitches. If you have not mastered the cable stitch yet, don’t give up, Hannah has a great video tutorial to help you.
Don’t let this word, cables, throw you off like it did Hannah at first, they are not as scary as the look. The Rialto Square works great as a motif for pillows, table runners, and of course blankets. Find the Rialto Square at Hannah’s website Han Jan Crochet.
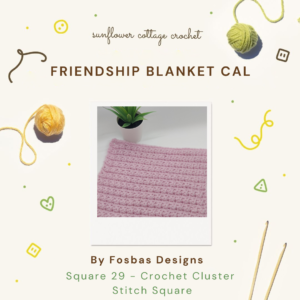
Susan of Fosbas Designs brings you a square that has lots of texture by using the Half Double Crochet Cluster Stitch. This is an easy stitch to master, but Susan has made a helpful video tutorial in case you need help.
Susan calls her Cluster Stitch Square “Cluster This Way.” As you crochet the square you will see the little arrows that point the way. Visit Fosbas Designs to get a free pdf copy of the “Cluster This Way” square.
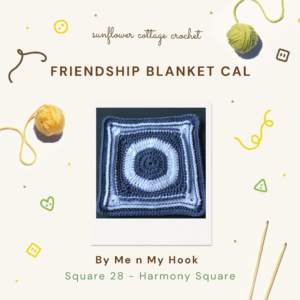
Square 28 – Friday, March 19, 2021 – Harmony Square
Harmony Square
Bernadine of Me N My Hook brings you the Harmony Square. The design starts out as a circle and turns into a hexagon. Bernadine has made a helpful video tutorial in case you are unfamiliar with front post and back post double crochet.
In designing the Harmony Square, Bernadine wanted to see if she could create a shape within a shape. The design reminded her of that early learning toy where you fit the shapes in the holes of a ball. You can find out more about the Harmony Square at Me N My Hook.
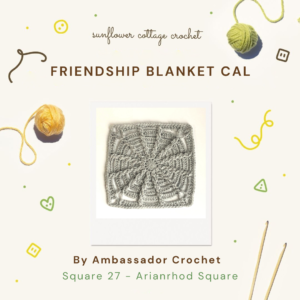
Kristine from Ambassador Crochet a square that creates Cables in the round. If you have never tried Cables before, that is ok, Kristine has made a very helpful video tutorial.
The Arianrhod Blanket Square may seem like a funny or weird name, that is because it is a Celtic word. You can find out more about this square and the meaning behind the Celtic word at Kristine’s website Ambassador Crochet. You will also be able to get a free pdf copy of the Arianrhod Blanket Square there as well.
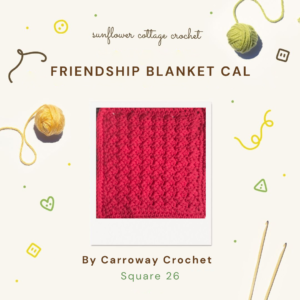
Pam of Carroway Crochet brings you a square that has lots of texture using basic crochet stitches, single crochet, half double crochet, and double crochet.
There are helpful video tutorials for Right and Left Handed crocheters for the Sedge Stitch Square. You can get a free pdf copy for one day only, March 14, 2021, so be sure to stop by Carroway Crochet and grab you a copy!
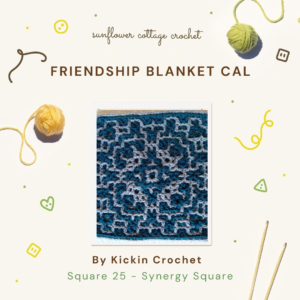
Mary of Kickin Crochet designed a square that brings you synergy using two colors together that creates an intricate design that meshes more than one color by itself. This is a fabulous definition of what the Friendship CAL is all about, we are better together than apart.
To get a free pdf copy visit Kickin Crochet. You can also find the free pattern for the Synergy Interlocking Square at Kickin Crochet with helpful picture and video tutorials along the way.
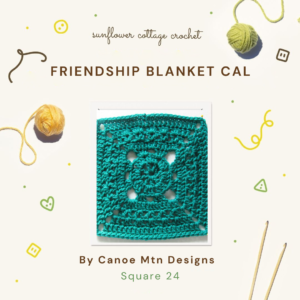
Square 24 – Wednesday, March 10, 2021 – Square for CAL
Square for CAL
Audrey Friesen of Canoe Mtn Designs brings you her design where it starts out as a circle and ends up a square. The Square for CAL is beginner friendly and uses the basic crochet stitches.
Visit Ravelry or click on the image above to get a free pdf copy of Audrey’s Square for CAL.
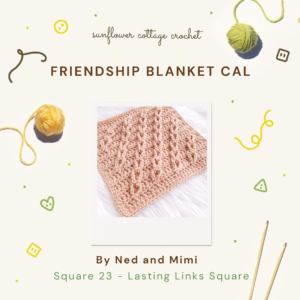
Sarah of Ned and Mimi brings you the Lasting Links Crochet Blanket Square with a unique take on the Jacob’s Ladder stitch. Sarah describes the use of this stitch pattern: “For this square, the “ladder” is worked diagonally rather than vertically! And once all each set of chains has been linked, they are secured with a single crochet stitch – these are links that can’t be undone.” What a fitting description for the Friendship Blanket!
To get a free pdf copy of the Lasting Links Crochet Blanket Square visit Sarah’s website Ned and Mimi.
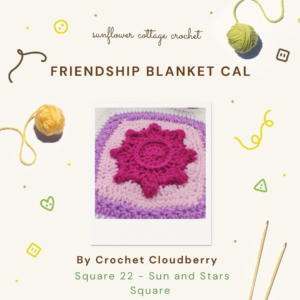
Square 22 – Friday, March 5, 2021 – Sun and Stars Square
Sun and Stars Square
Cat of Crochet Cloudberry brings you the Sun and Stars Square. This square uses the Granny Square technique, but starts out as a circle and turns into a square. This square was originally designed as an old Victorian weather picture of the sun and stars.
The Sun and Stars Square crochet pattern is considered Intermediate level so Cat has added helpful picture and video tutorials. You can get the free crochet pattern from Cat’s website Crochet Cloudberry.
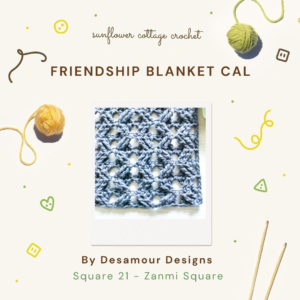
Elisabeth from Desamour Designs brings you the Zanmi Crochet Square. Zanmi is a Haitian word for friends and friendship. This is a perfect word to describe the meaning behind our Friendship Blanket Square.
The Zanmi Crochet Square uses the Diamond Zigzag stitch. This square design features the use of the Tunisian technique. You can find a free pdf copy of the Zanmi Crochet Square at Desamour Designs.
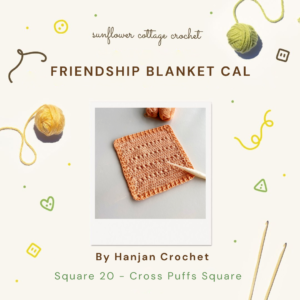
Hannah of Han Jan Crochet brings you the Cross Puff Stitch Crochet Square that has LOTS of texture. Some of you may be intimidated when you see Puff Stitches, so Hannah has made a helpful Video Tutorial to help you with her square.
When using the Puff Stitch in her design Hannah wanted to bring you more texture by adding some back loop and a lacy detailing. Visit Han Jan Crochet and get a free pdf copy of this square’s crochet pattern. The Cross Puff Stitch Crochet Square would also be great for blankets, pillows, bags, and more.
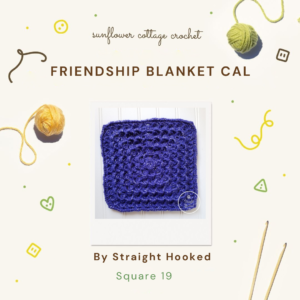
Malena of Straight Hooked brings you a square, the Dolphin Stitch Square, with a crochet stitch she created herself, the Dolphin Stitch. This stitch uses 4 basic crochet stitches, the Single Crochet, Half Double Crochet, Double Crochet and Triple Crochet.
Malena’s design has a lot of texture that is perfect for this square. The Dolphin Stitch Square can be crocheted quickly and the Dolphin Stitch can be used in so many crochet designs! Visit Straight Hooked to get a free pdf copy of Malena’s signature stitch square.
Lisa from Green Fox Farms Designs brings you the Sweet Stripes Friendship Square that uses the basic crochet stitches and row repeats that will be quick and easy to do! Lisa has also made a great video tutorial to help you with this square.
You can make a whole set in different colors! A set of cloths paired with some bath salts and fancy soaps would be an awesome Mother’s Day Gift, housewarming gift or a gift for any occasion! Visit Green Fox Farms Designs where you can find a free pdf copy of the Sweet Stripes Friendship Square.
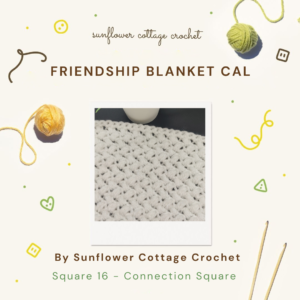
Square 16 – Friday, February 19, 2021 – Connection Square
Connection Square
Helen & Sara, the hosts of the Friendship Blanket CAL, from Sunflower Cottage Crochet bring you the Connection Square that uses a neat stitch, the Bean Stitch. Helen and Sara have right and left hand video tutorials to help you master this stitch.
This square can be used in so many different projects. You can make a great washcloth or a spa set and it is a nice thick pattern stitch. You can use cotton yarn and make a hot pad. To find a free pdf copy of the Connection Square visit Sunflower Cottage Crochet.
Natalia from Natali’s Crochet has brought you a square that has lots of texture with a beautiful design called the Friendship Blanket Square.
The Friendship Blanket Square is an intermediate design with puff stitches, foundation double crochet single crochet and double crochet. These stitches may sound hard, but they are easier than they look. You will find a helpful video tutorial that will show you how to crochet the whole square. You can find a free pdf copy of this square at Natali’s website.
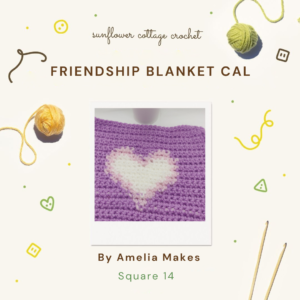
Amelia of Amelia Makes has brought you a perfect square not only this CAL, but for Valentine’s Day as well. The Tapestry Heart Square uses the technique of tapestry.
The Tapestry Heart Square will also be good for pillow covers, bags, the possibilities are endless! You will find the free crochet pattern at Amelia Makes‘ website. Happy Valentine’s Day!
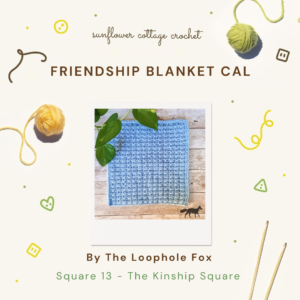
Square 13 – Friday, February 12, 2021 – Kinship Square
Kinship Square
Shannon from The Loophole Fox has brought you a square using the Even Moss Stitch technique. If you know how to chain, single crochet and half double crochet than you will be on easy street! The Even Moss Stitch is the perfect way to brings you lots of texture.
Visit The Loophole Fox to find the free pattern on Shannon’s website. The Even Moss Stitch adds a ton of texture, is pretty easy once you get started, and is lightweight but warm!
Trista of Crochets By Trista has brought you a square that uses the basic crochet stitches, the single crochet and double crochet.
When thinking about the type of squares we wanted to bring to you, we chose squares that have texture. Even though the Eclectic Friendship Blanket Square uses the basic stitches, you still get a nice pretty texture. You can find a free pdf copy of the Eclectic Friendship Blanket Square at Trista’s website Crochets by Trista.
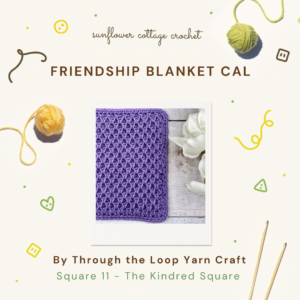
Square 11 – Sunday, February 7, 2021 – Kindred Square
Kindred Square
Ashley of Through The Loop Yarn Craft wanted to bring you a square that has the Honey Comb look of Tunisian Crochet. The Kindred Square has a nice thick texture, which is one of the things we wanted to bring you in the designs of the Friendship Blanket CAL.
To get a free pdf copy of the Kindred Square crochet pattern you can visit Through The Loop Yarn Craft. The can be many ways to use the design of the Kindred Square. You can make pillow covers, placemats, and more. Switch the yarn out for cotton yarn and you can make nice pot holders!
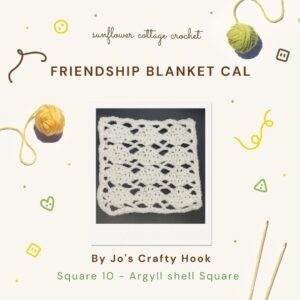
Square 10 – Friday, February 5, 2021 – Diamonds Square
Diamonds Square
The Diamonds Square was designed by me, Jo of Jo‘s Crafty Hook! Who doesn’t ❤️ covering themselves in diamonds! The Diamonds Square uses the Argyle Shell Stitch that I discovered earlier this year and fell in ❤️ with!
You can use the Diamond Square crochet pattern tosurround yourself with more diamonds! You cancustomize the pattern to make pillow covers, tablerunners, wraps, and more! You can get a free pdf copy of the Diamonds Square crochet at my website here.
************************************************
Week 3
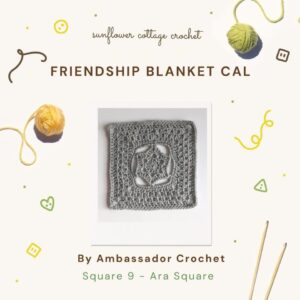
Square 9 – Wednesday, February 3, 2021 – Ara Square
Ara Square
Kristine of Ambassador Crochet wanted to design a square that reminder her of a galaxy of bright stars. So set your sites on the Ara galaxy above as you crochet the Asa Square that starts out as a circle and turns into a square.
You can find a free pattern of the Asa Square at Ambassador Crochet website. Crochet more than one of these squares and surround yourself in your own galaxy of stars.
Sara of Sunflower Cottage Crochet wanted to bring you a square with flair. Each row you will work in the post stitches to create the diagonal look.
The Raised Diagonal Square can be found at Sunflower Cottage Crochet where you can get a free pdf copy of her square. The Raised Diagonal Square would also make a great washcloth or you could increase the stitch count and make a pillow with it, or a gorgeous runner.
Square 7 – Friday, January 29, 2021 – Omatra Square
Omatra Square
Bella of Three Fates Creation’s named her square Omatra. Omatra is a Sanskrit word meaning protection. I think protection is fitting because the Friendship Blanket brings so many unique crochet designers from all over the world and what is a blanket for, but protection from the cold.
The design of this square starts out as a circle and turns into a square. You can find a free pdf copy of the Omatra square by going to Three Fates Creation here. ********************************************************
Caleb from Crafting at the Poole designed this gorgeous square for our Friendship Blanket CAL. The diamond bliss square has what any girl loves, diamonds! The texture in this square is created by using front post and back post triple crochet stitches.
Caleb has a video tutorial of this square attached to his post for those who are unfamiliar with these stitches. So visit Crafting at the Poole and get a free pdf copy of the Diamond Bliss Square.
Square 5 – Sunday, January 24, 2021 – Illusion Square
Illusion Square
The illusion square is so bright and colorful, it brings to mind tapestry crochet. The basic stitches used are single crochet, you just can carry your different color yarns with you.
L’amas De Laine is the designer behind the Illusion Square. You can get a free pdf copy of the pattern directly from L’amas De Laine. If you enjoy making square, remember that you can always use the pattern for blankets, pillow covers, table runners, tops, and so many wonderful things!
Square 4 – Friday, January 22, 2021 – Rambling Rose Square
Rambling Rose Square
The rambling roses square is a combination of the Primrose stitch and the half double crochet stitches. There are a lot fun ways to use this design. You can make it as a washcloth, a hot pad, table or bed runner.
So stop by Made for Gootie and get the Rambling Rose Square crochet pattern. You can get a free pdf copy of this pattern from Made by Gootie’s
Square 3 – Wednesday, January 20, 2021 – Lauren Square
The Lauren Square
Square 3 was designed by Suzanne of Crafting Each Day. This square has a wavy design that looks like ocean waves. The color is gorgeous and makes you think of clear blue water.
The Lauren Square is available for free on Crafting Each Day’s website. You will find the pattern only uses basic stitches. It uses single crochet, half double crochet, and double crochet. Visit Crafting Each Day and get your free crochet pattern.
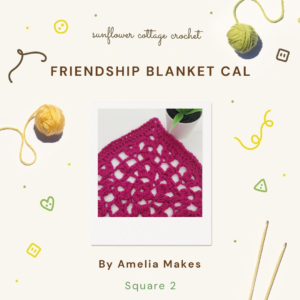
Square 2 was designed by Amelia of Amelia Makes. This square uses a lacy design. This square can be used in many different projects. It looks like leaves or maybe scattered petals.
This square is available as a free pattern on Amelia’s blog. If you would like the free pdf, Amelia has updated her free pattern for signing up to her emails so an immediate pdf version of this pattern will be delivered directly to your inbox. If you have any issues getting the pdf please contact Amelia directly and she will help you!
Square 1 – Friday, January 15, 2021 – Kinship Square
Square 1 starts off with our hosts, Helen and Sara of Sunflower Cottage Crochet. Their square is aptly named the Kinship Square. It uses the fpdc & bpdc stitches to create a nice tight, textured square. Don’t worry! There are helpful Video Tutorials inside the crochet pattern to help you master these stitches!
You can find all the information needed about the Friendship CAL and how to get a free copy of the Friendship Square at Sunflower Cottage Crochet. You can also join our hosts’ Facebook Group Sunflower Cottage Crochet Community if you have questions about the CAL, share WIPs, and more. They will have great tips, tricks, and useful information as the CAL progresses.
Thank you for stopping by my website! Check out some of my patterns at my Ravelry Store Jo’s Crafty Hook Designs or LoveCraft or Etsy Shop JosCraftyHook or get free crochet patterns at my website joscraftyhook.com! While you are at my website be sure to subscribe to my Newsletter. This way you will be notified when I release another pattern or giveaway or blog post!
If you have any questions or concerns about this pattern or any other pattern please find me at Joey Lea Baird on Facebook or email me at jo@joscraftyhook.com
You are free to sell or gift the item you make from my website, please do NOT claim any of my designs as your own. If you share your finished product, please acknowledge me as the designer. Please forward any one who would like to do this crochet pattern or any of my patterns to the Ravelry Store or to LoveCraft or to my Etsy shop, or to my website. The web addresses for any place to connect with me are listed below.
Every purchase of my patterns helps! It allows me to buy more yarn so I can create and design more Handmade Crocheted Creations for you to enjoy.
I would LOVE to see your version of my designs! You can “Hook It” at my Ravelry Jo’s Crafty Hook Designs OR add a pic using the hashtag of the design at anyone of the places below that allows you to connect with me! Comments, Feedback, etc. are ALWAYS welcome at my website www.joscraftyhook.com!
If you would like to make a donation to Jo’s Crafty Hook and help me with the costs of running my website, crocheting new designs I would greatly appreciate it!
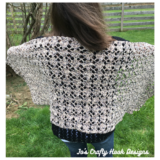
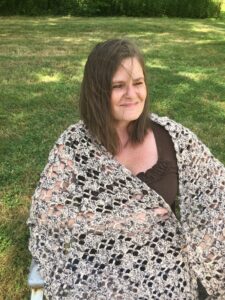
The weather has really turned cold here in NE Ohio! Since we still have a few more months of cold weather ahead, I decided to bring you a perfect crochet pattern to wrap you up in warmth. The Wrapped in Diamonds Free Crochet Pattern will help you stay warm. You can also make it for a loved one and wrap them in what many girls love, Diamonds. Below you will find the Wrapped in Diamonds Free Crochet Pattern!
This page contains affiliate links. You can make a purchase using these links that I provide where I may receive compensation (at no added cost to you.) Purchases you make will help keep my website, my Ravelry Store, my Etsy Shop, and LoveCrafts going and provide quality designs just for you!
Wrapped in Diamonds Wrap
The Wrapped in Diamonds Wrap uses a new stitch for me that I found last year, the Argyle Shell Stitch. I have created 9 other crochet patterns using this stitch. Once you get the hang of the pattern repeats, the wrap will be done before you know it!
Be sure to sign up for my Newsletter so you don’t miss information about more free crochet patterns, blog hops, giveaways and more!
[yikes-mailchimp form=”1″]
I am collaborating with Bernadine of Me N My Hook and over 20 other crochet designers in the Mother’s Day Gift Ideas Blog Hop. In this blog hop we will be bringing a wide range of crochet patterns that would be perfect for moms. The Mother’s Day Gift Ideas Blog Hop runs from February 1, 2021 until February 28, 2021. This blog hops runs each day starting at 10a GMT or 5a EST and runs until 9:59a GMT or 4:59a EST until the next day.
On my day, February 8, 2021 you can get a free pdf copy of my Wrapped in Diamonds Wrap crochet pattern.
To find out how the Mother’s Day Gift Ideas Blog Hop works and to get the Coupon Code for my free pdf copy of my Wrapped in Diamonds Wrap on February 8, 2021 visit Me N My Hook or click on the button below.
On my day, February 8, 2021 you can get a free pdf copy of my Wrapped in Diamonds Wrap crochet pattern. Click on the button below to go directly to Ravelry with your Coupon Code you just got from Me N My Hook using the button above.
Below you will find the free crochet pattern for the Wrapped in Diamonds Wrap.
Wrapped in Diamonds Wrap
Pattern Information:
Materials: 1000 yards #3 Lightweight Yarn US Hook I or 5.5mm Tapestry Needle Scissors
Gauge: US I Hook or 5.5mm
2 full diamonds = 4″ wide
2 full diamonds 4″ length
Abbreviations/Stitches Used: ch = chain stitch sc = single crochet dc = double crochet sp = space ss = slip stitch
Size: 26” x 73”
Notes: Stitch count is a multiple of 8 + 2
There are helpful Video Tutorials below
Special Stitch:
Shell = (dc, ch 1, dc, ch 1, dc) all in the same stitch. Argyle Shell Stitch = consist of the base chain plus the repeat rows R2-R5, this creates the stitch which makes the Diamond shapes.
How to crochet in the Back Bar of Chain
How to crochet in the Back Bar of Chain
Video Tutorials: Right Handed Version here. Left Handed Version here.
———————————————————–
Wrapped in Diamonds Wrap
Pattern:
**If you prefer a wrap that is not as wide at the bottom, this is where you would shorten your chain count. Be sure to use the multiple of 8 + 2**
R1: Chain 82, in the back bar of the chain, sc in 2nd chain. (see pic above) *Ch 5, skip 3 ch, sc in the back bar of the next ch*. Repeat to the end. Make sure you have a sc in the last stitch.
Row 1
R2: Ch 5 and turn. sc in ch-5 sp, shell in next sc, sc in next ch-5 sp. *ch 5, sc in next ch-5 sp, shell in next sc, sc in next ch-5 sp.* Repeat from * to * until the last sc, then ch 2 and dc in last sc.
Row 2
R3: Ch 1 and turn. sc in 1st st, shell in next sc, sc in center dc of shell, shell in next sc. *sc in next ch-5 sp, shell in next sc, sc in center dc of shell, shell in next sc* Repeat from * to * until the last ch-5 sp, then sc in 3rd ch of the last ch-5 sp.
Row 3
R4: ch 5 and turn. sc in center dc of shell, shell in next sc, sc in center dc of shell, *ch 5, sc in center dc of shell, shell in next sc, sc in dc of shell.* Repeat from * to * until the last sc, then ch 2 and dc in last sc.
Row 4
R5: ch 1, turn, sc in 1st st. Ch 5, *sc in center dc of shell, ch 5, sc in ch-5 sp, ch 5* Repeat from * to * until the last ch-5 sp, then sc in center dc of shell, ch 5, sc in 3rd ch of the last ch-5 sp.
Row 5
R6-R145: Repeat R2-R5 or until your desired length is reached.
**If you prefer a wrap that is not as long, this is where you would not crochet as many rows**
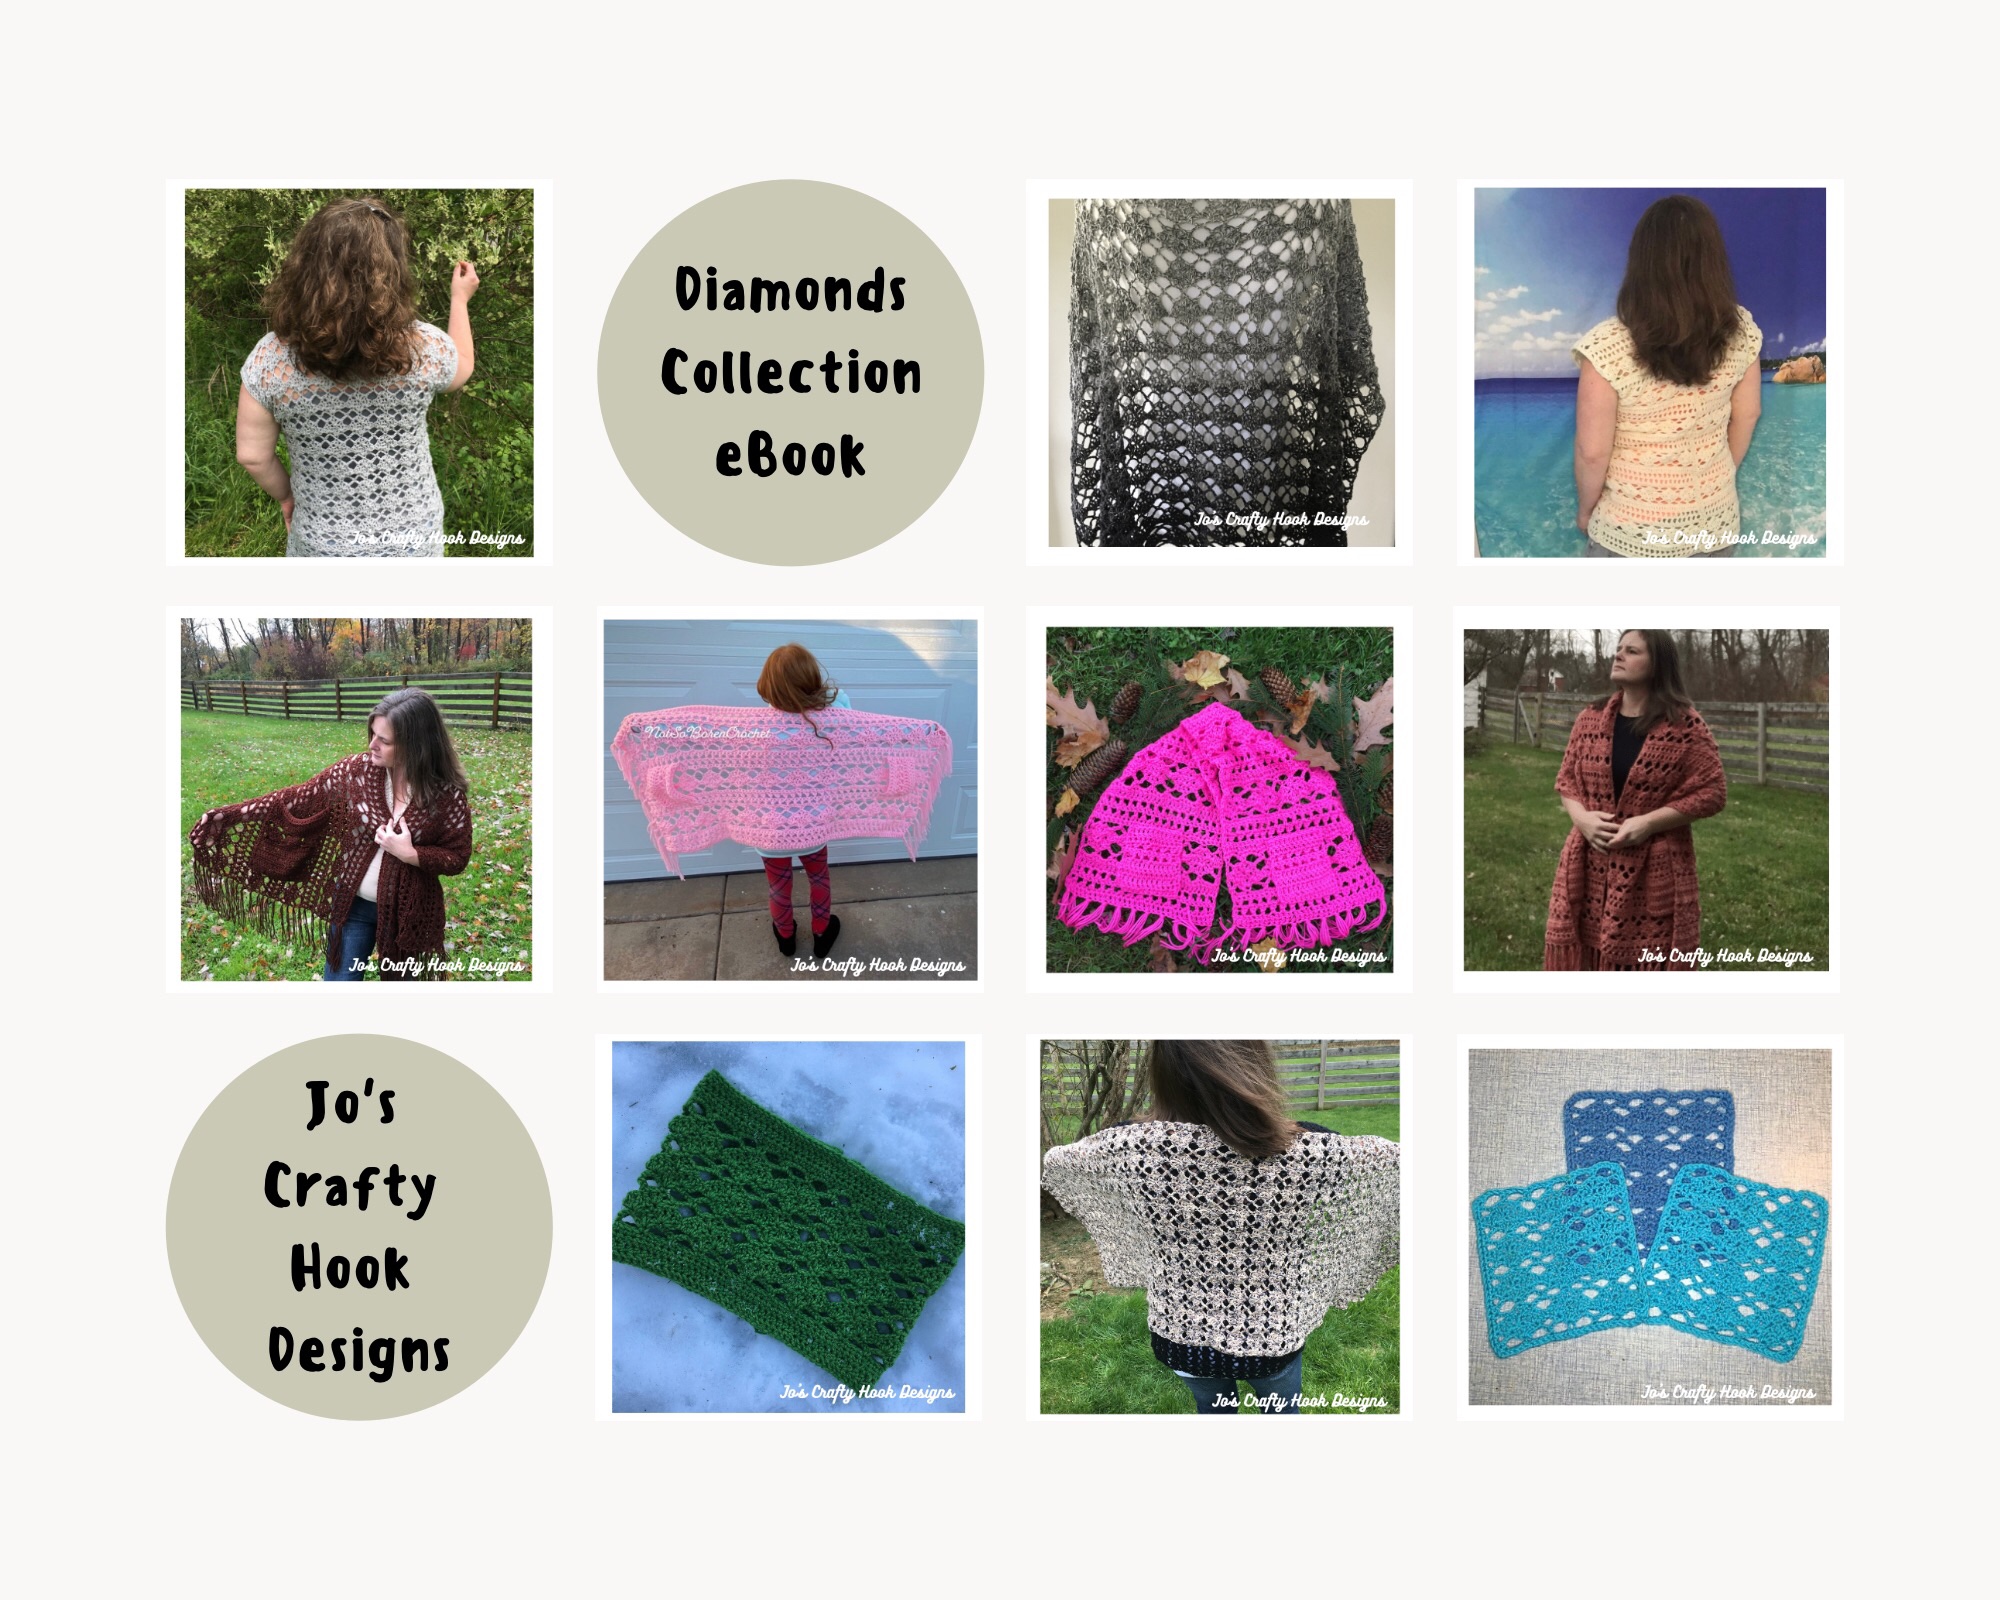
Earlier I stated that I used the Argyle Shell Stitch in this wrap and 9 other crochet patterns. I am happy to announce you can find ALL 10 crochet patterns in one pdf, my Diamonds Collection eBook. You can find it at Ravelry and Etsy!
In my collection you will find 1 bonus crochet pattern that is not sold in any of my stores, the Diamond Arches Tee. Inside my eBook you will find patterns for this wrap, 2 summer tees, a poncho, 2 pocket shawl in adult and child sizes, a cowl, and an Afghan square. Each pattern has multiple sizes to choose from. You can customize these patterns to fit your style, size, and colors.
I am offering my Diamonds Collection eBook at an introductory price of $30! The original retail price of all the crochet patterns in my eBook is $50. So you can get it for 40% off that’s $20 off the retail value! Visit my Ravelry Store and Etsy Shop for your copy today!
You can find more of my crochet patterns at these locations listed below.
If you would like to make a donation to Jo’s Crafty Hook and help me with the costs of running my website, crocheting new designs I would greatly appreciate it!
From the Designer:
Thank you for stopping by my website! Check out some of my patterns at my Ravelry Store Jo’s Crafty Hook Designs or LoveCraft or Etsy Shop JosCraftyHook or get free crochet patterns at my website joscraftyhook.com! While you are at my website be sure to subscribe to my Newsletter. This way you will be notified when I release another pattern or giveaway or blog post!
If you have any questions or concerns about this pattern or any other pattern please find me at Joey Lea Baird on Facebook or email me at jo@joscraftyhook.com
You are free to sell or gift the item you make from my website, please do NOT claim any of my designs as your own. If you share your finished product, please acknowledge me as the designer. Please forward any one who would like to do this crochet pattern or any of my patterns to the Ravelry Store or to LoveCraft or to my Etsy shop, or to my website. The web addresses for any place to connect with me are listed below.
Every purchase of my patterns helps! It allows me to buy more yarn so I can create and design more Handmade Crocheted Creations for you to enjoy.
I would LOVE to see your version of my designs! You can “Hook It” at my Ravelry Jo’s Crafty Hook Designs OR add a pic using the hashtag of the design at anyone of the places below that allows you to connect with me! Comments, Feedback, etc. are ALWAYS welcome at my website www.joscraftyhook.com!